管理环境
Manage multiple environments using Database Migrations and GitHub Actions.
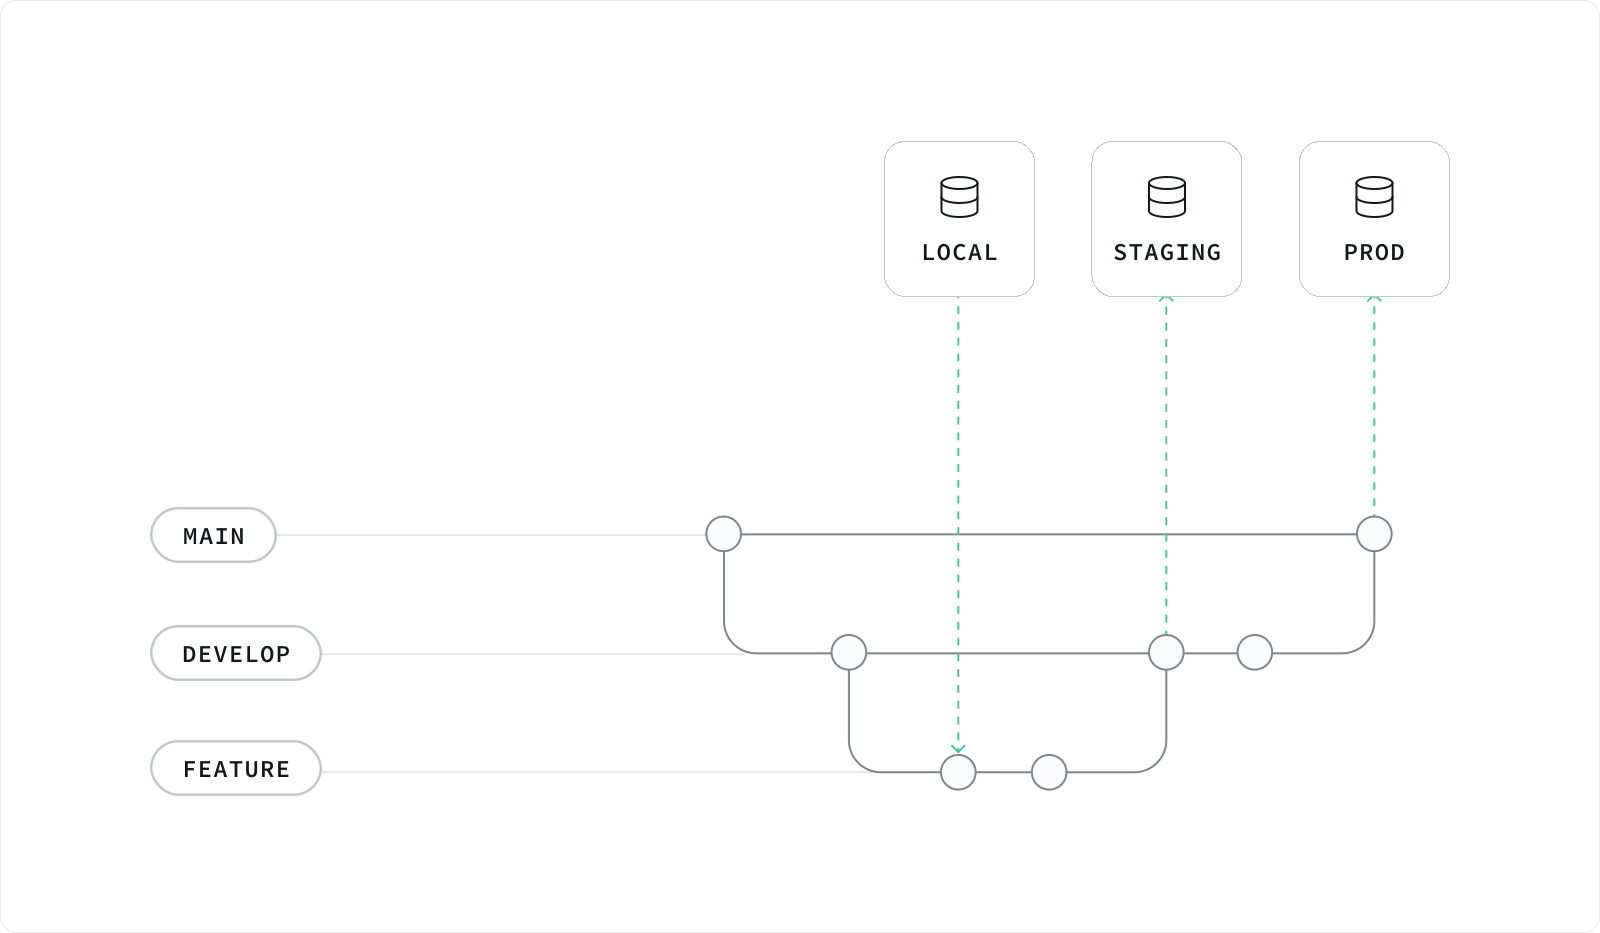
本指南向你展示如何设置本地 Supabase 开发环境,并与 GitHub Actions 集成,以自动测试和发布模式和生产 Supabase 项目的架构更改。
🌐 This guide shows you how to set up your local Supabase development environment that integrates with GitHub Actions to automatically test and release schema changes to staging and production Supabase projects.
搭建本地环境 #
🌐 Set up a local environment
第一步是用 Supabase CLI 设置你的本地仓库:
🌐 The first step is to set up your local repository with the Supabase CLI:
1supabase init你应该会看到一个新的 supabase 目录。然后你需要将本地仓库与 Supabase 项目关联起来:
🌐 You should see a new supabase directory. Then you need to link your local repository with your Supabase project:
1supabase login2supabase link --project-ref $PROJECT_ID你可以从你项目的仪表板 URL 获取你的 $PROJECT_ID:
🌐 You can get your $PROJECT_ID from your project's dashboard URL:
1https://supabase.com/dashboard/project/<project-id>如果你正在使用现有的 Supabase 项目,你可能已经通过仪表板进行了架构更改。在使用 CLI 进行本地架构更改之前,运行以下命令来拉取这些更改:
🌐 If you're using an existing Supabase project, you might have made schema changes through the Dashboard. Run the following command to pull these changes before making local schema changes from the CLI:
1supabase db pull这个命令会在 supabase/migrations/<timestamp>_remote_schema.sql 中创建一个新的迁移,用来反映你之前做的架构更改。
现在把本地更改提交到 Git,然后运行本地开发环境设置:
🌐 Now commit your local changes to Git and run the local development setup:
1git add .2git commit -m "init supabase"3supabase start你现在可以在本地开发模式更改并创建你的第一个迁移了。
🌐 You are now ready to develop schema changes locally and create your first migration.
创建一个新的迁移 #
🌐 Create a new migration
有两种方法可以进行模式更改:
🌐 There are two ways to make schema changes:
- 手动迁移:手动把 DDL 语句写进迁移文件里
- 自动模式差异:通过 Studio UI 进行更改并自动生成模式差异
手动迁移 #
🌐 Manual migration
通过运行以下命令创建一个新的迁移脚本:
🌐 Create a new migration script by running:
1supabase migration new new_employee你应该会看到一个新文件被创建:supabase/migrations/<timestamp>_new_employee.sql。然后你可以使用文本编辑器在这个脚本中编写 SQL 语句:
1create table public.employees (2 id integer primary key generated always as identity,3 name text4);把新的迁移应用到你的本地数据库:
🌐 Apply the new migration to your local database:
1supabase db reset这个命令会从零重新创建你的本地数据库,并应用 supabase/migrations 目录下的所有迁移脚本。现在你的本地数据库是最新的了。
🌐 This command recreates your local database from scratch and applies all migration scripts under supabase/migrations directory. Now your local database is up to date.
新的迁移命令也支持将 stdin 作为输入。这让你可以将另一个文件或 stdout 的现有脚本通过管道输入进来:
🌐 The new migration command also supports stdin as input. This allows you to pipe in an existing script from another file or stdout:
supabase migration new new_employee < create_employees_table.sql
自动模式差异 #
🌐 Auto schema diff
和手动迁移不同,自动模式差异会根据你本地数据库中已经生效的更改创建一个新的迁移脚本。
🌐 Unlike manual migrations, auto schema diff creates a new migration script from changes already applied to your local database.
使用 Studio UI 在 public 模式下创建一个 employees 表,默认可以通过 localhost:54323 访问。
🌐 Create an employees table under the public schema using Studio UI, accessible at localhost:54323 by default.
接下来,通过运行以下命令生成一个模式差异:
🌐 Next, generate a schema diff by running the following command:
1supabase db diff -f new_employee你应该看到一个新文件 supabase/migrations/<timestamp>_new_employee.sql 已创建。打开文件并确认生成的 DDL 语句与下面的一样。
1-- This script was generated by the Schema Diff utility in pgAdmin 42-- For the circular dependencies, the order in which Schema Diff writes the objects is not very sophisticated3-- and may require manual changes to the script to ensure changes are applied in the correct order.4-- Please report an issue for any failure with the reproduction steps.56CREATE TABLE IF NOT EXISTS public.employees7(8 id integer NOT NULL GENERATED ALWAYS AS IDENTITY ( INCREMENT 1 START 1 MINVALUE 1 MAXVALUE 2147483647 CACHE 1 ),9 name text COLLATE pg_catalog."default",10 CONSTRAINT employees_pkey PRIMARY KEY (id)11)1213TABLESPACE pg_default;1415ALTER TABLE IF EXISTS public.employees16 OWNER to postgres;1718GRANT ALL ON TABLE public.employees TO anon;1920GRANT ALL ON TABLE public.employees TO authenticated;2122GRANT ALL ON TABLE public.employees TO postgres;2324GRANT ALL ON TABLE public.employees TO service_role;你可能会注意到,自动生成的迁移脚本比手动编写的更冗长。这是因为默认的架构差异工具没有考虑初始架构添加的默认权限。
🌐 You may notice that the auto-generated migration script is more verbose than the manually written one. This is because the default schema diff tool does not account for default privileges added by the initial schema.
把新的迁移脚本提交到 git,就可以准备部署了。
🌐 Commit the new migration script to git and you are ready to deploy.
部署迁移 #
🌐 Deploy a migration
在生产环境中,我们建议使用 CI/CD 流水线通过 GitHub Actions 部署新的迁移,而不是从本地机器进行部署。
🌐 In a production environment, we recommend using a CI/CD pipeline to deploy new migrations with GitHub Actions rather than deploying from your local machine.
这个例子使用了两个 Supabase 项目,一个用于生产环境,一个用于测试环境。
🌐 This example uses two Supabase projects, one for production and one for staging.
准备你的环境,通过:
🌐 Prepare your environments by:
- 为测试环境和生产环境创建单独的 Supabase 项目
- 将你的 git 仓库推送到 GitHub 并启用 GitHub Actions
你需要一个_新的_项目来做预演。已经修改过以反映生产项目架构的项目不能使用,因为 CLI 会重新应用这些更改。
🌐 You need a new project for staging. A project which has already been modified to reflect the production project's schema can't be used because the CLI would reapply these changes.
配置 GitHub Actions #
🌐 Configure GitHub Actions
Supabase CLI 在非交互模式下运行需要一些环境变量。
🌐 The Supabase CLI requires a few environment variables to run in non-interactive mode.
SUPABASE_ACCESS_TOKEN是你的个人访问令牌SUPABASE_DB_PASSWORD是你项目专用的数据库密码SUPABASE_PROJECT_ID是你项目特定的参考字符串
我们建议将这些作为加密的秘密添加到你的 GitHub Actions 运行器中。
🌐 We recommend adding these as encrypted secrets to your GitHub Actions runners.
在 .github/workflows 目录里创建以下文件:
🌐 Create the following files inside the .github/workflows directory:
1name: CI23on:4 pull_request:5 workflow_dispatch:67jobs:8 test:9 runs-on: ubuntu-latest1011 steps:12 - uses: actions/checkout@v41314 - uses: supabase/setup-cli@v115 with:16 version: latest1718 - name: Start Supabase local development setup19 run: supabase db start2021 - name: Verify generated types are checked in22 run: |23 supabase gen types typescript --local > types.gen.ts24 if ! git diff --ignore-space-at-eol --exit-code --quiet types.gen.ts; then25 echo "Detected uncommitted changes after build. See status below:"26 git diff27 exit 128 fi完整的示例代码可以在 演示仓库 中查看。
🌐 The full example code is available in the demo repository.
把这些文件提交到 git 并推送到你在 GitHub 上的 main 分支。更新这些环境变量以匹配你的 Supabase 项目:
🌐 Commit these files to git and push to your main branch on GitHub. Update these environment variables to match your Supabase projects:
SUPABASE_ACCESS_TOKENPRODUCTION_PROJECT_IDPRODUCTION_DB_PASSWORDSTAGING_PROJECT_IDSTAGING_DB_PASSWORD
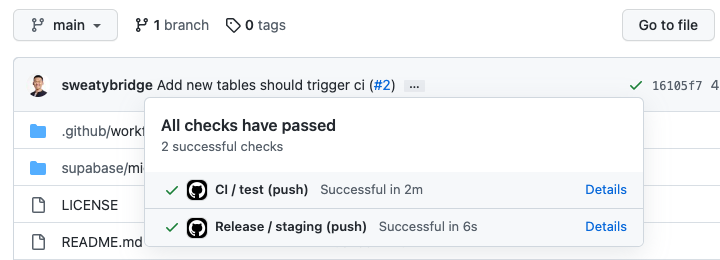
当配置正确时,你的仓库将拥有在推送到 main 和 develop 分支上的新提交时触发的 CI 和发布工作流。
🌐 When configured correctly, your repository will have CI and Release workflows that trigger on new commits pushed to main and develop branches.
提交一个包含新迁移的 PR #
🌐 Open a PR with new migration
按照 迁移步骤 来创建一个 supabase/migrations/<timestamp>_new_employee.sql 文件。
从 develop 检出一个新分支 feat/employee,提交迁移文件,然后推送到 GitHub。
🌐 Checkout a new branch feat/employee from develop , commit the migration file, and push to GitHub.
1git checkout -b feat/employee2git add supabase/migrations/<timestamp>_new_employee.sql3git commit -m "Add employee table"4git push --set-upstream origin feat/employee从 feat/employee 分支向 develop 分支发起一个 PR,看看 CI 工作流是否已被触发。
🌐 Open a PR from feat/employee to the develop branch to see that the CI workflow has been triggered.
一旦测试错误解决,就合并这个 PR,然后看看部署的效果。
🌐 Once the test error is resolved, merge this PR and watch the deployment in action.
发布到生产环境 #
🌐 Release to production
在确认你的暂存项目已成功迁移后,从 develop 创建另一个 PR 到 main 并合并它,将迁移部署到生产项目。
🌐 After verifying your staging project has successfully migrated, create another PR from develop to main and merge it to deploy the migration to the production project.
release 任务会将所有合并到 supabase/migrations 目录的新增迁移脚本应用到一个已关联的 Supabase 项目上。你可以通过 PROJECT_ID 环境变量来控制任务关联到哪个项目。
🌐 The release job applies all new migration scripts merged in supabase/migrations directory to a linked Supabase project. You can control which project the job links to via PROJECT_ID environment variable.
故障排除 #
🌐 Troubleshooting
将生产项目同步到预发布环境 #
🌐 Sync production project to staging
在设置一个新的测试项目时,你可能需要将初始架构与之前应用到生产项目的迁移进行同步。
🌐 When setting up a new staging project, you might need to sync the initial schema with migrations previously applied to the production project.
一种方法是利用发布工作流程:
🌐 One way is to leverage the Release workflow:
- 创建一个新分支
develop,并选择main作为分支源 - 把
develop分支推送到 GitHub
GitHub Actions 运行器会把你现有的迁移部署到测试项目上。
🌐 The GitHub Actions runner will deploy your existing migrations to the staging project.
或者,你也可以通过本地 CLI 对已关联的远程数据库应用迁移。
🌐 Alternatively, you can also apply migrations through your local CLI to a linked remote database.
1supabase db push一旦推送,检查本地和远程数据库的迁移版本是否是最新的。
🌐 Once pushed, check that the migration version is up to date for both local and remote databases.
1supabase migration listdb pull#
🌐 Permission denied on db pull
如果你一直在使用 Supabase 托管的项目,执行 db pull 时可能会遇到以下权限错误。
🌐 If you have been using Supabase hosted projects for a long time, you might encounter the following permission error when executing db pull.
1Error: Error running pg_dump on remote database: pg_dump: error: query failed: ERROR: permission denied for table _type23pg_dump: error: query was: LOCK TABLE "graphql"."_type" IN ACCESS SHARE MODE要解决这个错误,你需要给 graphql 模式授予 postgres 角色权限。你可以在 Supabase 仪表板的 SQL 编辑器里运行以下查询来实现。
🌐 To resolve this error, you need to grant postgres role permissions to graphql schema. You can do that by running the following query from Supabase dashboard's SQL Editor.
1grant all on all tables in schema graphql to postgres, anon, authenticated, service_role;2grant all on all functions in schema graphql to postgres, anon, authenticated, service_role;3grant all on all sequences in schema graphql to postgres, anon, authenticated, service_role;db push#
🌐 Permission denied on db push
如果你使用自定义数据库角色创建表,默认的 postgres 用户可能没有权限修改它。这可能会在迁移过程中导致 42501 权限错误。要解决这个问题,可以将自定义角色的所有权授予 'postgres' 用户。
🌐 If you create a table using a custom database role, the default postgres user may lack permission to modify it. This can cause 42501 privilege errors during migrations. To resolve this, grant the 'postgres` user ownership of the custom role.
1grant "custom_role" to "postgres";重置新的迁移 #
🌐 Rebasing new migrations
有时候你的队友可能会把一个新的迁移文件合并到 git 主分支上,而现在你需要把你本地的 schema 改动在它上面进行变基。
🌐 Sometimes your teammate may merge a new migration file to git main branch, and now you need to rebase your local schema changes on top.
我们可以通过给你的旧迁移文件重命名一个新的时间戳来优雅地处理这种情况。
🌐 We can handle this scenario gracefully by renaming your old migration file with a new timestamp.
1git pull2supabase migration new dev_A3# Assume the new file is: supabase/migrations/<t+2>_dev_A.sql4mv <time>_dev_A.sql <t+2>_dev_A.sql5supabase db reset如果 reset 失败,你可以通过手动编辑 <t+2>_dev_A.sql 文件来解决冲突。
🌐 In case reset fails, you can manually resolve conflicts by editing <t+2>_dev_A.sql file.
在本地验证后,把你的更改提交到 Git,然后推送到 GitHub。
🌐 Once validated locally, commit your changes to Git and push to GitHub.