使用 Docker 自托管
Learn how to configure and deploy Supabase with Docker.
Docker 是开始使用自托管 Supabase 的最简单方式。你应该用不到 15 分钟就能启动并运行起来。
🌐 Docker is the easiest way to get started with self-hosted Supabase. It should take you less than 15 minutes to get up and running.
目录 #
🌐 Contents
在你开始之前 #
🌐 Before you begin
本指南假设你对以下内容很熟悉:
🌐 This guide assumes you're comfortable with:
- Linux 服务器管理基础
- 基本的
git使用 - Docker 和 Docker Compose
- 网络基础(端口、DNS、防火墙)
如果你对这些话题还不熟,可以考虑从免费的托管 Supabase 平台 开始。
🌐 If you're new to these topics, consider starting with the managed Supabase platform for free.
你需要在系统上安装以下内容:
🌐 You need the following installed on your system:
- Git
- Docker:
- Linux 服务器/VPS:安装 Docker Engine 和 Docker Compose
- Linux 桌面:安装 Docker Desktop
- macOS:安装 Docker Desktop
- Windows:安装 Docker 桌面
系统需求 #
🌐 System requirements
运行所有 Supabase 组件的最低要求,适合开发和小到中等的生产工作量:
🌐 Minimum requirements for running all Supabase components, suitable for development and small to medium production workloads:
| 资源 | 最低 | 推荐 |
|---|---|---|
| 内存 | 4 GB | 8 GB+ |
| CPU | 2 核 | 4 核+ |
| 硬盘 | 40 GB SSD | 80 GB+ SSD |
如果你不需要特定服务,比如 Realtime、Storage、imgproxy 或 Edge Runtime(functions),你可以从 docker-compose.yml 中移除相应的部分和依赖,以减少资源需求。
🌐 If you don't need specific services, such as Realtime, Storage, imgproxy, or Edge Runtime (functions), you can remove the corresponding sections and dependencies from docker-compose.yml to reduce resource requirements.
默认配置不包括 日志与分析。你可以通过使用可选的 docker-compose 覆盖文件来在 Studio 中 启用 Logflare(分析)、Vector(日志收集)和日志浏览器。请注意,启用这些服务会增加资源需求。
🌐 The default configuration does not include Logs & Analytics. You can enable Logflare (Analytics), Vector (log collection), and the Log Explorer in Studio by using an optional docker-compose override file. Note that enabling these services will increase resource requirements.
安装 Supabase #
🌐 Installing Supabase
Docker 配置作为 Supabase 仓库 的一部分进行分发。有两种方法可以将其获取到你的电脑上:
🌐 The Docker configuration is distributed as part of the Supabase repository. There are two paths to get it onto your machine:
- 快速上手(Linux) - 一条命令即可安装 Docker、获取配置、生成所有密钥和密码,并提示你输入 URL。如果你使用的是受支持的 Linux 发行版,这是最快的方式。
- 手动安装 - 在任何操作系统上自行克隆仓库,然后按照下面的说明配置秘密和网址。
快速开始(Linux) #
🌐 Quick start (Linux)
运行自动安装脚本,在当前目录下设置一个新项目:
🌐 Run the automated install script to set up a new project in the current directory:
1curl -fsSL https://supabase.link/setup.sh | sh该脚本仅支持 Linux(Debian/Ubuntu 和 RHEL/CentOS/Fedora),并将会:
🌐 The script supports Linux only (Debian/Ubuntu and RHEL/CentOS/Fedora) and will:
- 如果还没有的话,先安装必要的组件(
git、openssl、jq)和 Docker 引擎 - 从主 Supabase 仓库 稀疏克隆
docker/目录 - 创建一个项目目录(默认是
supabase-project)并把配置文件复制进去 - 将已安装的发布版本记录在
.supabase-version中,以便将来进行update.sh升级 - 提示输入主要的网址(
SUPABASE_PUBLIC_URL、API_EXTERNAL_URL、SITE_URL、PROXY_DOMAIN)并将它们写入.env - 生成所有秘密,包括一个随机的
DASHBOARD_PASSWORD,以及非对称 JWT 签名密钥对(运行generate-keys.sh和add-new-auth-keys.sh,并在docker-compose.yml中启用匹配条目) - 拉取 Docker 镜像
缩短链接指向 setup.sh - 在运行之前你可以先检查一下。使用 -y 可以在非交互模式下使用默认值运行。
🌐 The shortened link points to setup.sh - you can inspect it before running. Use -y to run non-interactively with default values.
脚本运行完后,启动堆栈:
🌐 After the script finishes, start the stack:
1cd supabase-project && \2sh run.sh start随时通过以下方式查看生成的凭证:
🌐 View the generated credentials any time via:
1sh run.sh secrets接下来,查看 启动和停止 了解如何检查服务状态和查看日志,然后查看 访问 Supabase Studio(仪表板) 及其他相关部分。要进一步自定义安装,请浏览 配置和保护 Supabase 和 高级主题。
🌐 Next, see Starting and stopping for how to check service health and follow logs, then Accessing Supabase Studio (Dashboard) and the other related sections. To customize the install further, browse Configuring and securing Supabase and Advanced topics.
不是在 Linux 上,或者想手动操作?请看下面的 手动安装。
🌐 Not on Linux, or want to do it manually? See Manual installation below.
手动安装 #
🌐 Manual installation
这条路径会把 Docker Compose 配置放到你的服务器上,并固定到一个特定的标签。你将在下一节设置密钥、密钥和网址。对于最新版本,请使用最新标签。
🌐 This path gets the Docker Compose configuration onto your server, pinned to a specific tag. You'll set up secrets, keys, and URLs in the next section. For a newer release, use the latest tag.
完整 Supabase 仓库的浅克隆。只要安装了 git,在任何操作系统上都能使用,是最简单的手动选项。
🌐 A shallow clone of the full Supabase repository. Works on any OS with git installed and is the simplest manual option.
1# Get the code2git clone --depth 1 --branch self-hosted/v0.7.2 https://github.com/supabase/supabase34# Make your new supabase project directory5mkdir supabase-project67# Tree should look like this8# .9# ├── supabase10# └── supabase-project1112# Copy the configuration to your project13cp -rf supabase/docker/. supabase-project1415# Switch to the project directory and create a .env from the example16cd supabase-project && cp .env.example .env1718# Record the base version so update.sh can upgrade this install later19printf 'ref=self-hosted/v0.7.2\n' > .supabase-version2021# Pull the latest images22docker compose pull如果你正在使用无根 Docker,编辑 .env 并将 DOCKER_SOCKET_LOCATION 设置为你的 docker 套接字位置。例如:/run/user/1000/docker.sock。否则,你会看到类似 container supabase-vector exited (0) 的错误。
配置和保护 Supabase #
🌐 Configuring and securing Supabase
虽然我们在 .env.example 文件中提供了示例占位符密码和密钥,但你绝对不应该使用这些默认值来启动自托管的 Supabase。
🌐 While we provided example placeholder passwords and keys in the .env.example file, you should never start your self-hosted Supabase using these defaults.
查看下面的配置步骤,并确保在启动服务之前正确设置所有秘密信息。
如果你使用了 快速开始(Linux),这些任务已经完成——setup.sh 配置了密钥、URLs 和一个随机的 DASHBOARD_PASSWORD。你可以直接跳到 启动和停止,或者继续阅读以查看已设置的内容以及如何更改它。
生成密钥和秘密 #
🌐 Generate keys and secrets
要生成安全的密码和密钥,请运行:
🌐 To generate secure passwords and secrets, run:
1sh utils/generate-keys.sh作为下一步,使用以下脚本添加新的 API 密钥和非对称密钥对:
🌐 As the next step, use the following script to add the new API keys and asymmetric key pair:
1sh utils/add-new-auth-keys.sh在继续配置 Supabase URLs 之前,先查看两个脚本的输出并检查 .env 文件。
🌐 Review the output of both scripts and check the .env file before proceeding to configure Supabase URLs.
有关所有秘密的描述,请参阅下面“高级主题”中的相关部分。如果你想了解更多关于在自托管 Supabase 设置中新 API 密钥和非对称 JWT 签名的工作原理,请务必阅读详细的操作指南。
🌐 For a description of all secrets refer to the related section in the "Advanced topics" below. If you'd like to learn more about how the new API keys and asymmetric JWT signing work in a self-hosted Supabase setup, make sure to read the detailed how-to guide.
配置 Supabase URL #
🌐 Configure Supabase URLs
查看并修改 URL 配置变量:
🌐 Review and change URL configuration variables:
SUPABASE_PUBLIC_URL:从互联网上访问 Supabase 的基础 URL(仪表板、API、存储等),例如http://example.com:8000API_EXTERNAL_URL:由身份验证服务用于配置回调 URL,例如,http://example.com:8000/auth/v1SITE_URL:默认的认证重定向 URL,例如,http://example.com:3000
文档里 your-domain 的意思
在整个自托管指南中,<your-domain> 代表你可以访问 Supabase 实例的主机:你的域名、服务器的 IP,或者根据你的设置是 localhost。
- 默认设置: API 网关(Kong)监听端口
8000,所以完整的 URL 是http://<your-domain>:8000。 - 在反向代理之后: 代理在端口
443上终止 TLS,所以 URL 变成了https://<your-domain>。
在哪里可以找到你的凭据 #
🌐 Where to find your credentials
生成的密钥和密码会写入 .env 文件。当你将应用连接到自托管的 Supabase 时,你最可能需要的是:
🌐 The generated secrets and password are written to the .env file. The ones you are most likely to need when connecting your application to self-hosted Supabase are:
POSTGRES_PASSWORD:在 Postgres 连接字符串和psql中使用的数据库密码SUPABASE_PUBLISHABLE_KEY:可用于客户端的可发布 API 密钥(例如,在你的前端)SUPABASE_SECRET_KEY:服务器端使用的秘密 API 密钥。绝不要在客户端代码中暴露它SUPABASE_PUBLIC_URL:你传给客户端库的基本 URL,作为supabaseUrl
你可以随时直接打开 .env 查看它们,或者运行:
🌐 You can view them at any time by opening .env directly, or by running:
1sh run.sh secrets工作室认证 #
🌐 Studio authentication
访问工作室(仪表板)需要HTTP 基本认证。
🌐 Access to Studio (Dashboard) is protected with HTTP basic authentication.
在启动 Supabase 之前必须设置一个安全密码。密码中至少要包含一个字母——不要只用数字或任何特殊字符。
在 .env 文件中,编辑 DASHBOARD_PASSWORD 来更改密码,也可以选择编辑 DASHBOARD_USERNAME 来更改用户名。
🌐 In the .env file, edit DASHBOARD_PASSWORD to change the password, and optionally DASHBOARD_USERNAME to change the username.
启动和停止 #
🌐 Starting and stopping
从与你的 docker-compose.yml 文件相同的目录启动 Supabase:
🌐 Start Supabase from the same directory as your docker-compose.yml file:
1sh run.sh start这相当于 docker compose up -d --wait,它会启动所有服务并等待它们健康运行。
🌐 This is equivalent to docker compose up -d --wait, which starts all services and waits until they are healthy.
检查服务状态:
🌐 Check the status of the services:
1docker compose ps大约一分钟或更短时间后,所有服务的状态应该都是 Up [...] (healthy)。如果你看到类似 created 但不是 Up 的状态,运行测试脚本来确定可能的问题:
🌐 After a minute or less, all services should have a status Up [...] (healthy). If you see a status such as created but not Up, run the test script to determine what the problem might be:
1sh tests/test-container-logs.sh然后试着查看某个特定容器的 Docker 日志,例如,
🌐 Then try inspecting the Docker logs for a specific container, e.g.,
1sh run.sh logs storage要停止 Supabase,使用:
🌐 To stop Supabase, use:
1sh run.sh stopWindows:CRLF 换行符
如果 API 网关(Kong)因为入口点错误而启动失败,你本地的文件可能是以 CRLF 换行符而不是 LF 签出。重新克隆仓库,或者把 docker/ 目录下的所有文件统一换成 LF,然后重启 Supabase。新的克隆应该已经使用 LF,因为有 .gitattributes。
访问 Supabase Studio(控制台) #
🌐 Accessing Supabase Studio (Dashboard)
默认情况下,你可以通过端口 8000 上的 API 网关访问仪表板。
🌐 By default, you can access the dashboard through the API gateway on port 8000.
例如:http://<your-domain>:8000,或者 http://<your-ip>:8000(如果你在本地运行 Docker Compose,则可以用 localhost:8000)。
系统会提示你输入用户名和密码。详情请参见 Studio 认证 部分。
🌐 You will be prompted for a username and password. See the Studio authentication section for details.
访问 Postgres #
🌐 Accessing Postgres
自托管的 Supabase 堆栈提供了 Supavisor 连接池,用于访问 Postgres 并管理数据库连接。
🌐 The self-hosted Supabase stack provides the Supavisor connection pooler for accessing Postgres and managing database connections.
你可以通过 Supavisor 使用下面描述的方法连接到 Postgres 数据库。根据你是在 VPS 上自建 Supabase 还是本地运行,使用你的域名、服务器 IP 或者 localhost。
🌐 You can connect to the Postgres database via Supavisor using the methods described below. Use your domain name, your server IP, or localhost depending on whether you are running self-hosted Supabase on a VPS, or locally.
默认的 POOLER_TENANT_ID 是 your-tenant-id(以后可以在 .env 中更改),密码是 .env 文件中 POSTGRES_PASSWORD 的值。
🌐 The default POOLER_TENANT_ID is your-tenant-id (can be later changed in .env), and the password is the value of POSTGRES_PASSWORD from the .env file.
对于会话模式连接(等同于直接的 Postgres 连接):
🌐 For session-mode connections (equivalent to a direct Postgres connection):
1psql 'postgres://postgres.[POOLER_TENANT_ID]:[POSTGRES_PASSWORD]@[your-domain]:5432/postgres'对于事务模式的连接:
🌐 For transaction-mode connections:
1psql 'postgres://postgres.[POOLER_TENANT_ID]:[POSTGRES_PASSWORD]@[your-domain]:6543/postgres'当使用 psql 搭配命令行参数而不是连接字符串来连接 Supavisor 时,-U 参数也应该是 postgres.[POOLER_TENANT_ID]。
🌐 When using psql with command-line parameters instead of a connection string to connect to Supavisor, the -U parameter should also be postgres.[POOLER_TENANT_ID].
如果你需要配置 Postgres 让其可以直接从互联网访问,请阅读 暴露你的 Postgres 数据库。
🌐 If you need to configure Postgres to be directly accessible from the Internet, read Exposing your Postgres database.
要更改数据库密码,请阅读 更改数据库密码。
🌐 To change the database password, read Changing database password.
访问 Edge 功能 #
🌐 Accessing Edge Functions
边缘函数位于 volumes/functions。默认设置包含一个你可以通过 curl 调用的 hello 函数:
🌐 Edge Functions live in volumes/functions. The default setup includes a hello function you can invoke with curl:
1curl http://<your-domain>:8000/functions/v1/hello在 volumes/functions/<FUNCTION_NAME>/index.ts 添加新功能,然后重启服务以加载它们:
1sh run.sh restart functions主工作进程会在每次请求时从磁盘加载每个函数,所以重启一次就可以应用新的或修改过的函数代码。如果你修改了环境变量或密钥(比如 .env.functions 或服务的 environment: 块),请改用 sh run.sh recreate functions,因为这些只有在容器重新创建时才会生效。
🌐 The main worker loads each function from disk per request, so a restart is enough to pick up new or changed function code. Use sh run.sh recreate functions instead when you change environment variables or secrets (for example .env.functions or the service's environment: block), since those are only applied when the container is recreated.
查看更多详情,请参考自托管 Edge Functions指南。
🌐 See the Self-hosted Edge Functions guide for more details.
访问 API #
🌐 Accessing APIs
每个 API 都可以通过相同的 API 网关访问:
🌐 Each of the APIs is available through the same API gateway:
- 剩余:
http://<your-domain>:8000/rest/v1/ - 认证:
http://<your-domain>:8000/auth/v1/ - 存储:
http://<your-domain>:8000/storage/v1/ - 实时:
http://<your-domain>:8000/realtime/v1/
启用分析 #
🌐 Enabling analytics
默认配置中不包括日志和分析,以减少内存占用。要启用它们:
🌐 Logs & Analytics are not included in the default configuration to reduce the memory footprint. To enable them:
1sh run.sh config add logs && \2sh run.sh start这会把 docker-compose.logs.yml 层放到基础配置上,并启动两个额外的服务:
🌐 This layers docker-compose.logs.yml on top of the base configuration and starts two additional services:
- Logflare(分析)- 日志管理和事件分析
- Vector - 收集所有运行中容器的日志并转发到 Logflare
Studio 中的日志浏览器也会自动启用。请注意,这些服务会增加资源需求。
🌐 The Log Explorer in Studio is also enabled automatically. Note that these services increase resource requirements.
配置 HTTPS #
🌐 Configuring HTTPS
默认情况下,Supabase 可以通过 HTTP 访问。对于生产环境部署,尤其是使用 OAuth 提供商时,你需要用有效的 TLS 证书启用 HTTPS。推荐的方法是在 API 网关前放置一个反向代理(比如 Caddy 或 Nginx)。
🌐 By default, Supabase is accessible over HTTP. For production deployments, especially when using OAuth providers, you need HTTPS with a valid TLS certificate. The recommended approach is to place a reverse proxy (such as Caddy or Nginx) in front of the API gateway.
查看 配置 HTTPS 指南获取详细的设置说明。
🌐 See the Configure HTTPS guide for detailed setup instructions.
管理堆栈 #
🌐 Managing the stack
在你的项目目录里有两个辅助脚本——run.sh 和 reset.sh,用来封装常用操作。
🌐 Two helper scripts - run.sh and reset.sh are available in your project directory and wrap common operations.
run.sh 管理 Docker Compose 堆栈。主要命令:
| 命令 | 描述 |
|---|---|
sh run.sh start / stop | 启动或停止堆栈 |
sh run.sh restart [service] | 重新启动堆栈或指定服务 |
sh run.sh recreate [service] | 强制重新创建容器,应用配置更改 |
sh run.sh secrets | 打印 .env 的主要凭证 |
sh run.sh config add <name> | 启用可选的覆盖文件 |
sh run.sh config remove <name> | 禁用可选的覆盖文件 |
sh run.sh printenv <service> | 显示容器内的环境变量 |
sh run.sh logs [service] | 跟踪所有服务或指定服务的日志 |
config add / config remove 命令用于管理你 .env 中的 COMPOSE_FILE 变量,它控制了哪些覆盖文件会叠加在 docker-compose.yml 上。例如,sh run.sh config add logs 会把 docker-compose.logs.yml 添加到 COMPOSE_FILE,而 sh run.sh config remove logs 会删除它。运行 sh run.sh help 查看完整命令列表。
🌐 The config add / config remove commands manage the COMPOSE_FILE variable in your .env, which controls which override files are layered on top of docker-compose.yml. For example, sh run.sh config add logs appends docker-compose.logs.yml to COMPOSE_FILE, and sh run.sh config remove logs removes it. Run sh run.sh help for the full list of commands.
reset.sh 会完全清空堆栈,删除所有数据,并将 .env 重置为默认设置。详情请参阅 卸载。
正在更新 #
🌐 Updating
我们大约每个月发布一次 Docker Compose 配置的稳定快照。这些镜像会一起进行测试,所以可能会落后于 Docker Hub 上的最新更新。如果你想运行单个服务的不同版本,可以在 Compose 文件中更改镜像标签,但不保证兼容性。
🌐 We publish stable snapshots of the Docker Compose setup approximately once a month. The images are tested together, so they may lag behind the latest updates on Docker Hub. If you want to run different versions of individual services, you can change the image tags in the compose files, but compatibility is not guaranteed.
要了解最新动态,请参考自托管 Supabase 的 更新日志 和 GitHub 讨论。
🌐 To follow the updates, refer to the self-hosted Supabase changelog and the GitHub Discussions.
update.sh 脚本会就地更新现有的部署。默认情况下,它会拉取 最新 的 self-hosted/v* 配置,并通过三路合并把它覆盖到你的文件上。
🌐 The update.sh script updates an existing deployment in place. By default, it pulls the latest self-hosted/v* configuration and merges it over your files with a three-way merge.
请参考 更新你的自托管部署 获取完整指南——包括重大变更、冲突解决、固定版本,以及没有记录版本的旧安装。
🌐 Refer to Update your self-hosted deployment for the full walkthrough - breaking changes, conflict resolution, pinning a release, and older installs without a recorded version.
要更改或回滚单个服务的镜像,而不是更新所有内容 - 例如,Studio:
🌐 To change or roll back a single service's image instead of updating everything - for example, Studio:
- 在 Supabase Docker Hub 查看 supabase/studio 的图片
- 找到你想要的版本(标签)。它看起来像
2026.04.27-sha-5f60601 - 更新
docker-compose.yml中的工作室image:image: supabase/studio:2026.04.27-sha-5f60601 - 运行
sh run.sh pull来拉取新镜像,然后运行sh run.sh recreate studio来更新 Studio,而不会影响其他服务的运行。
正在卸载 #
🌐 Uninstalling
小心——接下来的操作会销毁所有数据,包括数据库和存储卷!
要卸载,请在与你的 docker-compose.yml 文件相同的目录中运行以下命令:
🌐 To uninstall, run the following from the same directory as your docker-compose.yml file:
1sh reset.sh这将会:
🌐 This will:
- 停止所有容器并移除 Docker 管理的卷(
docker compose down -v --remove-orphans) - 删除 Postgres 数据目录(
volumes/db/data)和存储数据(volumes/storage) - 把你的
.env备份到.env.old,然后把.env.example恢复为新的.env
使用 -y 来跳过确认提示:sh reset.sh -y
🌐 Run with -y to skip the confirmation prompts: sh reset.sh -y
高级话题 #
🌐 Advanced topics
从这一点开始,指南的内容会帮助你了解系统是如何运作的,以及如何根据你的需求修改它。
🌐 Everything beyond this point in the guide helps you understand how the system works and how you can modify it to suit your needs.
架构 #
🌐 Architecture
Supabase 是由开源工具构建的,每一个工具都是为了生产环境使用而选择或开发的。
🌐 Supabase is built from open source tools, each chosen or developed for production use.
如果工具和社区已经存在,并且拥有 MIT、Apache 2、PostgreSQL 或其他同等的开源许可证,我们会使用并支持这个工具。如果工具不存在,我们就自己开发并开源它。
🌐 If the tools and communities already exist, with an MIT, Apache 2, PostgreSQL, or equivalent open source license, we will use and support that tool. If the tool doesn't exist, we build and open source it ourselves.
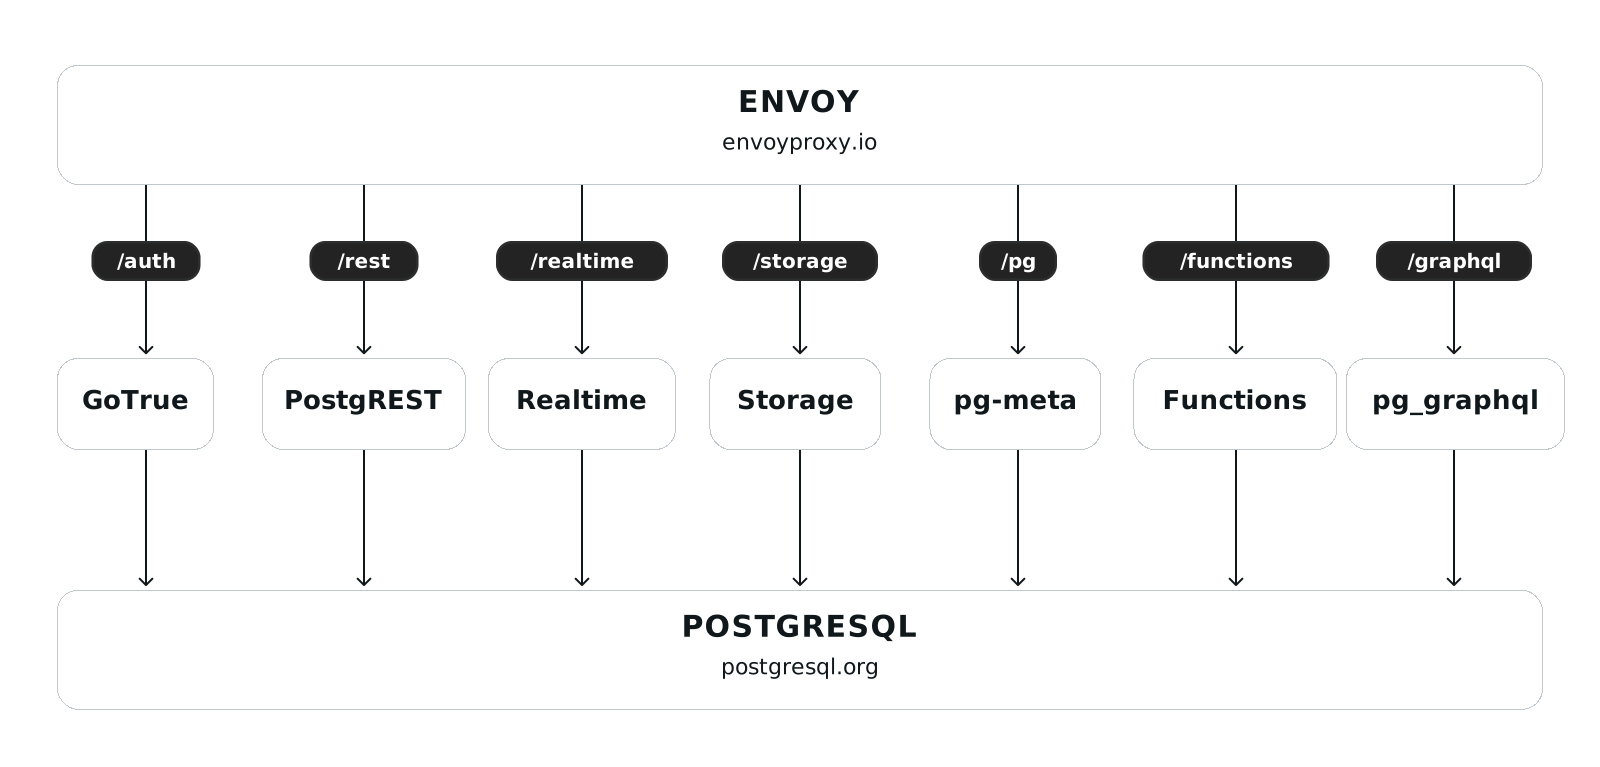
- Studio - 用来管理你自建 Supabase 项目的仪表板
- Kong - Kong API 网关
- Auth - 基于 JWT 的用户注册、登录和会话管理身份验证 API
- PostgREST - 一个把你的 Postgres 数据库直接变成 RESTful API 的网络服务器
- 实时 - 一个监听 Postgres 数据库变化并将其广播给订阅客户端的 Elixir 服务器
- 存储 - 用于管理 S3 文件的 RESTful API,Postgres 负责处理权限
- imgproxy - 快速且安全的图片处理服务器
- postgres-meta - 用于管理 Postgres 的 RESTful API(获取表、添加角色、执行查询)
- Postgres - 一个有着超过30年活跃开发历程的对象关系型数据库
- Edge Runtime - 基于 Deno 运行时的 Web 服务器,用于运行 JavaScript、TypeScript 和 WASM 服务
- Logflare - 日志管理与事件分析平台
- Vector - 高性能日志可观测性数据管道
- Supavisor - Supabase 的 Postgres 连接池管理器
多个服务需要在 Postgres 数据库中进行特定配置。请参考描述默认角色的文档以了解更多信息。
🌐 Multiple services require specific configuration within the Postgres database. Refer to the documentation describing the default roles to learn more.
你可以在模式迁移脚本仓库中找到所有默认扩展。这些脚本会挂载在/docker-entrypoint-initdb.d,在启动 Postgres 容器时会自动运行。
🌐 You can find all the default extensions inside the schema migration scripts repo. These scripts are mounted at /docker-entrypoint-initdb.d to run automatically when starting the Postgres container.
设置数据库密码 #
🌐 Setting database password
generate-keys.sh 脚本会创建一个安全的随机数据库密码。如果你想使用自己的密码,可以在 第一次启动 Supabase 之前,修改 .env 文件中的 POSTGRES_PASSWORD。
🌐 The generate-keys.sh script creates a secure random database password. If you want to use your own, you can change POSTGRES_PASSWORD in the .env file before starting Supabase for the first time.
遵循密码指南来选择一个安全的密码。为了更容易配置,只使用字母和数字,以避免连接字符串中的 URL 编码问题。
🌐 Follow the password guidelines for choosing a secure password. For easier configuration, use only letters and numbers to avoid URL encoding issues in connection strings.
更改数据库密码 #
🌐 Changing database password
在初次设置后,要更改数据库密码,请运行:
🌐 To change the database password after the initial setup, run:
1sh utils/db-passwd.sh该脚本会生成一个新密码,更新所有数据库角色,并修改你的 .env 文件。运行后,使用以下方式停止并启动服务:
🌐 The script generates a new password, updates all database roles, and modifies your .env file. After running it, stop and start the services with:
1sh run.sh recreate配置秘密 #
🌐 Configuring secrets
generate-keys.sh 脚本会自动设置以下密钥。如果需要,你也可以在 .env 文件中手动配置它们:
🌐 The generate-keys.sh script sets the following secrets automatically. You can also configure them manually in the .env file if needed:
SECRET_KEY_BASE:用于保护 Realtime 和 Supavisor 通信的加密密钥。(必须至少 64 个字符;使用openssl rand -base64 48生成)REALTIME_DB_ENC_KEY:Realtime 用于_realtime模式中敏感字段的加密密钥。(必须正好 16 个字符;使用openssl rand -hex 8生成)VAULT_ENC_KEY:Supavisor 用来存储加密配置的加密密钥。(必须正好 32 个字符;用openssl rand -hex 16生成)PG_META_CRYPTO_KEY:用于保护 Studio 对 postgres-meta 使用的连接字符串的加密密钥。(必须至少 32 个字符;使用openssl rand -base64 24生成)LOGFLARE_PUBLIC_ACCESS_TOKEN:Logflare 和 Vector 使用的日志采集 API 令牌。(必须至少 32 个字符;使用openssl rand -base64 24生成)LOGFLARE_PRIVATE_ACCESS_TOKEN:用于 Logflare 管理操作的 API 令牌。由 Studio 用于管理任务。切勿在客户端暴露。(必须至少 32 个字符;使用openssl rand -base64 24生成)S3_PROTOCOL_ACCESS_KEY_ID:访问密钥 ID(类似用户名)用于访问 Storage 中的 S3 协议端点。(使用openssl rand -hex 16生成)S3_PROTOCOL_ACCESS_KEY_SECRET:与 S3_PROTOCOL_ACCESS_KEY_ID 一起使用的秘密密钥(类似密码)。(使用openssl rand -hex 32生成)MINIO_ROOT_PASSWORD:RustFS 或 MinIO 服务器 的 root 管理员密码。(必须 8 个字符以上;可用openssl rand -hex 16生成)
配置 Supabase 服务 #
🌐 Configuring Supabase services
每个服务都有一些配置选项,你可以在相关文档中找到。
🌐 Each service has a number of configuration options you can find in the related documentation.
配置选项通常会添加到 .env 文件中,并在 docker-compose.yml 服务定义中引用,例如:
🌐 Configuration options are generally added to the .env file and referenced in docker-compose.yml service definitions, e.g.,
1services:2 rest:3 image: postgrest/postgrest4 environment:5 PGRST_DB_SCHEMAS: ${PGRST_DB_SCHEMAS}6 PGRST_DB_MAX_ROWS: ${PGRST_DB_MAX_ROWS:-1000}7 PGRST_DB_EXTRA_SEARCH_PATH: ${PGRST_DB_EXTRA_SEARCH_PATH:-public}配置社交登录(OAuth)提供商 #
🌐 Configuring social login (OAuth) providers
查看配置社交登录(OAuth)提供商指南以获取设置说明。
🌐 See the Configure Social Login (OAuth) Providers guide for setup instructions.
配置手机登录、短信和多因素认证 #
🌐 Configuring phone login, SMS, and MFA
查看 配置手机登录和多因素认证 指南,了解短信提供商设置、一次性密码设置以及多因素认证配置。
🌐 See the Configure Phone Login & MFA guide for SMS provider setup, OTP settings, and multi-factor authentication configuration.
配置电子邮件服务器 #
🌐 Configuring an email server
你需要使用一个可投入生产的 SMTP 服务器来发送邮件。你可以通过更新 .env 文件中的以下环境变量来配置 SMTP 服务器:
🌐 You will need to use a production-ready SMTP server for sending emails. You can configure the SMTP server by updating the following environment variables in the .env file:
1SMTP_ADMIN_EMAIL=admin@example.com2SMTP_HOST=smtp.example.com3SMTP_PORT=4654SMTP_USER=your-smtp-user5SMTP_PASS=your-smtp-password6SMTP_SENDER_NAME=your-sender-name我们建议使用 AWS SES。它既实惠又可靠。重启所有服务以应用新的配置。
🌐 We recommend using AWS SES. It's affordable and reliable. Restart all services to pick up the new configuration.
配置 S3 存储 #
🌐 Configuring S3 Storage
默认情况下,当使用自托管的存储服务时,所有文件都会存储在你的服务器文件系统上(通过 docker-compose.yml 的绑定挂载)。你可以将存储连接到兼容 S3 的后端(如 AWS S3、RustFS、MinIO、Cloudflare R2),为像 rclone 这样的工具启用 S3 协议端点,或者两者都做。这些功能是独立的。
🌐 By default, when using self-hosted Storage service, all files are stored locally on your server filesystem (via a bind mount in docker-compose.yml). You can connect Storage to an S3-compatible backend (AWS S3, RustFS, MinIO, Cloudflare R2), enable the S3 protocol endpoint for tools like rclone, or both. These are independent features.
查看 配置 S3 存储 指南以获取详细的设置说明。
🌐 See the Configure S3 Storage guide for detailed setup instructions.
在 macOS 上在存储中使用文件后端 #
🌐 Using file backend in Storage on macOS
默认情况下,Storage 后端通过绑定挂载使用本地文件。在 macOS 上,Docker Desktop 的绑定挂载有已知的限制(缺少 xattr 支持、权限问题),可能会导致 Storage 无法正常工作。将绑定挂载改为命名的 Docker 卷即可。
🌐 By default, the Storage backend uses local files via a bind mount. On macOS, Docker Desktop bind mounts have known limitations (missing xattr support, permission issues) that can prevent Storage from working correctly. Change the bind mount to a named Docker volume instead.
配置 Supabase AI 助手 #
🌐 Configuring Supabase AI Assistant
配置 Supabase AI 助手是可选的。通过将 你自己的 OPENAI_API_KEY 添加到 .env,你可以启用 AI 服务,它可以帮助编写 SQL 查询、语句和策略。
🌐 Configuring the Supabase AI Assistant is optional. By adding your own OPENAI_API_KEY to .env you can enable AI services, which help with writing SQL queries, statements, and policies.
通过 Supavisor 访问 Postgres #
🌐 Accessing Postgres through Supavisor
默认情况下,Postgres 连接会通过 Supavisor 连接池进行,以实现高效的连接管理。有两个端口可用:
🌐 By default, Postgres connections go through the Supavisor connection pooler for efficient connection management. Two ports are available:
POSTGRES_PORT(默认: 5432)- 会话模式,表现得像直接的 Postgres 连接POOLER_PROXY_PORT_TRANSACTION(默认: 6543)- 事务模式,使用连接池
想了解更多关于配置和使用 Supavisor 的信息,请查看 Supavisor 文档。
🌐 For more information on configuring and using Supavisor, see the Supavisor documentation.
暴露你的 Postgres 数据库 #
🌐 Exposing your Postgres database
默认情况下,Postgres 只能通过 Supavisor 访问。如果你需要直接访问数据库(绕过连接池),你需要禁用 Supavisor 并开放 Postgres 端口。
🌐 By default, Postgres is only accessible through Supavisor. If you need direct access to the database (bypassing the connection pooler), you need to disable Supavisor and expose the Postgres port.
直接暴露 Postgres 会绕过连接池,并让你的数据库暴露在网络上。配置防火墙规则或网络策略,只允许受信任的 IP 访问。
编辑 docker-compose.yml:
🌐 Edit docker-compose.yml:
- 禁用 Supavisor - 注释掉或删除整个
supavisor服务部分 - 暴露 Postgres 端口 - 给
db服务添加端口映射,看起来应该像下面的例子:
1db:2 ports:3 - ${POSTGRES_PORT}:${POSTGRES_PORT}4 container_name: supabase-db重启后,你可以直接使用标准的 Postgres 连接字符串连接到数据库:
🌐 After restarting, you can connect to the database directly using a standard Postgres connection string:
1postgres://postgres:[POSTGRES_PASSWORD]@[your-server-ip]:5432/[POSTGRES_DB]在 Postgres 中设置 log_min_messages #
🌐 Setting log_min_messages in Postgres
默认情况下,数据库的 log_min_messages 配置在 docker-compose.yml 中设置为 fatal,以防止 Realtime 产生多余的日志。你可以使用任意 Postgres 的 严重性级别 来配置 log_min_messages。
🌐 By default, the database's log_min_messages configuration is set to fatal in docker-compose.yml to prevent redundant logs generated by Realtime. You can configure log_min_messages using any of the Postgres Severity Levels.
管理你的秘密 #
🌐 Managing your secrets
Supabase 里的很多组件都依赖于秘密和密码的安全保存。默认情况下,所有的秘密都在 .env 文件中,但我们强烈建议在部署到生产环境时使用秘密管理器。
🌐 Many components inside Supabase rely on secrets and passwords being kept securely. By default, all secrets are in the .env file, but we strongly recommend using a secrets manager when deploying to production.
一些建议的系统包括:
🌐 Some suggested systems include:
- 多普勒
- Infisical
- Azure (Microsoft) 的 Key Vault
- AWS 的 Secrets Manager
- GCP 的 Secrets Manager
- HashiCorp 的 Vault
演示 #
🌐 Demo
- VPS 实例是一个 DigitalOcean droplet。(服务器要求请参考 系统要求)
- 要访问 Studio,请使用你的 Droplet 的 IPv4 IP 地址。
- 如果你无法使用 Studio,运行
docker compose ps来查看所有服务是否正常运行。