数据库迁移
Track and version your database schema changes with migrations.
Supabase 是一个灵活的平台,让你可以决定如何构建你的项目。你可以直接使用仪表板快速上手,或者使用正规的本地环境。我们建议你在本地工作,并将你的更改部署到 Supabase 平台 上的已关联项目。
🌐 Supabase is a flexible platform that lets you decide how you want to build your projects. You can use the Dashboard directly to get up and running, or use a proper local setup. We suggest you work locally and deploy your changes to a linked project on the Supabase Platform.
使用 CLI 在本地开发,运行本地 Supabase 堆栈。你可以使用集成的 Studio 仪表板进行更改,然后将你的更改记录到 schema 迁移文件中,这些文件可以保存到版本控制中。
🌐 Develop locally using the CLI to run a local Supabase stack. You can use the integrated Studio Dashboard to make changes, then capture your changes in schema migration files, which can be saved in version control.
或者,如果你对迁移文件和 SQL 感到熟悉,你可以自己编写迁移,然后推送到本地数据库进行测试,再分享你的更改。
🌐 Alternatively, if you're comfortable with migration files and SQL, you can write your own migrations and push them to the local database for testing before sharing your changes.
本页是关于迁移的专门教程。如果你想把现有的平台项目迁移到本地开发,或者从零开始搭建一个可复现的项目并一直部署到远程,看看本地开发工作流指南。它涵盖了两种起点、日常开发循环、推送到生产、清理生成的迁移文件以及故障排除。
🌐 This page is a focused tutorial on migrations. If you want to move an existing platform project to local development, or set up a reproducible project from scratch and take it all the way to a remote deploy, see the Local development workflow guide. It covers both starting points, the daily development loop, pushing to production, cleaning up generated migrations, and troubleshooting.
数据库迁移 #
🌐 Database migrations
数据库的变化是通过“迁移”来管理的。数据库迁移是跟踪数据库随时间变化的一种常用方法。
🌐 Database changes are managed through "migrations." Database migrations are a common way of tracking changes to your database over time.
在本指南中,我们将创建一个名为 employees 的表,并看看如何对它进行修改。
🌐 For this guide, we'll create a table called employees and see how we can make changes to it.
要开始的话,先生成一个 新迁移 来存储创建我们 employees 表所需的 SQL
1supabase migration new create_employees_table这会创建一个新的迁移:supabase/migrations/<timestamp> _create_employees_table.sql。
在那个文件中,添加创建这个 employees 表的 SQL
1create table employees (2 id bigint primary key generated always as identity,3 name text,4 email text,5 created_at timestamptz default now()6);现在你有了迁移文件,你可以运行这个迁移并创建 employees 表。
在这里使用 reset 命令将数据库重置为当前迁移
1supabase db reset现在你可以在仪表板中查看你新的 employees 表了。
接下来,通过添加一个部门列来修改你的 employees 表。为此创建一个新的迁移文件。
1supabase migration new add_department_to_employees_table这会创建一个新的迁移文件:supabase/migrations/<timestamp> _add_department_to_employees_table.sql。
在那个文件中,添加创建新部门列的 SQL
1alter table if exists public.employees2add department text default 'Hooli';添加示例数据 #
🌐 Add sample data
既然你现在用迁移脚本管理数据库,有一些种子数据可以在每次重置数据库时使用会很棒。
🌐 Now that you are managing your database with migrations scripts, it would be great have some seed data to use every time you reset the database.
为此,你可以在 supabase/seed.sql 中创建一个种子脚本。
🌐 For this, you can create a seed script in supabase/seed.sql.
使用你的 supabase/seed.sql 文件将数据插入到你的 employees 表中。
1insert into public.employees2 (name)3values4 ('Erlich Bachman'),5 ('Richard Hendricks'),6 ('Monica Hall');重置你的数据库(应用当前迁移),并填充种子数据
1supabase db reset你现在应该可以在仪表板中看到 employees 表和你的种子数据了!你所有的数据库更改都会被记录在代码中,而且你可以随时重置到已知状态,还包含种子数据。
🌐 You should now see the employees table, along with your seed data in the Dashboard! All of your database changes are captured in code, and you can reset to a known state at any time, complete with seed data.
差异比较 #
🌐 Diffing changes
如果你懂 SQL 并且熟悉创建表和列,这个工作流程非常棒。如果不熟悉,你仍然可以使用仪表板来创建表和列,然后用 CLI 对比你的更改并创建迁移。
🌐 This workflow is great if you know SQL and are comfortable creating tables and columns. If not, you can still use the Dashboard to create tables and columns, and then use the CLI to diff your changes and create migrations.
创建一个名为 cities 的新表,包含 id、name 和 population 列。要查看对应的 SQL,可以使用 supabase db diff --schema public 命令。这会显示将用于创建表和列的 SQL。supabase db diff 的输出大概会是这样的:
🌐 Create a new table called cities, with columns id, name and population. To see the corresponding SQL for this, you can use the supabase db diff --schema public command. This will show you the SQL that will be run to create the table and columns. The output of supabase db diff will look something like this:
1Diffing schemas: public2Finished supabase db diff on branch main.34create table "public"."cities" (5 "id" bigint primary key generated always as identity,6 "name" text,7 "population" bigint8);或者,你也可以直接从表格编辑器查看你的表格定义:
🌐 Alternately, you can view your table definitions directly from the Table Editor:
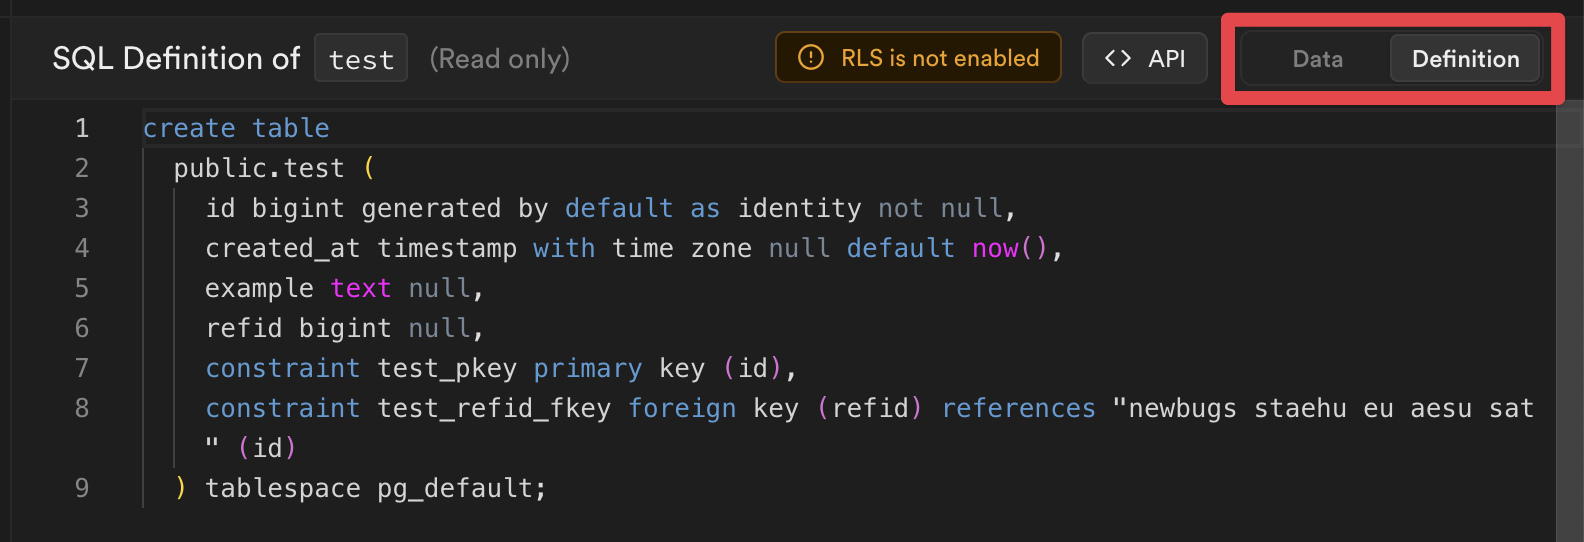
然后你可以把这个 SQL 复制到一个新的迁移文件里,然后运行 supabase db reset 来应用更改。
🌐 You can then copy this SQL into a new migration file, and run supabase db reset to apply the changes.
最后一步是把这些更改部署到一个实际的 Supabase 项目中。
🌐 The last step is deploying these changes to a live Supabase project.
部署你的项目 #
🌐 Deploy your project
你一直在本地开发项目,通过迁移对表进行修改。现在是时候将你的项目部署到 Supabase 平台,并开始扩大到数百万用户了!前往 Supabase 并创建一个新项目进行部署。
🌐 You've been developing your project locally, making changes to your tables via migrations. It's time to deploy your project to the Supabase Platform and start scaling up to millions of users! Head over to Supabase and create a new project to deploy to.
登录 Supabase CLI #
🌐 Log in to the Supabase CLI
1supabase login关联你的项目 #
🌐 Link your project
使用 supabase link 将你的本地项目与远程项目关联起来。
🌐 Associate your local project with your remote project using supabase link.
1supabase link --project-ref <project-id>2# You can get <project-id> from your project's dashboard URL: https://supabase.com/dashboard/project/<project-id>如果你的远程数据库已经有本地迁移中没有的模式更改(例如,你直接在仪表板中创建的表),在推送之前先把它们捕获下来:
🌐 If your remote database already has schema changes that aren't in your local migrations (for example, tables you created directly in the Dashboard), capture them before you push:
1supabase db pull2supabase db resetdb pull 会将这些更改写入 <timestamp>_remote_schema.sql 迁移,以便你的本地和远程历史记录保持一致,而 db reset 会在本地重新应用你的迁移,以确认它们是一致的。对于一个全新的远程项目且啥都没的情况下,可以跳过这一步。
部署数据库更改 #
🌐 Deploy database changes
使用 db push 部署任何本地数据库迁移:
🌐 Deploy any local database migrations using db push:
1supabase db push访问你在 Supabase 上的实时项目,你会看到一个新的 employees 表,其中包含你在上面第二次迁移中添加的 department 列。
🌐 Visiting your live project on Supabase, you'll see a new employees table, complete with the department column you added in the second migration above.
部署边缘函数 #
🌐 Deploy Edge Functions
如果你的项目使用 Edge 函数,你可以使用 functions deploy 来部署它们:
🌐 If your project uses Edge Functions, you can deploy these using functions deploy:
1supabase functions deploy <function_name>本地使用身份验证 #
🌐 Use Auth locally
要在本地使用身份验证,更新在运行 supabase init 后创建的项目 supabase/config.toml 文件。添加你想要的任何提供者,并将 enabled 设置为 true。
🌐 To use Auth locally, update your project's supabase/config.toml file that gets created after running supabase init. Add any providers you want, and set enabled to true.
1[auth.external.github]2enabled = true3client_id = "env(SUPABASE_AUTH_GITHUB_CLIENT_ID)"4secret = "env(SUPABASE_AUTH_GITHUB_SECRET)"5redirect_uri = "http://localhost:54321/auth/v1/callback"作为最佳实践,任何秘密值都应该从环境变量中加载。你可以把它们添加到项目根目录下的 .env 文件中,这样 CLI 就会自动替换它们。
🌐 As a best practice, any secret values should be loaded from environment variables. You can add them to .env file in your project's root directory for the CLI to automatically substitute them.
1SUPABASE_AUTH_GITHUB_CLIENT_ID="redacted"2SUPABASE_AUTH_GITHUB_SECRET="redacted"要让这些更改生效,你需要再次运行 supabase stop 和 supabase start。
🌐 For these changes to take effect, you need to run supabase stop and supabase start again.
如果你在 auth 模式上定义了额外的触发器或 RLS 策略,你可以把它们作为迁移文件拉到本地。
🌐 If you have additional triggers or RLS policies defined on your auth schema, you can pull them as a migration file locally.
1supabase db pull --schema auth同步存储桶 #
🌐 Sync storage buckets
你可以通过指定 storage 模式在本地获取你对存储桶的 RLS 策略。例如,
🌐 Your RLS policies on storage buckets can be pulled locally by specifying storage schema. For example,
1supabase db pull --schema storage这些桶和对象本身是存储表中的行,所以它们不会出现在你的模式中。你可以通过 supabase/config.toml 文件来定义它们。例如,
🌐 The buckets and objects themselves are rows in the storage tables so they won't appear in your schema. You can instead define them via supabase/config.toml file. For example,
1[storage.buckets.images]2public = false3file_size_limit = "50MiB"4allowed_mime_types = ["image/png", "image/jpeg"]5objects_path = "./images"这将用一个命令把 supabase/images 目录下的文件上传到你项目里名为 images 的存储桶。
🌐 This will upload files from supabase/images directory to a bucket named images in your project with one command.
1supabase seed buckets将任何模式与 --schema#
🌐 Sync any schema with --schema
你可以使用 --schema 选项按如下方式将你的数据库与特定的模式同步:
🌐 You can synchronize your database with a specific schema using the --schema option as follows:
1supabase db pull --schema <schema_name>使用 --schema
🌐 Using --schema
如果本地 supabase/migrations 目录是空的,db pull 命令会忽略 --schema 参数。
🌐 If the local supabase/migrations directory is empty, the db pull command will ignore the --schema parameter.
要解决这个问题,你可以拉两次:
🌐 To fix this, you can pull twice:
1supabase db pull2supabase db pull --schema <schema_name>限制和注意事项 #
🌐 Limitations and considerations
本地开发环境的功能没有 Supabase 平台那么完整。以下是一些差异:
🌐 The local development environment is not as feature-complete as the Supabase Platform. Here are some of the differences:
- 你不能在控制面板里更新项目设置。这必须通过本地配置文件来完成。
- CLI 版本决定了使用的本地 Studio 版本,所以请确保保持本地 Supabase CLI 最新。我们会持续添加新功能和修复 bug。