用 Jetpack Compose 构建一个产品管理安卓应用
本教程演示了如何构建一个基本的产品管理应用。该应用展示了管理操作、照片上传、账户创建和身份验证,使用的技术有:
🌐 This tutorial demonstrates how to build a basic product management app. The app demonstrates management operations, photo upload, account creation and authentication using:
- Supabase 数据库 - 一个用于存储用户数据的 Postgres 数据库,并且有 行级安全,所以数据是受保护的,用户只能访问自己的信息。
- Supabase Auth - 用户通过发送到他们邮箱的魔法链接登录(无需设置密码)。
- Supabase Storage - 用户可以上传个人头像。
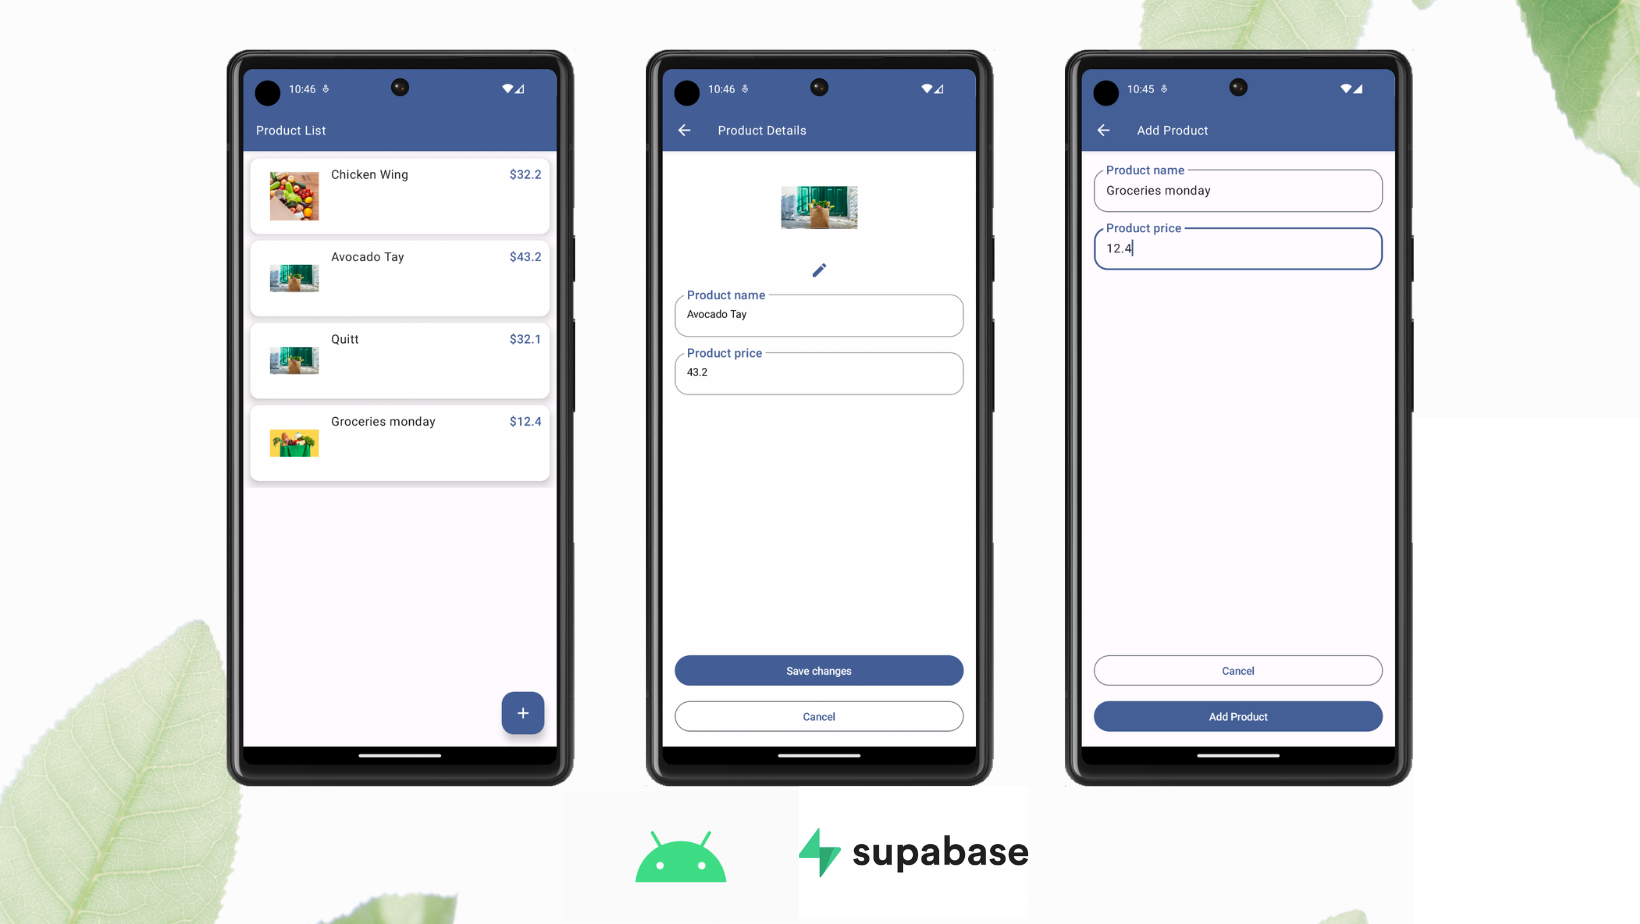
如果你在使用本指南的过程中遇到困难,可以参考 GitHub 上的完整示例。
🌐 If you get stuck while working through this guide, refer to the full example on GitHub.
项目设置 #
🌐 Project setup
在构建之前,你必须在 Supabase 中为一个新项目设置好数据库和 API,然后在数据库里创建一个“schema”。
🌐 Before building, you must set up your Database and API with a new Project in Supabase and then create a "schema" inside the database.
创建一个项目 #
🌐 Create a project
- 在 Supabase 仪表板中创建一个新项目。
- 输入你的项目详情。
- 等新数据库上线。
设置数据库模式 #
🌐 Set up the database schema
现在我们要设置数据库模式了。你可以从下面复制/粘贴 SQL 并自己运行。
🌐 Now we are going to set up the database schema. You can copy/paste the SQL from below and run it yourself.
1-- Create a table for public profiles23create table4 public.products (5 id uuid not null default gen_random_uuid (),6 name text not null,7 price real not null,8 image text null,9 constraint products_pkey primary key (id)10 ) tablespace pg_default;1112-- Set up Storage!13insert into storage.buckets (id, name)14 values ('Product Image', 'Product Image');1516-- Set up access controls for storage.17-- See https://supabase.com/docs/guides/storage/security/access-control#policy-examples for more details.18CREATE POLICY "Enable read access for all users" ON "storage"."objects"19AS PERMISSIVE FOR SELECT20TO public21USING (true)2223CREATE POLICY "Enable insert for all users" ON "storage"."objects"24AS PERMISSIVE FOR INSERT25TO authenticated, anon26WITH CHECK (true)2728CREATE POLICY "Enable update for all users" ON "storage"."objects"29AS PERMISSIVE FOR UPDATE30TO public31USING (true)32WITH CHECK (true)获取 API 详情 #
🌐 Get API details
要与数据库表中的数据进行交互,你可以使用封装了自动生成的数据 API 端点的客户端库,并使用来自项目 Connect 对话框的项目 URL 和密钥进行认证。
🌐 To interact with data in database tables, you use the client libraries that wrap the auto-generated Data API endpoints, authenticating using the Project URL and key from the project Connect dialog.
阅读 API 密钥文档 以全面了解所有密钥类型、用途以及在哪里可以找到它们。
设置谷歌认证 #
🌐 Set up Google authentication
从 Google 控制台 创建一个新项目并添加 OAuth2 凭证。
🌐 From the Google Console, create a new project and add OAuth2 credentials.
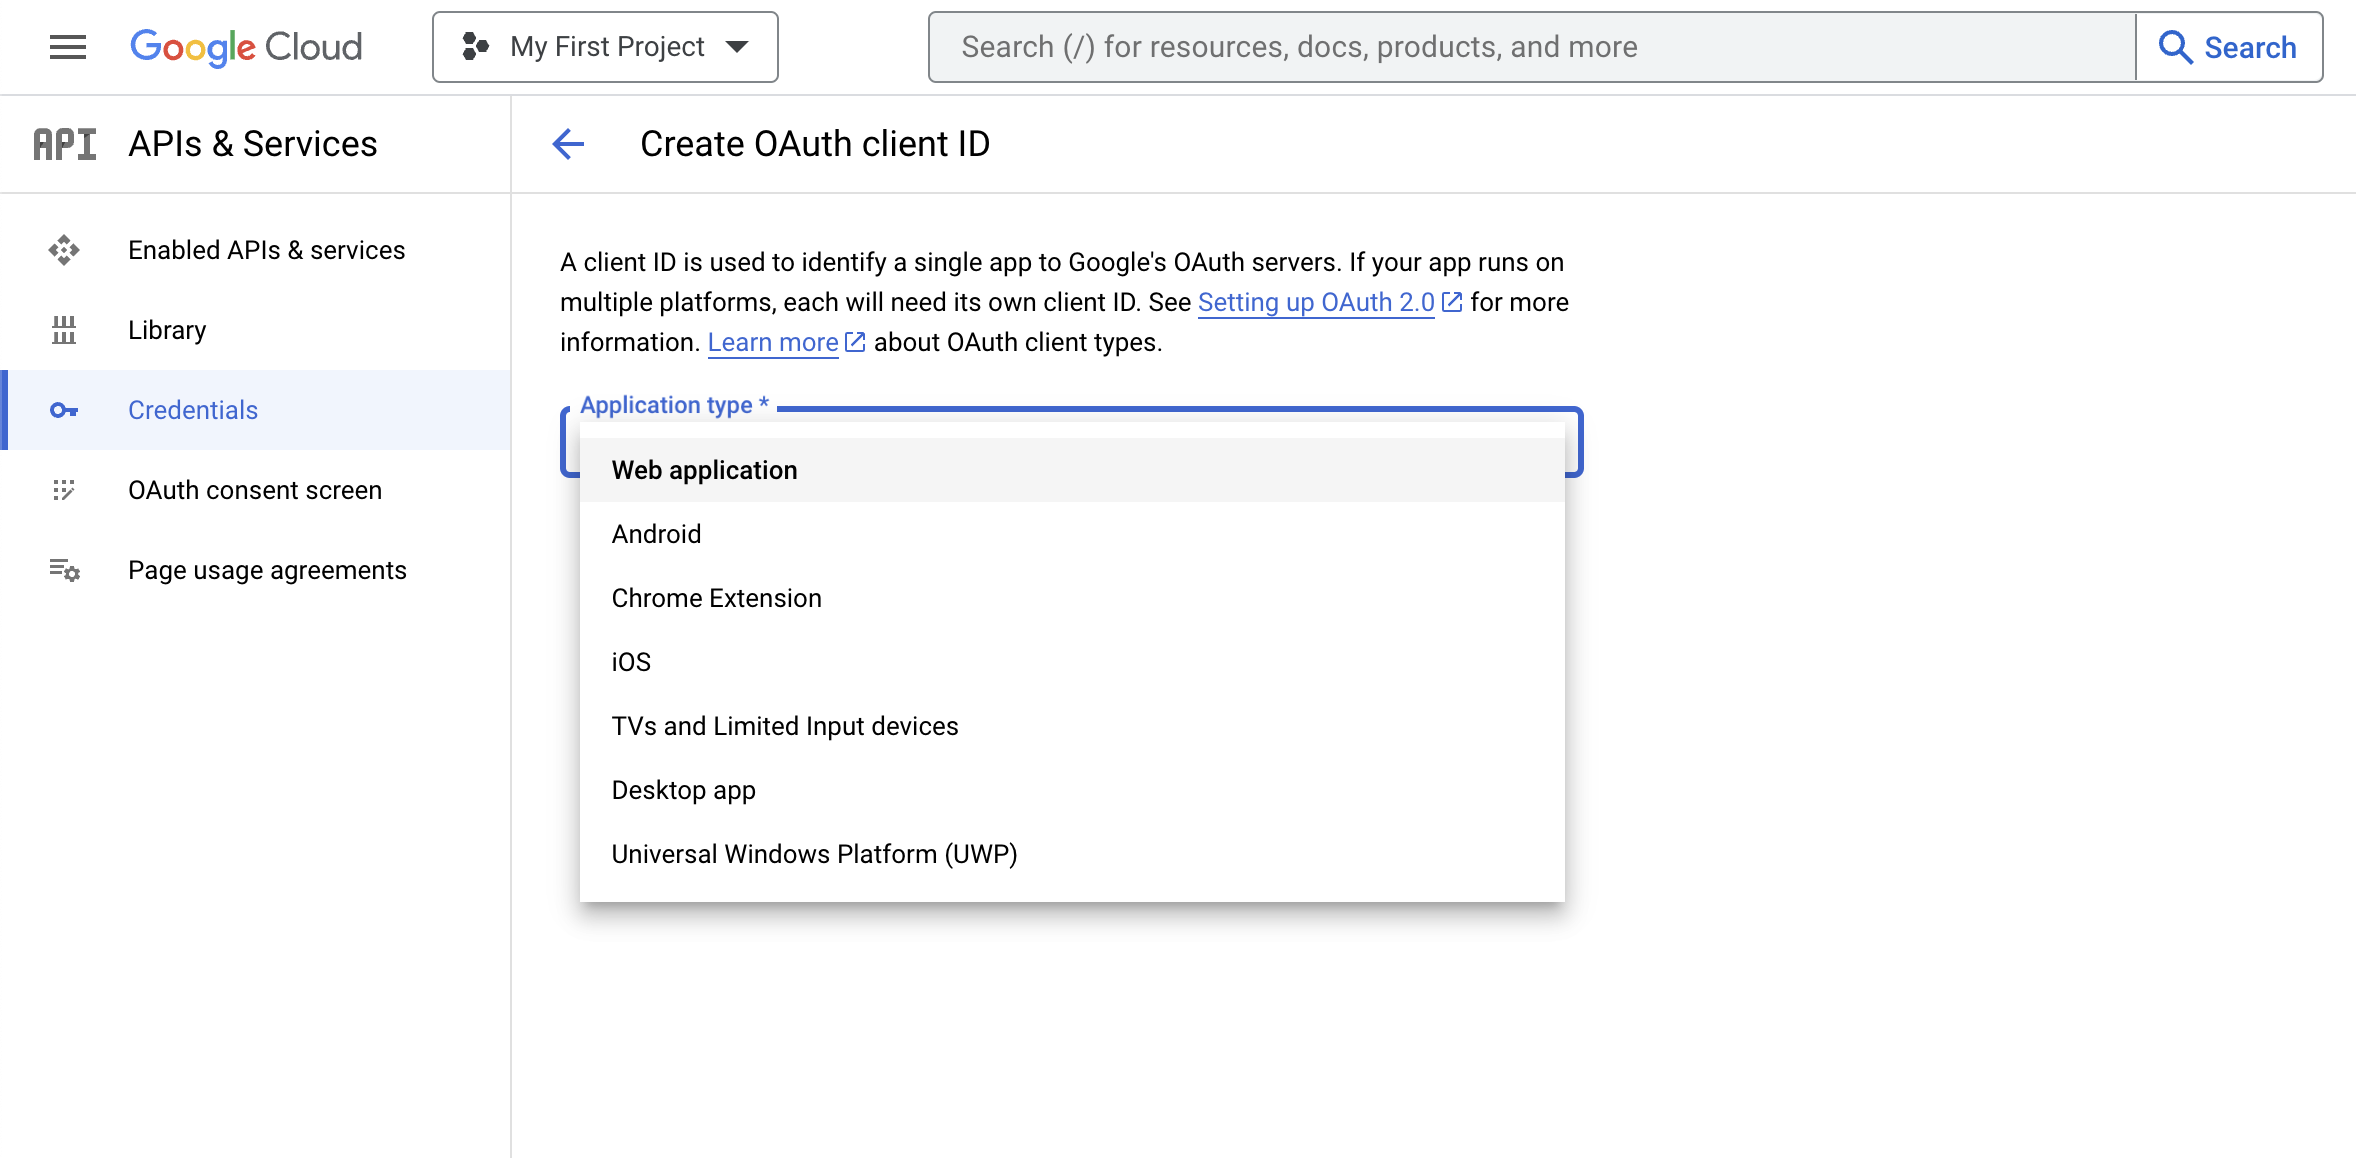
在你的 Supabase 认证设置 中启用 Google 作为提供商,并按照 认证文档 中的说明设置所需的凭据。
🌐 In your Supabase Auth settings enable Google as a provider and set the required credentials as outlined in the auth docs.
正在构建应用 #
🌐 Building the app
创建新的安卓项目 #
🌐 Create new Android project
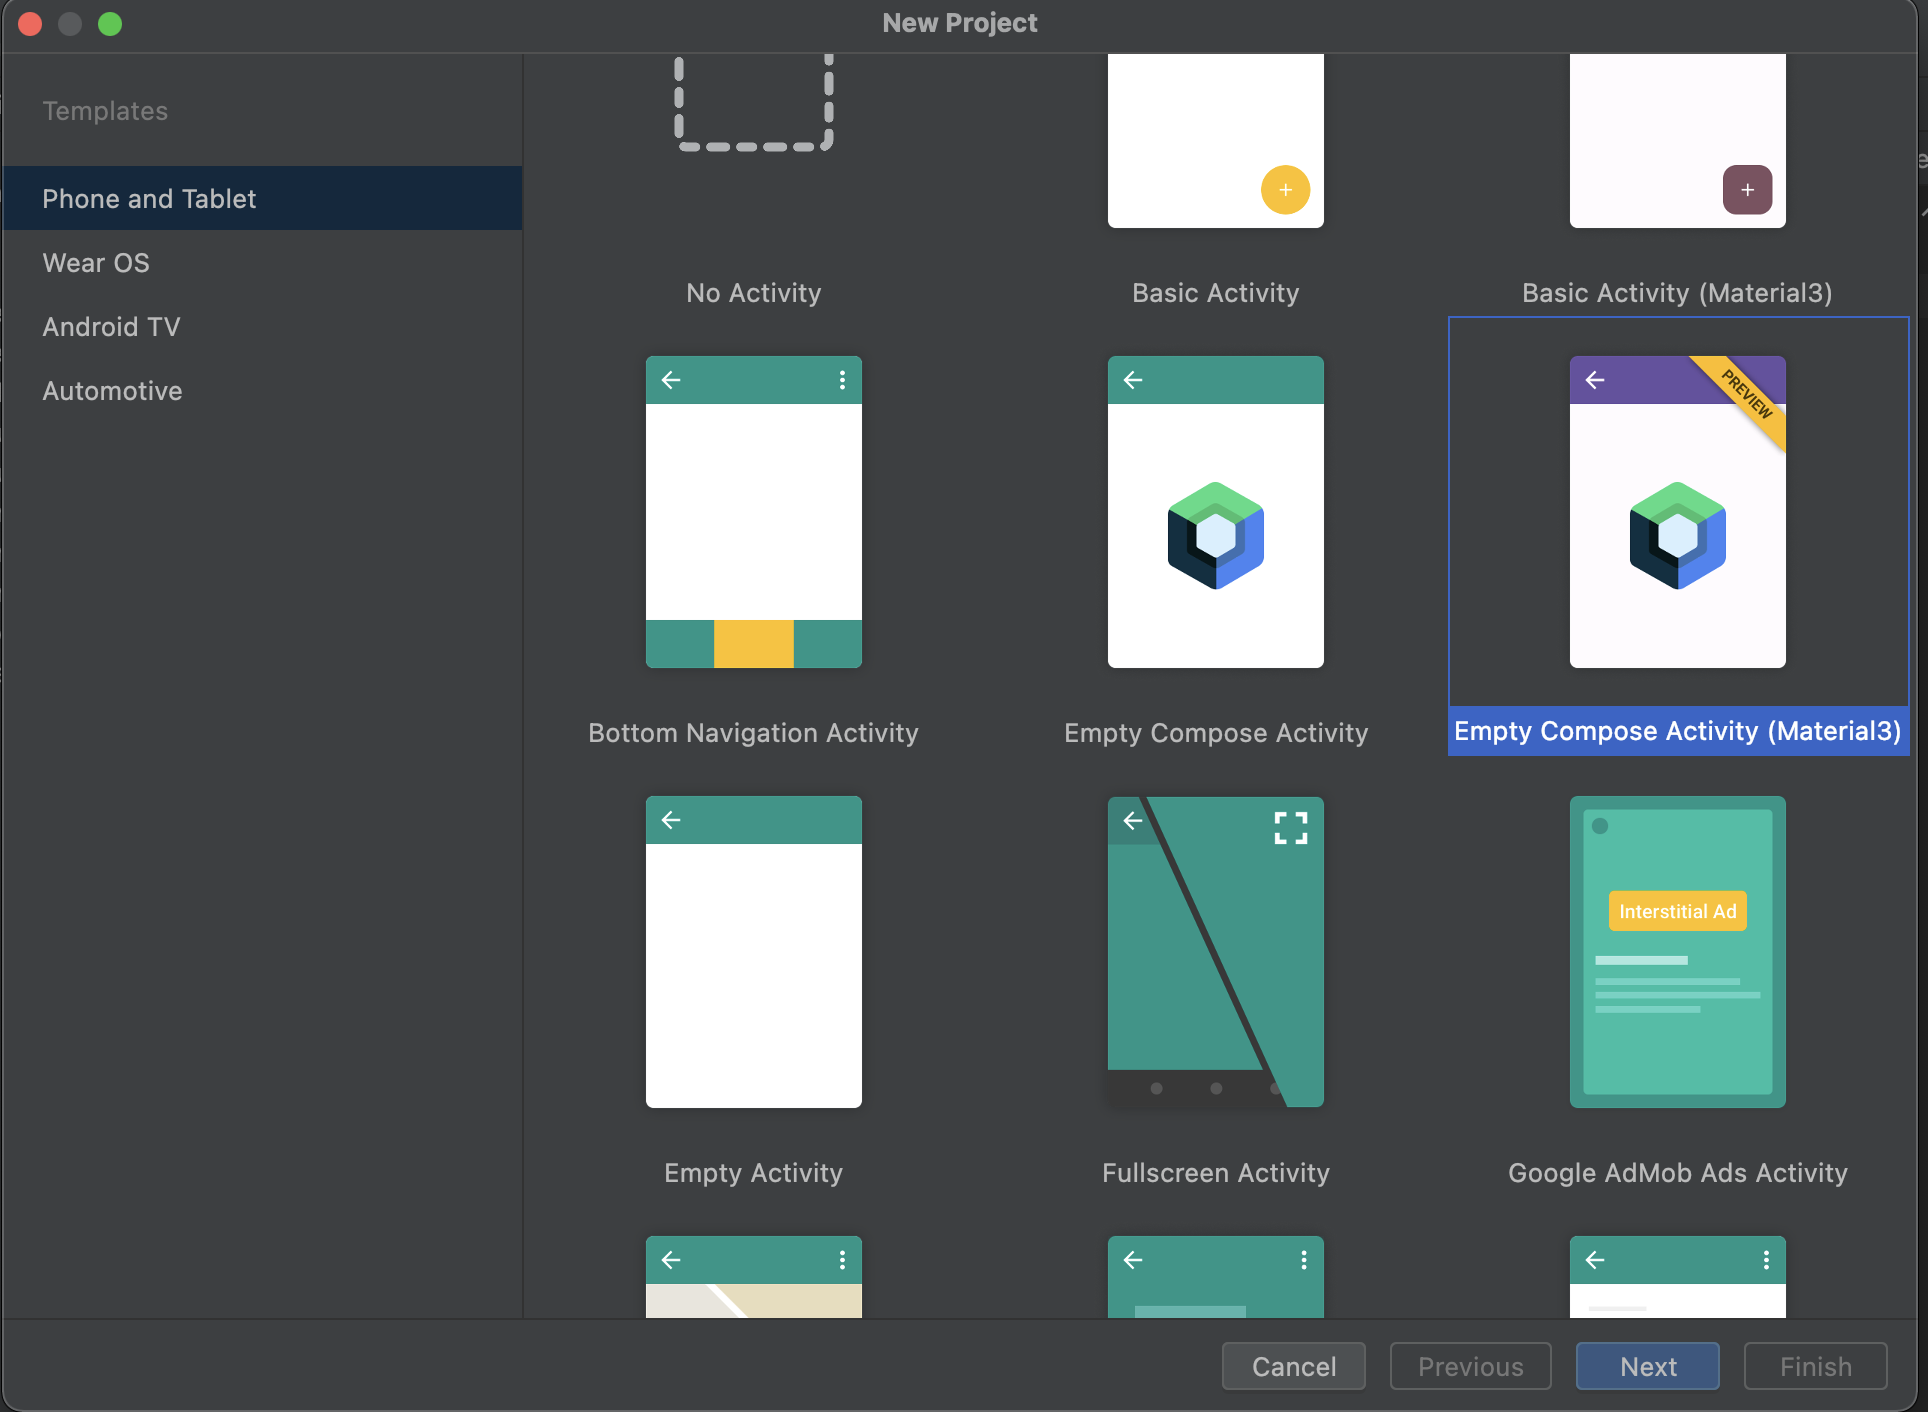
打开 Android Studio > 新建项目 > 基础活动(Jetpack Compose)。
🌐 Open Android Studio > New Project > Base Activity (Jetpack Compose).
安全地设置 API 密钥和密钥密码 #
🌐 Set up API key and secret securely
创建本地环境密钥 #
🌐 Create local environment secret
在你项目的根目录(与 build.gradle 同级)创建或编辑 local.properties 文件。
🌐 Create or edit the local.properties file at the root (same level as build.gradle) of your project.
注意:不要将此文件提交到你的源代码管理,例如,不要将其添加到你的
.gitignore文件中!
1SUPABASE_PUBLISHABLE_KEY=YOUR_SUPABASE_PUBLISHABLE_KEY2SUPABASE_URL=YOUR_SUPABASE_URL读取并设置 BuildConfig#
🌐 Read and set value to BuildConfig
在你的 build.gradle(应用)文件中,创建一个 Properties 对象,并通过调用 buildConfigField 方法从你的 local.properties 文件中读取值:
🌐 In your build.gradle (app) file, create a Properties object and read the values from your local.properties file by calling the buildConfigField method:
1defaultConfig {2 applicationId "com.example.manageproducts"3 minSdkVersion 224 targetSdkVersion 335 versionCode 56 versionName "1.0"7 testInstrumentationRunner "androidx.test.runner.AndroidJUnitRunner"89 // Set value part10 Properties properties = new Properties()11 properties.load(project.rootProject.file("local.properties").newDataInputStream())12 buildConfigField("String", "SUPABASE_PUBLISHABLE_KEY", "\"${properties.getProperty("SUPABASE_PUBLISHABLE_KEY")}\"")13 buildConfigField("String", "SECRET", "\"${properties.getProperty("SECRET")}\"")14 buildConfigField("String", "SUPABASE_URL", "\"${properties.getProperty("SUPABASE_URL")}\"")15}使用 BuildConfig#
🌐 Use value from BuildConfig
从 BuildConfig 读取值:
🌐 Read the value from BuildConfig:
1val url = BuildConfig.SUPABASE_URL2val apiKey = BuildConfig.SUPABASE_PUBLISHABLE_KEY设置 Supabase 依赖 #
🌐 Set up Supabase dependencies
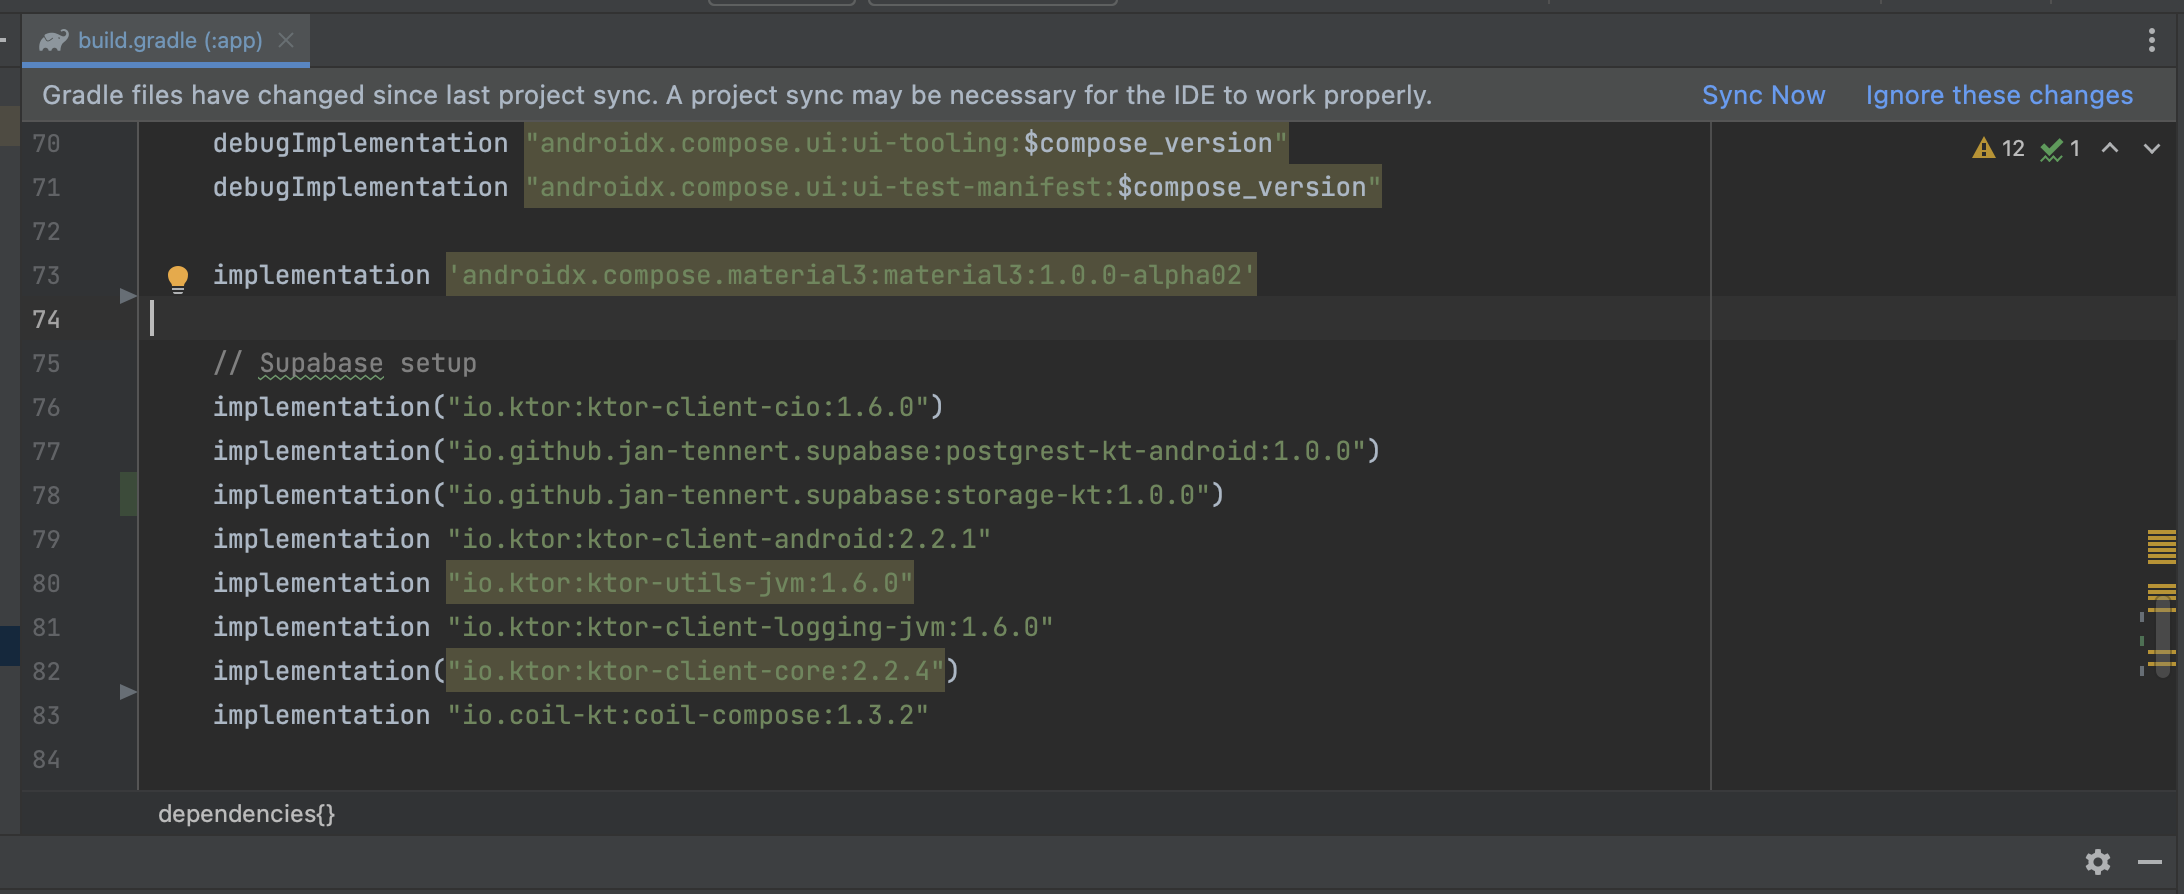
在 build.gradle(应用)文件中,添加这些依赖,然后点击“立即同步”。将依赖版本占位符 $supabase_version 和 $ktor_version 替换为各自的最新版本。
🌐 In the build.gradle (app) file, add these dependencies then press "Sync now." Replace the dependency version placeholders $supabase_version and $ktor_version with their respective latest versions.
1implementation "io.github.jan-tennert.supabase:postgrest-kt:$supabase_version"2implementation "io.github.jan-tennert.supabase:storage-kt:$supabase_version"3implementation "io.github.jan-tennert.supabase:auth-kt:$supabase_version"4implementation "io.ktor:ktor-client-android:$ktor_version"5implementation "io.ktor:ktor-client-core:$ktor_version"6implementation "io.ktor:ktor-utils:$ktor_version"同样在 build.gradle(app)文件中,添加用于序列化的插件。这个插件的版本应该和你的 Kotlin 版本一样。
🌐 Also in the build.gradle (app) file, add the plugin for serialization. The version of this plugin should be the same as your Kotlin version.
1plugins {2 ...3 id 'org.jetbrains.kotlin.plugin.serialization' version '$kotlin_version'4 ...5}为依赖注入设置 Hilt #
🌐 Set up Hilt for dependency injection
在 build.gradle(应用)文件中,添加以下内容:
🌐 In the build.gradle (app) file, add the following:
1implementation "com.google.dagger:hilt-android:$hilt_version"2annotationProcessor "com.google.dagger:hilt-compiler:$hilt_version"3implementation("androidx.hilt:hilt-navigation-compose:1.0.0")创建一个带有 @HiltAndroidApp 注解的、继承自 Application 的新 ManageProductApplication.kt 类:
🌐 Create a new ManageProductApplication.kt class extending Application with @HiltAndroidApp annotation:
1// ManageProductApplication.kt2@HiltAndroidApp3class ManageProductApplication: Application()打开 AndroidManifest.xml 文件,更新 Application 标签的 name 属性:
🌐 Open the AndroidManifest.xml file, update name property of Application tag:
1<application2...3 android:name=".ManageProductApplication"4...5</application>创建 MainActivity:
🌐 Create the MainActivity:
1@AndroidEntryPoint2class MainActivity : ComponentActivity() {3 //This will come later4}用 Hilt 提供 Supabase 实例 #
🌐 Provide Supabase instances with Hilt
为了让这个应用更容易测试,创建一个 SupabaseModule.kt 文件,如下所示:
🌐 To make the app easier to test, create a SupabaseModule.kt file as follows:
1@InstallIn(SingletonComponent::class)2@Module3object SupabaseModule {45 @Provides6 @Singleton7 fun provideSupabaseClient(): SupabaseClient {8 return createSupabaseClient(9 supabaseUrl = BuildConfig.SUPABASE_URL,10 supabaseKey = BuildConfig.SUPABASE_PUBLISHABLE_KEY11 ) {12 install(Postgrest)13 install(Auth) {14 flowType = FlowType.PKCE15 scheme = "app"16 host = "supabase.com"17 }18 install(Storage)19 }20 }2122 @Provides23 @Singleton24 fun provideSupabaseDatabase(client: SupabaseClient): Postgrest {25 return client.postgrest26 }2728 @Provides29 @Singleton30 fun provideSupabaseAuth(client: SupabaseClient): Auth {31 return client.auth32 }333435 @Provides36 @Singleton37 fun provideSupabaseStorage(client: SupabaseClient): Storage {38 return client.storage39 }4041}创建一个数据传输对象 #
🌐 Create a data transfer object
创建一个 ProductDto.kt 类,并使用注解从 Supabase 解析数据:
🌐 Create a ProductDto.kt class and use annotations to parse data from Supabase:
1@Serializable2data class ProductDto(34 @SerialName("name")5 val name: String,67 @SerialName("price")8 val price: Double,910 @SerialName("image")11 val image: String?,1213 @SerialName("id")14 val id: String,15)在 Product.kt 中创建一个域对象,在你的视图中展示数据:
🌐 Create a Domain object in Product.kt expose the data in your view:
1data class Product(2 val id: String,3 val name: String,4 val price: Double,5 val image: String?6)实现仓库 #
🌐 Implement repositories
创建一个 ProductRepository 接口及其实现,命名为 ProductRepositoryImpl。它包含与 Supabase 数据源交互的逻辑。对 AuthenticationRepository 也做同样的处理。
🌐 Create a ProductRepository interface and its implementation named ProductRepositoryImpl. This holds the logic to interact with data sources from Supabase. Do the same with the AuthenticationRepository.
创建产品仓库:
🌐 Create the Product Repository:
1interface ProductRepository {2 suspend fun createProduct(product: Product): Boolean3 suspend fun getProducts(): List<ProductDto>?4 suspend fun getProduct(id: String): ProductDto5 suspend fun deleteProduct(id: String)6 suspend fun updateProduct(7 id: String, name: String, price: Double, imageName: String, imageFile: ByteArray8 )9}1class ProductRepositoryImpl @Inject constructor(2 private val postgrest: Postgrest,3 private val storage: Storage,4) : ProductRepository {5 override suspend fun createProduct(product: Product): Boolean {6 return try {7 withContext(Dispatchers.IO) {8 val productDto = ProductDto(9 name = product.name,10 price = product.price,11 )12 postgrest.from("products").insert(productDto)13 true14 }15 true16 } catch (e: java.lang.Exception) {17 throw e18 }19 }2021 override suspend fun getProducts(): List<ProductDto>? {22 return withContext(Dispatchers.IO) {23 val result = postgrest.from("products")24 .select().decodeList<ProductDto>()25 result26 }27 }282930 override suspend fun getProduct(id: String): ProductDto {31 return withContext(Dispatchers.IO) {32 postgrest.from("products").select {33 filter {34 eq("id", id)35 }36 }.decodeSingle<ProductDto>()37 }38 }3940 override suspend fun deleteProduct(id: String) {41 return withContext(Dispatchers.IO) {42 postgrest.from("products").delete {43 filter {44 eq("id", id)45 }46 }47 }48 }4950 override suspend fun updateProduct(51 id: String,52 name: String,53 price: Double,54 imageName: String,55 imageFile: ByteArray56 ) {57 withContext(Dispatchers.IO) {58 if (imageFile.isNotEmpty()) {59 val imageUrl =60 storage.from("Product%20Image").upload(61 path = "$imageName.png",62 data = imageFile,63 upsert = true64 )65 postgrest.from("products").update({66 set("name", name)67 set("price", price)68 set("image", buildImageUrl(imageFileName = imageUrl))69 }) {70 filter {71 eq("id", id)72 }73 }74 } else {75 postgrest.from("products").update({76 set("name", name)77 set("price", price)78 }) {79 filter {80 eq("id", id)81 }82 }83 }84 }85 }8687 // Because I named the bucket as "Product Image" so when it turns to an url, it is "%20"88 // For better approach, you should create your bucket name without space symbol89 private fun buildImageUrl(imageFileName: String) =90 "${BuildConfig.SUPABASE_URL}/storage/v1/object/public/${imageFileName}".replace(" ", "%20")91}创建认证仓库:
🌐 Create the Authentication Repository:
1interface AuthenticationRepository {2 suspend fun signIn(email: String, password: String): Boolean3 suspend fun signUp(email: String, password: String): Boolean4 suspend fun signInWithGoogle(): Boolean5}1class AuthenticationRepositoryImpl @Inject constructor(2 private val auth: Auth3) : AuthenticationRepository {4 override suspend fun signIn(email: String, password: String): Boolean {5 return try {6 auth.signInWith(Email) {7 this.email = email8 this.password = password9 }10 true11 } catch (e: Exception) {12 false13 }14 }1516 override suspend fun signUp(email: String, password: String): Boolean {17 return try {18 auth.signUpWith(Email) {19 this.email = email20 this.password = password21 }22 true23 } catch (e: Exception) {24 false25 }26 }2728 override suspend fun signInWithGoogle(): Boolean {29 return try {30 auth.signInWith(Google)31 true32 } catch (e: Exception) {33 false34 }35 }36}实现屏幕 #
🌐 Implement screens
要导航屏幕,请使用 AndroidX 导航库。对于路由,请实现 Destination 接口:
🌐 To navigate screens, use the AndroidX navigation library. For routes, implement a Destination interface:
1interface Destination {2 val route: String3 val title: String4}567object ProductListDestination : Destination {8 override val route = "product_list"9 override val title = "Product List"10}1112object ProductDetailsDestination : Destination {13 override val route = "product_details"14 override val title = "Product Details"15 const val productId = "product_id"16 val arguments = listOf(navArgument(name = productId) {17 type = NavType.StringType18 })19 fun createRouteWithParam(productId: String) = "$route/${productId}"20}2122object AddProductDestination : Destination {23 override val route = "add_product"24 override val title = "Add Product"25}2627object AuthenticationDestination: Destination {28 override val route = "authentication"29 override val title = "Authentication"30}3132object SignUpDestination: Destination {33 override val route = "signup"34 override val title = "Sign Up"35}这以后在不同屏幕之间切换会很有帮助。
🌐 This will help later for navigating between screens.
创建一个 ProductListViewModel:
🌐 Create a ProductListViewModel:
1@HiltViewModel2class ProductListViewModel @Inject constructor(3private val productRepository: ProductRepository,4) : ViewModel() {56 private val _productList = MutableStateFlow<List<Product>?>(listOf())7 val productList: Flow<List<Product>?> = _productList8910 private val _isLoading = MutableStateFlow(false)11 val isLoading: Flow<Boolean> = _isLoading1213 init {14 getProducts()15 }1617 fun getProducts() {18 viewModelScope.launch {19 val products = productRepository.getProducts()20 _productList.emit(products?.map { it -> it.asDomainModel() })21 }22 }2324 fun removeItem(product: Product) {25 viewModelScope.launch {26 val newList = mutableListOf<Product>().apply { _productList.value?.let { addAll(it) } }27 newList.remove(product)28 _productList.emit(newList.toList())29 // Call api to remove30 productRepository.deleteProduct(id = product.id)31 // Then fetch again32 getProducts()33 }34 }3536 private fun ProductDto.asDomainModel(): Product {37 return Product(38 id = this.id,39 name = this.name,40 price = this.price,41 image = this.image42 )43 }4445}创建 ProductListScreen.kt:
🌐 Create the ProductListScreen.kt:
1@OptIn(ExperimentalMaterial3Api::class, ExperimentalMaterialApi::class)2@Composable3fun ProductListScreen(4 modifier: Modifier = Modifier,5 navController: NavController,6 viewModel: ProductListViewModel = hiltViewModel(),7) {8 val isLoading by viewModel.isLoading.collectAsState(initial = false)9 val swipeRefreshState = rememberSwipeRefreshState(isRefreshing = isLoading)10 SwipeRefresh(state = swipeRefreshState, onRefresh = { viewModel.getProducts() }) {11 Scaffold(12 topBar = {13 TopAppBar(14 backgroundColor = MaterialTheme.colorScheme.primary,15 title = {16 Text(17 text = stringResource(R.string.product_list_text_screen_title),18 color = MaterialTheme.colorScheme.onPrimary,19 )20 },21 )22 },23 floatingActionButton = {24 AddProductButton(onClick = { navController.navigate(AddProductDestination.route) })25 }26 ) { padding ->27 val productList = viewModel.productList.collectAsState(initial = listOf()).value28 if (!productList.isNullOrEmpty()) {29 LazyColumn(30 modifier = modifier.padding(padding),31 contentPadding = PaddingValues(5.dp)32 ) {33 itemsIndexed(34 items = productList,35 key = { _, product -> product.name }) { _, item ->36 val state = rememberDismissState(37 confirmStateChange = {38 if (it == DismissValue.DismissedToStart) {39 // Handle item removed40 viewModel.removeItem(item)41 }42 true43 }44 )45 SwipeToDismiss(46 state = state,47 background = {48 val color by animateColorAsState(49 targetValue = when (state.dismissDirection) {50 DismissDirection.StartToEnd -> MaterialTheme.colorScheme.primary51 DismissDirection.EndToStart -> MaterialTheme.colorScheme.primary.copy(52 alpha = 0.2f53 )54 null -> Color.Transparent55 }56 )57 Box(58 modifier = modifier59 .fillMaxSize()60 .background(color = color)61 .padding(16.dp),62 ) {63 Icon(64 imageVector = Icons.Filled.Delete,65 contentDescription = null,66 tint = MaterialTheme.colorScheme.primary,67 modifier = modifier.align(Alignment.CenterEnd)68 )69 }7071 },72 dismissContent = {73 ProductListItem(74 product = item,75 modifier = modifier,76 onClick = {77 navController.navigate(78 ProductDetailsDestination.createRouteWithParam(79 item.id80 )81 )82 },83 )84 },85 directions = setOf(DismissDirection.EndToStart),86 )87 }88 }89 } else {90 Text("Product list is empty!")91 }9293 }94 }95}9697@Composable98private fun AddProductButton(99 modifier: Modifier = Modifier,100 onClick: () -> Unit,101) {102 FloatingActionButton(103 modifier = modifier,104 onClick = onClick,105 containerColor = MaterialTheme.colorScheme.primary,106 contentColor = MaterialTheme.colorScheme.onPrimary107 ) {108 Icon(109 imageVector = Icons.Filled.Add,110 contentDescription = null,111 )112 }113}创建 ProductDetailsViewModel.kt:
🌐 Create the ProductDetailsViewModel.kt:
1@HiltViewModel2class ProductDetailsViewModel @Inject constructor(3 private val productRepository: ProductRepository,4 savedStateHandle: SavedStateHandle,5 ) : ViewModel() {67 private val _product = MutableStateFlow<Product?>(null)8 val product: Flow<Product?> = _product910 private val _name = MutableStateFlow("")11 val name: Flow<String> = _name1213 private val _price = MutableStateFlow(0.0)14 val price: Flow<Double> = _price1516 private val _imageUrl = MutableStateFlow("")17 val imageUrl: Flow<String> = _imageUrl1819 init {20 val productId = savedStateHandle.get<String>(ProductDetailsDestination.productId)21 productId?.let {22 getProduct(productId = it)23 }24 }2526 private fun getProduct(productId: String) {27 viewModelScope.launch {28 val result = productRepository.getProduct(productId).asDomainModel()29 _product.emit(result)30 _name.emit(result.name)31 _price.emit(result.price)32 }33 }3435 fun onNameChange(name: String) {36 _name.value = name37 }3839 fun onPriceChange(price: Double) {40 _price.value = price41 }4243 fun onSaveProduct(image: ByteArray) {44 viewModelScope.launch {45 productRepository.updateProduct(46 id = _product.value?.id,47 price = _price.value,48 name = _name.value,49 imageFile = image,50 imageName = "image_${_product.value.id}",51 )52 }53 }5455 fun onImageChange(url: String) {56 _imageUrl.value = url57 }5859 private fun ProductDto.asDomainModel(): Product {60 return Product(61 id = this.id,62 name = this.name,63 price = this.price,64 image = this.image65 )66 }67}创建 ProductDetailsScreen.kt:
🌐 Create the ProductDetailsScreen.kt:
1@OptIn(ExperimentalCoilApi::class)2@SuppressLint("UnusedMaterialScaffoldPaddingParameter")3@Composable4fun ProductDetailsScreen(5 modifier: Modifier = Modifier,6 viewModel: ProductDetailsViewModel = hiltViewModel(),7 navController: NavController,8 productId: String?,9) {10 val snackBarHostState = remember { SnackbarHostState() }11 val coroutineScope = rememberCoroutineScope()1213 Scaffold(14 snackbarHost = { SnackbarHost(snackBarHostState) },15 topBar = {16 TopAppBar(17 navigationIcon = {18 IconButton(onClick = {19 navController.navigateUp()20 }) {21 Icon(22 imageVector = Icons.Filled.ArrowBack,23 contentDescription = null,24 tint = MaterialTheme.colorScheme.onPrimary25 )26 }27 },28 backgroundColor = MaterialTheme.colorScheme.primary,29 title = {30 Text(31 text = stringResource(R.string.product_details_text_screen_title),32 color = MaterialTheme.colorScheme.onPrimary,33 )34 },35 )36 }37 ) {38 val name = viewModel.name.collectAsState(initial = "")39 val price = viewModel.price.collectAsState(initial = 0.0)40 var imageUrl = Uri.parse(viewModel.imageUrl.collectAsState(initial = null).value)41 val contentResolver = LocalContext.current.contentResolver4243 Column(44 modifier = modifier45 .padding(16.dp)46 .fillMaxSize()47 ) {48 val galleryLauncher =49 rememberLauncherForActivityResult(ActivityResultContracts.GetContent())50 { uri ->51 uri?.let {52 if (it.toString() != imageUrl.toString()) {53 viewModel.onImageChange(it.toString())54 }55 }56 }5758 Image(59 painter = rememberImagePainter(imageUrl),60 contentScale = ContentScale.Fit,61 contentDescription = null,62 modifier = Modifier63 .padding(16.dp, 8.dp)64 .size(100.dp)65 .align(Alignment.CenterHorizontally)66 )67 IconButton(modifier = modifier.align(alignment = Alignment.CenterHorizontally),68 onClick = {69 galleryLauncher.launch("image/*")70 }) {71 Icon(72 imageVector = Icons.Filled.Edit,73 contentDescription = null,74 tint = MaterialTheme.colorScheme.primary75 )76 }77 OutlinedTextField(78 label = {79 Text(80 text = "Product name",81 color = MaterialTheme.colorScheme.primary,82 style = MaterialTheme.typography.titleMedium83 )84 },85 maxLines = 2,86 shape = RoundedCornerShape(32),87 modifier = modifier.fillMaxWidth(),88 value = name.value,89 onValueChange = {90 viewModel.onNameChange(it)91 },92 )93 Spacer(modifier = modifier.height(12.dp))94 OutlinedTextField(95 label = {96 Text(97 text = "Product price",98 color = MaterialTheme.colorScheme.primary,99 style = MaterialTheme.typography.titleMedium100 )101 },102 maxLines = 2,103 shape = RoundedCornerShape(32),104 modifier = modifier.fillMaxWidth(),105 value = price.value.toString(),106 keyboardOptions = KeyboardOptions(keyboardType = KeyboardType.Number),107 onValueChange = {108 viewModel.onPriceChange(it.toDouble())109 },110 )111 Spacer(modifier = modifier.weight(1f))112 Button(113 modifier = modifier.fillMaxWidth(),114 onClick = {115 if (imageUrl.host?.contains("supabase") == true) {116 viewModel.onSaveProduct(image = byteArrayOf())117 } else {118 val image = uriToByteArray(contentResolver, imageUrl)119 viewModel.onSaveProduct(image = image)120 }121 coroutineScope.launch {122 snackBarHostState.showSnackbar(123 message = "Product updated successfully !",124 duration = SnackbarDuration.Short125 )126 }127 }) {128 Text(text = "Save changes")129 }130 Spacer(modifier = modifier.height(12.dp))131 OutlinedButton(132 modifier = modifier133 .fillMaxWidth(),134 onClick = {135 navController.navigateUp()136 }) {137 Text(text = "Cancel")138 }139140 }141142 }143}144145146private fun getBytes(inputStream: InputStream): ByteArray {147 val byteBuffer = ByteArrayOutputStream()148 val bufferSize = 1024149 val buffer = ByteArray(bufferSize)150 var len = 0151 while (inputStream.read(buffer).also { len = it } != -1) {152 byteBuffer.write(buffer, 0, len)153 }154 return byteBuffer.toByteArray()155}156157158private fun uriToByteArray(contentResolver: ContentResolver, uri: Uri): ByteArray {159 if (uri == Uri.EMPTY) {160 return byteArrayOf()161 }162 val inputStream = contentResolver.openInputStream(uri)163 if (inputStream != null) {164 return getBytes(inputStream)165 }166 return byteArrayOf()167}创建一个 AddProductScreen:
🌐 Create a AddProductScreen:
1@SuppressLint("UnusedMaterial3ScaffoldPaddingParameter")2@OptIn(ExperimentalMaterial3Api::class)3@Composable4fun AddProductScreen(5 modifier: Modifier = Modifier,6 navController: NavController,7 viewModel: AddProductViewModel = hiltViewModel(),8) {9 Scaffold(10 topBar = {11 TopAppBar(12 navigationIcon = {13 IconButton(onClick = {14 navController.navigateUp()15 }) {16 Icon(17 imageVector = Icons.Filled.ArrowBack,18 contentDescription = null,19 tint = MaterialTheme.colorScheme.onPrimary20 )21 }22 },23 backgroundColor = MaterialTheme.colorScheme.primary,24 title = {25 Text(26 text = stringResource(R.string.add_product_text_screen_title),27 color = MaterialTheme.colorScheme.onPrimary,28 )29 },30 )31 }32 ) { padding ->33 val navigateAddProductSuccess =34 viewModel.navigateAddProductSuccess.collectAsState(initial = null).value35 val isLoading =36 viewModel.isLoading.collectAsState(initial = null).value37 if (isLoading == true) {38 LoadingScreen(message = "Adding Product",39 onCancelSelected = {40 navController.navigateUp()41 })42 } else {43 SuccessScreen(44 message = "Product added",45 onMoreAction = {46 viewModel.onAddMoreProductSelected()47 },48 onNavigateBack = {49 navController.navigateUp()50 })51 }5253 }54}创建 AddProductViewModel.kt:
🌐 Create the AddProductViewModel.kt:
1@HiltViewModel2class AddProductViewModel @Inject constructor(3 private val productRepository: ProductRepository,4) : ViewModel() {56 private val _isLoading = MutableStateFlow(false)7 val isLoading: Flow<Boolean> = _isLoading89 private val _showSuccessMessage = MutableStateFlow(false)10 val showSuccessMessage: Flow<Boolean> = _showSuccessMessage1112 fun onCreateProduct(name: String, price: Double) {13 if (name.isEmpty() || price <= 0) return14 viewModelScope.launch {15 _isLoading.value = true16 val product = Product(17 id = UUID.randomUUID().toString(),18 name = name,19 price = price,20 )21 productRepository.createProduct(product = product)22 _isLoading.value = false23 _showSuccessMessage.emit(true)2425 }26 }27}创建一个 SignUpViewModel:
🌐 Create a SignUpViewModel:
1@HiltViewModel2class SignUpViewModel @Inject constructor(3 private val authenticationRepository: AuthenticationRepository4) : ViewModel() {56 private val _email = MutableStateFlow("")7 val email: Flow<String> = _email89 private val _password = MutableStateFlow("")10 val password = _password1112 fun onEmailChange(email: String) {13 _email.value = email14 }1516 fun onPasswordChange(password: String) {17 _password.value = password18 }1920 fun onSignUp() {21 viewModelScope.launch {22 authenticationRepository.signUp(23 email = _email.value,24 password = _password.value25 )26 }27 }28}创建 SignUpScreen.kt:
🌐 Create the SignUpScreen.kt:
1@Composable2fun SignUpScreen(3 modifier: Modifier = Modifier,4 navController: NavController,5 viewModel: SignUpViewModel = hiltViewModel()6) {7 val snackBarHostState = remember { SnackbarHostState() }8 val coroutineScope = rememberCoroutineScope()9 Scaffold(10 snackbarHost = { androidx.compose.material.SnackbarHost(snackBarHostState) },11 topBar = {12 TopAppBar(13 navigationIcon = {14 IconButton(onClick = {15 navController.navigateUp()16 }) {17 Icon(18 imageVector = Icons.Filled.ArrowBack,19 contentDescription = null,20 tint = MaterialTheme.colorScheme.onPrimary21 )22 }23 },24 backgroundColor = MaterialTheme.colorScheme.primary,25 title = {26 Text(27 text = "Sign Up",28 color = MaterialTheme.colorScheme.onPrimary,29 )30 },31 )32 }33 ) { paddingValues ->34 Column(35 modifier = modifier36 .padding(paddingValues)37 .padding(20.dp)38 ) {39 val email = viewModel.email.collectAsState(initial = "")40 val password = viewModel.password.collectAsState()41 OutlinedTextField(42 label = {43 Text(44 text = "Email",45 color = MaterialTheme.colorScheme.primary,46 style = MaterialTheme.typography.titleMedium47 )48 },49 maxLines = 1,50 shape = RoundedCornerShape(32),51 modifier = modifier.fillMaxWidth(),52 value = email.value,53 onValueChange = {54 viewModel.onEmailChange(it)55 },56 )57 OutlinedTextField(58 label = {59 Text(60 text = "Password",61 color = MaterialTheme.colorScheme.primary,62 style = MaterialTheme.typography.titleMedium63 )64 },65 maxLines = 1,66 shape = RoundedCornerShape(32),67 modifier = modifier68 .fillMaxWidth()69 .padding(top = 12.dp),70 value = password.value,71 onValueChange = {72 viewModel.onPasswordChange(it)73 },74 )75 val localSoftwareKeyboardController = LocalSoftwareKeyboardController.current76 Button(modifier = modifier77 .fillMaxWidth()78 .padding(top = 12.dp),79 onClick = {80 localSoftwareKeyboardController?.hide()81 viewModel.onSignUp()82 coroutineScope.launch {83 snackBarHostState.showSnackbar(84 message = "Create account successfully. Sign in now!",85 duration = SnackbarDuration.Long86 )87 }88 }) {89 Text("Sign up")90 }91 }92 }93}创建一个 SignInViewModel:
🌐 Create a SignInViewModel:
1@HiltViewModel2class SignInViewModel @Inject constructor(3 private val authenticationRepository: AuthenticationRepository4) : ViewModel() {56 private val _email = MutableStateFlow("")7 val email: Flow<String> = _email89 private val _password = MutableStateFlow("")10 val password = _password1112 fun onEmailChange(email: String) {13 _email.value = email14 }1516 fun onPasswordChange(password: String) {17 _password.value = password18 }1920 fun onSignIn() {21 viewModelScope.launch {22 authenticationRepository.signIn(23 email = _email.value,24 password = _password.value25 )26 }27 }2829 fun onGoogleSignIn() {30 viewModelScope.launch {31 authenticationRepository.signInWithGoogle()32 }33 }3435}创建 SignInScreen.kt:
🌐 Create the SignInScreen.kt:
1@OptIn(ExperimentalMaterial3Api::class, ExperimentalComposeUiApi::class)2@Composable3fun SignInScreen(4 modifier: Modifier = Modifier,5 navController: NavController,6 viewModel: SignInViewModel = hiltViewModel()7) {8 val snackBarHostState = remember { SnackbarHostState() }9 val coroutineScope = rememberCoroutineScope()10 Scaffold(11 snackbarHost = { androidx.compose.material.SnackbarHost(snackBarHostState) },12 topBar = {13 TopAppBar(14 navigationIcon = {15 IconButton(onClick = {16 navController.navigateUp()17 }) {18 Icon(19 imageVector = Icons.Filled.ArrowBack,20 contentDescription = null,21 tint = MaterialTheme.colorScheme.onPrimary22 )23 }24 },25 backgroundColor = MaterialTheme.colorScheme.primary,26 title = {27 Text(28 text = "Login",29 color = MaterialTheme.colorScheme.onPrimary,30 )31 },32 )33 }34 ) { paddingValues ->35 Column(36 modifier = modifier37 .padding(paddingValues)38 .padding(20.dp)39 ) {40 val email = viewModel.email.collectAsState(initial = "")41 val password = viewModel.password.collectAsState()42 androidx.compose.material.OutlinedTextField(43 label = {44 Text(45 text = "Email",46 color = MaterialTheme.colorScheme.primary,47 style = MaterialTheme.typography.titleMedium48 )49 },50 maxLines = 1,51 shape = RoundedCornerShape(32),52 modifier = modifier.fillMaxWidth(),53 value = email.value,54 onValueChange = {55 viewModel.onEmailChange(it)56 },57 )58 androidx.compose.material.OutlinedTextField(59 label = {60 Text(61 text = "Password",62 color = MaterialTheme.colorScheme.primary,63 style = MaterialTheme.typography.titleMedium64 )65 },66 maxLines = 1,67 shape = RoundedCornerShape(32),68 modifier = modifier69 .fillMaxWidth()70 .padding(top = 12.dp),71 value = password.value,72 onValueChange = {73 viewModel.onPasswordChange(it)74 },75 )76 val localSoftwareKeyboardController = LocalSoftwareKeyboardController.current77 Button(modifier = modifier78 .fillMaxWidth()79 .padding(top = 12.dp),80 onClick = {81 localSoftwareKeyboardController?.hide()82 viewModel.onGoogleSignIn()83 }) {84 Text("Sign in with Google")85 }86 Button(modifier = modifier87 .fillMaxWidth()88 .padding(top = 12.dp),89 onClick = {90 localSoftwareKeyboardController?.hide()91 viewModel.onSignIn()92 coroutineScope.launch {93 snackBarHostState.showSnackbar(94 message = "Sign in successfully !",95 duration = SnackbarDuration.Long96 )97 }98 }) {99 Text("Sign in")100 }101 OutlinedButton(modifier = modifier102 .fillMaxWidth()103 .padding(top = 12.dp), onClick = {104 navController.navigate(SignUpDestination.route)105 }) {106 Text("Sign up")107 }108 }109 }110}实现 MainActivity#
🌐 Implement the MainActivity
在你之前创建的 MainActivity 中,显示你新建的屏幕:
🌐 In the MainActivity you created earlier, show your newly created screens:
1@AndroidEntryPoint2class MainActivity : ComponentActivity() {3 @Inject4 lateinit var supabaseClient: SupabaseClient56 @OptIn(ExperimentalMaterial3Api::class)7 override fun onCreate(savedInstanceState: Bundle?) {8 super.onCreate(savedInstanceState)9 setContent {10 ManageProductsTheme {11 // A surface container using the 'background' color from the theme12 val navController = rememberNavController()13 val currentBackStack by navController.currentBackStackEntryAsState()14 val currentDestination = currentBackStack?.destination15 Scaffold { innerPadding ->16 NavHost(17 navController,18 startDestination = ProductListDestination.route,19 Modifier.padding(innerPadding)20 ) {21 composable(ProductListDestination.route) {22 ProductListScreen(23 navController = navController24 )25 }2627 composable(AuthenticationDestination.route) {28 SignInScreen(29 navController = navController30 )31 }3233 composable(SignUpDestination.route) {34 SignUpScreen(35 navController = navController36 )37 }3839 composable(AddProductDestination.route) {40 AddProductScreen(41 navController = navController42 )43 }4445 composable(46 route = "${ProductDetailsDestination.route}/{${ProductDetailsDestination.productId}}",47 arguments = ProductDetailsDestination.arguments48 ) { navBackStackEntry ->49 val productId =50 navBackStackEntry.arguments?.getString(ProductDetailsDestination.productId)51 ProductDetailsScreen(52 productId = productId,53 navController = navController,54 )55 }56 }57 }58 }59 }60 }61}创建成功屏幕 #
🌐 Create the success screen
要处理 OAuth 和 OTP 登录,创建一个新活动来处理你在 AndroidManifest.xml 中设置的深度链接:
🌐 To handle OAuth and OTP signins, create a new activity to handle the deep link you set in AndroidManifest.xml:
1<?xml version="1.0" encoding="utf-8"?>2<manifest xmlns:android="http://schemas.android.com/apk/res/android"3 xmlns:tools="http://schemas.android.com/tools">4 <uses-permission android:name="android.permission.INTERNET" />5 <application6 android:name=".ManageProductApplication"7 android:allowBackup="true"8 android:dataExtractionRules="@xml/data_extraction_rules"9 android:enableOnBackInvokedCallback="true"10 android:fullBackupContent="@xml/backup_rules"11 android:icon="@mipmap/ic_launcher"12 android:label="@string/app_name"13 android:supportsRtl="true"14 android:theme="@style/Theme.ManageProducts"15 tools:targetApi="31">16 <activity17 android:name=".DeepLinkHandlerActivity"18 android:exported="true"19 android:theme="@style/Theme.ManageProducts" >20 <intent-filter android:autoVerify="true">21 <action android:name="android.intent.action.VIEW" />22 <category android:name="android.intent.category.DEFAULT" />23 <category android:name="android.intent.category.BROWSABLE" />24 <data25 android:host="supabase.com"26 android:scheme="app" />27 </intent-filter>28 </activity>29 <activity30 android:name=".MainActivity"31 android:exported="true"32 android:label="@string/app_name"33 android:theme="@style/Theme.ManageProducts">34 <intent-filter>35 <action android:name="android.intent.action.MAIN" />36 <category android:name="android.intent.category.LAUNCHER" />37 </intent-filter>38 </activity>39 </application>40</manifest>然后创建 DeepLinkHandlerActivity:
🌐 Then create the DeepLinkHandlerActivity:
1@AndroidEntryPoint2class DeepLinkHandlerActivity : ComponentActivity() {34 @Inject5 lateinit var supabaseClient: SupabaseClient67 private lateinit var callback: (String, String) -> Unit89 override fun onCreate(savedInstanceState: Bundle?) {10 super.onCreate(savedInstanceState)11 supabaseClient.handleDeeplinks(intent = intent,12 onSessionSuccess = { userSession ->13 Log.d("LOGIN", "Log in successfully with user info: ${userSession.user}")14 userSession.user?.apply {15 callback(email ?: "", createdAt.toString())16 }17 })18 setContent {19 val navController = rememberNavController()20 val emailState = remember { mutableStateOf("") }21 val createdAtState = remember { mutableStateOf("") }22 LaunchedEffect(Unit) {23 callback = { email, created ->24 emailState.value = email25 createdAtState.value = created26 }27 }28 ManageProductsTheme {29 Surface(30 modifier = Modifier.fillMaxSize(),31 color = MaterialTheme.colorScheme.background32 ) {33 SignInSuccessScreen(34 modifier = Modifier.padding(20.dp),35 navController = navController,36 email = emailState.value,37 createdAt = createdAtState.value,38 onClick = { navigateToMainApp() }39 )40 }41 }42 }43 }4445 private fun navigateToMainApp() {46 val intent = Intent(this, MainActivity::class.java).apply {47 flags = Intent.FLAG_ACTIVITY_CLEAR_TOP48 }49 startActivity(intent)50 }51}