用 Next.js 构建一个用户管理应用
探索适用于你 Supabase 应用的即插即用 UI 组件。
基于 shadcn/ui 构建的 UI 组件,通过一个命令连接到 Supabase。
🌐 UI components built on shadcn/ui that connect to Supabase via a single command.
探索组件本教程演示了如何构建一个基本的用户管理应用。该应用可以进行用户认证和识别,将用户的个人资料信息存储在数据库中,并允许用户登录、更新他们的个人资料信息以及上传头像。该应用使用了:
🌐 This tutorial demonstrates how to build a basic user management app. The app authenticates and identifies the user, stores their profile information in the database, and allows the user to log in, update their profile details, and upload a profile photo. The app uses:
- Supabase 数据库 - 一个用于存储用户数据的 Postgres 数据库,并且有 行级安全,所以数据是受保护的,用户只能访问自己的信息。
- Supabase Auth - 允许用户注册和登录。
- Supabase 存储 - 允许用户上传个人头像。
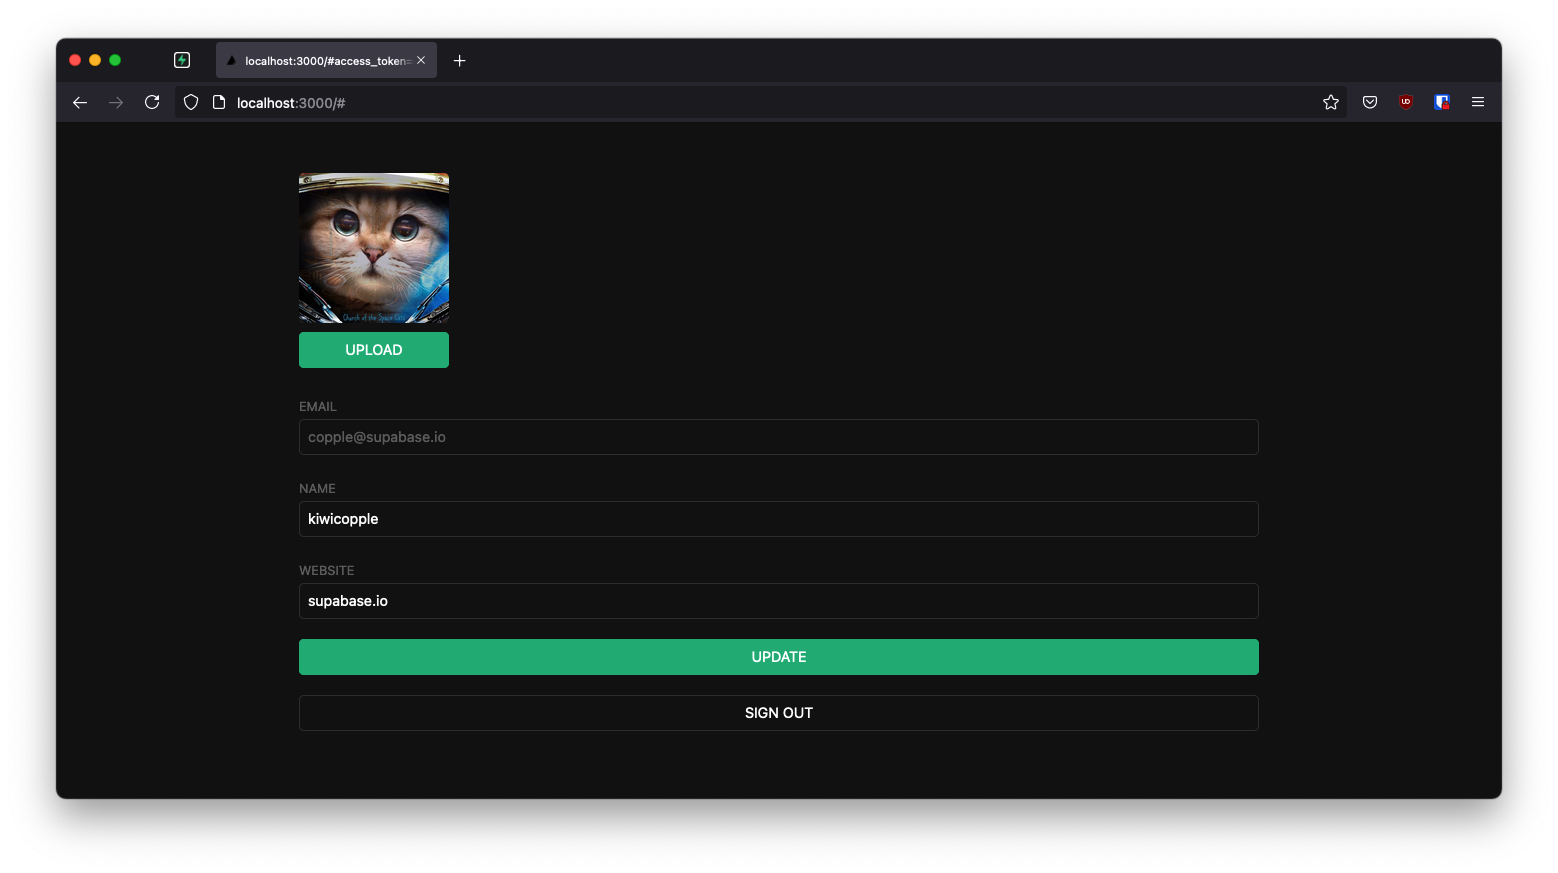
如果你在跟着这个指南操作时遇到困难,你可以在GitHub上找到完整示例。
🌐 If you get stuck while working through this guide, you can find the full example on GitHub.
项目设置 #
🌐 Project setup
在你开始构建之前,你需要先设置数据库和 API。你可以通过在 Supabase 中启动一个新项目,然后在数据库中创建一个“架构”来完成这一步。
🌐 Before you start building you need to set up the Database and API. You can do this by starting a new Project in Supabase and then creating a "schema" inside the database.
创建一个项目 #
🌐 Create a project
- 在 Supabase 仪表板中创建一个新项目。
- 输入你的项目详情。
- 等新数据库上线。
设置数据库模式 #
🌐 Set up the database schema
现在设置数据库模式。你可以在 SQL 编辑器中使用“用户管理入门”快速开始,也可以复制粘贴下面的 SQL 并运行。
🌐 Now set up the database schema. You can use the "User Management Starter" quickstart in the SQL Editor, or you can copy/paste the SQL from below and run it.
- 在仪表板中转到SQL 编辑器页面。
- 点击 社区 > 快速入门 标签下的 用户管理入门。
- 点击运行。
你可以通过运行 db pull 命令将数据库架构拉到本地项目。查看本地开发文档获取详细说明。
🌐 You can pull the database schema down to your local project by running the db pull command. Read the local development docs for detailed instructions.
1supabase link --project-ref <project-id>2# You can get <project-id> from your project's dashboard URL: https://supabase.com/dashboard/project/<project-id>3supabase db pull获取 API 详情 #
🌐 Get API details
要与数据库表中的数据进行交互,你可以使用封装了自动生成的数据 API 端点的客户端库,并使用来自项目 Connect 对话框的项目 URL 和密钥进行认证。
🌐 To interact with data in database tables, you use the client libraries that wrap the auto-generated Data API endpoints, authenticating using the Project URL and key from the project Connect dialog.
阅读 API 密钥文档 以全面了解所有密钥类型、用途以及在哪里可以找到它们。
正在构建应用 #
🌐 Building the app
从零开始构建 Next.js 应用。
🌐 Start building the Next.js app from scratch.
初始化一个 Next.js 应用 #
🌐 Initialize a Next.js app
使用 create-next-app 来初始化一个叫做 supabase-nextjs 的应用:
🌐 Use create-next-app to initialize an app called supabase-nextjs:
1npx create-next-app@latest --ts --use-npm supabase-nextjs2cd supabase-nextjs安装 supabase-js:
🌐 Install supabase-js:
1npm install @supabase/supabase-js将环境变量保存在项目根目录的 .env.local 文件中,然后粘贴你之前复制的 API URL 和密钥 之前 。
🌐 Save the environment variables in a .env.local file at the root of the project, and paste the API URL and the key that you copied earlier.
这个应用会在浏览器中暴露这些变量,这没问题,因为 Supabase 默认在所有表上启用了行级安全。
🌐 The application exposes these variables in the browser, and that's fine as Supabase enables Row Level Security by default on all tables.
1NEXT_PUBLIC_SUPABASE_URL=YOUR_SUPABASE_URL2NEXT_PUBLIC_SUPABASE_PUBLISHABLE_KEY=YOUR_SUPABASE_PUBLISHABLE_KEY应用风格(可选) #
🌐 App styling (optional)
一个可选步骤是更新 CSS 文件 app/globals.css,让应用看起来更好。你可以在示例仓库中找到这个文件的完整内容。
🌐 An optional step is to update the CSS file app/globals.css to make the app look better.
You can find the full contents of this file in the example repository.
Supabase 服务端身份验证包 #
🌐 Supabase Server-Side Auth package
Next.js 是一个多功能框架,提供构建时预渲染(SSG)、请求时服务器端渲染(SSR)、API 路由和代理边缘函数。
🌐 Next.js is a versatile framework offering pre-rendering at build time (SSG), server-side rendering at request time (SSR), API routes, and proxy edge-functions.
为了更好地与框架集成,我们创建了用于服务器端认证的 @supabase/ssr 包。它具备所有功能,可以配置你的 Supabase 项目使用 Cookie 来存储用户会话。想了解更多信息,请阅读 Next.js 服务器端认证指南 。
🌐 To better integrate with the framework, we've created the @supabase/ssr package for Server-Side Auth. It has all the functionalities to configure your Supabase project to use cookies for storing user sessions. Read the Next.js Server-Side Auth guide for more information.
为 Next.js 安装这个包。
🌐 Install the package for Next.js.
1npm install @supabase/ssrSupabase 工具 #
🌐 Supabase utilities
在 Supabase 中有两种不同类型的客户端:
🌐 There are two different types of clients in Supabase:
- 客户端组件 client - 用于从在浏览器中运行的客户端组件访问 Supabase。
- 服务器组件客户端 - 用于从仅在服务器上运行的服务器组件、服务器操作和路由处理程序中访问 Supabase。
我们建议创建以下用于创建客户端的工具文件,并将它们在项目根目录的 lib/supabase 中进行整理。
🌐 We recommend creating the following utilities files for creating clients, and organize them within lib/supabase at the root of the project.
使用以下代码分别为客户端 Supabase 和服务端 Supabase 创建一个 client.ts 和一个 server.ts。
🌐 Create a client.ts and a server.ts with the following code for client-side Supabase and server-side Supabase, respectively.
1import { createBrowserClient } from '@supabase/ssr'23export function createClient() {4 // Create a supabase client on the browser with project's credentials5 return createBrowserClient(6 process.env.NEXT_PUBLIC_SUPABASE_URL!,7 process.env.NEXT_PUBLIC_SUPABASE_PUBLISHABLE_KEY!8 )9}Next.js 代理 #
🌐 Next.js proxy
由于服务器组件不能写入 cookies,你需要 Proxy 来刷新过期的认证令牌并存储它们。
🌐 Since Server Components can't write cookies, you need Proxy to refresh expired Auth tokens and store them.
你可以这样做:
🌐 You accomplish this by:
- 正在通过调用
supabase.auth.getClaims刷新认证令牌。 - 通过
request.cookies.set将刷新后的 Auth 令牌传递给服务器组件,这样它们就不会尝试自己刷新同一个令牌了。 - 把更新后的认证令牌传给浏览器,这样就能替换掉旧的令牌。这是用
response.cookies.set完成的。
你也可以添加一个匹配器,让代理只在访问 Supabase 的路由上运行。想了解更多信息,可以阅读 Next.js 匹配器文档。
🌐 You could also add a matcher, so that the Proxy only runs on routes that access Supabase. For more information, read the Next.js matcher documentation.
保护页面时要小心。服务器从 cookies 获取用户会话,而任何人都可以伪造它。
🌐 Be careful when protecting pages. The server gets the user session from the cookies, which anyone can spoof.
Supabase Auth SDK 包含三种不同的函数,用于验证用户对应用的访问权限:
🌐 The Supabase Auth SDK contains three different functions for authenticating user access to applications:
方法总结 #
🌐 Summary of the methods
- 使用
getClaims来保护页面和用户数据。它会从存储中读取访问令牌并进行验证。在本地通过 WebCrypto API 和缓存的 JWKS 端点进行操作,当项目使用非对称签名密钥时(这是新项目的默认设置);如果使用对称密钥,则仅通过调用getUser来验证。返回的声明总是来自解析 JWT,而不是通过用户查询获得。 [getUser](/docs/reference/javascript/auth-getuser)会向项目的 Auth 实例发起网络请求以获取用户记录,这样可以获得用户的最新信息,但需要进行一次网络请求。getSession当你需要原始会话(访问令牌、刷新令牌和过期时间)时使用。例如,将访问令牌转发到另一个服务。会话是直接从本地存储加载的,并不会重新向认证服务器验证,因此当存储与客户端共享(如 cookies、请求头)时,嵌入的用户对象不应单独信任。要验证身份,请使用getClaims验证访问令牌,或调用getUser获取一个新的、服务器确认的用户记录。
总结:使用 getClaims 来验证身份(通常用于保护页面和数据),当你需要从认证服务器获取最新的用户记录时用 getUser,而当你直接需要访问或刷新令牌时用 getSession,但不要依赖它返回的用户对象来做授权决策。
在项目根目录创建一个 proxy.ts 文件,并在 lib/supabase 文件夹中再创建一个。lib/supabase 文件包含更新会话的逻辑。proxy.ts 文件使用了这个,这是 Next.js 的惯例。
🌐 Create a proxy.ts file at the project root and another one within the lib/supabase folder. The lib/supabase file contains the logic for updating the session. The proxy.ts file uses this, which is a Next.js convention.
1import { type NextRequest } from 'next/server'2import { updateSession } from '@/lib/supabase/proxy'34export async function proxy(request: NextRequest) {5 // update user's auth session6 return await updateSession(request)7}89export const config = {10 matcher: [11 /*12 * Match all request paths except for the ones starting with:13 * - _next/static (static files)14 * - _next/image (image optimization files)15 * - favicon.ico (favicon file)16 * Feel free to modify this pattern to include more paths.17 */18 '/((?!_next/static|_next/image|favicon.ico|.*\\.(?:svg|png|jpg|jpeg|gif|webp)$).*)',19 ],20}设置一个登录页面 #
🌐 Set up a login page
登录和注册表单 #
🌐 Login and signup form
要为你的应用添加登录/注册页面,创建一个名为 login 的新文件夹,里面包含一个 page.tsx 文件,文件内容如下,是一个登录/注册表单代码:
🌐 To add login/signup page for your application, create a new folder named login, containing a page.tsx file with the following code for a login/signup form:
1import { login, signup } from './actions'23export default function LoginPage() {4 return (5 <form>6 <label htmlFor="email">Email:</label>7 <input id="email" name="email" type="email" required />8 <label htmlFor="password">Password:</label>9 <input id="password" name="password" type="password" required />10 <button formAction={login}>Log in</button>11 <button formAction={signup}>Sign up</button>12 </form>13 )14}创建登录/注册动作,将表单连接到执行以下操作的函数:
🌐 Create the login/signup actions to hook up the form to the function which does the following:
- 获取用户的信息。
- 将这些信息作为注册请求发送到 Supabase,然后 Supabase 会发送确认邮件。它使用 Magic Links,所以用户可以通过邮箱登录,而无需使用密码。
- 处理出现的任何错误。
在 app/login 文件夹中创建 action.ts 文件,它包含登录和注册功能,以及 error/page.tsx 文件,如果登录或注册失败会显示错误信息。
🌐 Create the action.ts file in the app/login folder, which contains the login and signup functions and the error/page.tsx file, which displays an error message if the login or signup fails.
1'use server'23import { revalidatePath } from 'next/cache'4import { redirect } from 'next/navigation'56import { createClient } from '@/lib/supabase/server'78export async function login(formData: FormData) {9 const supabase = await createClient()1011 // type-casting here for convenience12 // in practice, you should validate your inputs13 const data = {14 email: formData.get('email') as string,15 password: formData.get('password') as string,16 }1718 const { error } = await supabase.auth.signInWithPassword(data)1920 if (error) {21 redirect('/error')22 }2324 revalidatePath('/', 'layout')25 redirect('/account')26}2728export async function signup(formData: FormData) {29 const supabase = await createClient()3031 // type-casting here for convenience32 // in practice, you should validate your inputs33 const data = {34 email: formData.get('email') as string,35 password: formData.get('password') as string,36 }3738 const { error } = await supabase.auth.signUp(data)3940 if (error) {41 redirect('/error')42 }4344 revalidatePath('/', 'layout')45 redirect('/account')46}cookies 方法在任何对 Supabase 的调用之前被调用,这会将 fetch 调用从 Next.js 的缓存中移除。这对于认证数据的获取很重要,以确保用户只能访问他们自己的数据。
🌐 The cookies method is called before any calls to Supabase, which takes fetch calls out of Next.js's caching. This is important for authenticated data fetches, to ensure that users get access only to their own data.
阅读 Next.js 文档以了解更多关于选择退出数据缓存的信息。
🌐 Read the Next.js docs to learn more about opting out of data caching.
电子邮件模板 #
🌐 Email template
在继续之前,先修改邮件模板以支持服务器端身份验证流程,该流程会发送一个令牌哈希:
🌐 Before proceeding, change the email template to support a server-side authentication flow that sends a token hash:
- 在你的仪表板上打开 Auth 模板 页面。
- 选择 确认注册 模板。
- 把
{{ .ConfirmationURL }}改成{{ .SiteURL }}/auth/confirm?token_hash={{ .TokenHash }}&type=email。
你知道吗?
你可以自定义发送给新用户的其他邮件,包括邮件的外观、内容以及查询参数,都可以在仪表板的 认证 > 邮件 部分进行设置。
🌐 You can customize other emails sent out to new users, including the email's looks, content, and query parameters from the Authentication > Email section of the Dashboard.
确认端点 #
🌐 Confirmation endpoint
既然你在使用服务端渲染(SSR)环境工作,你需要创建一个服务器端点,负责将 token_hash 换成一个会话。
🌐 As you are working in a server-side rendering (SSR) environment, you need to create a server endpoint responsible for exchanging the token_hash for a session.
这段代码执行以下步骤:
🌐 The code performs the following steps:
- 使用
token_hash查询参数获取从 Supabase Auth 服务器返回的代码。 - 用这个代码换取一个会话,然后你把它存储在你选择的存储方式里(在这个例子中是 cookies)。
- 最后,把用户重定向到
account页面。
1import { type EmailOtpType } from '@supabase/supabase-js'2import { type NextRequest, NextResponse } from 'next/server'3import { createClient } from '@/lib/supabase/server'45// Creating a handler to a GET request to route /auth/confirm6export async function GET(request: NextRequest) {7 const { searchParams } = new URL(request.url)8 const token_hash = searchParams.get('token_hash')9 const type = searchParams.get('type') as EmailOtpType | null10 const next = '/account'1112 // Create redirect link without the secret token13 const redirectTo = request.nextUrl.clone()14 redirectTo.pathname = next15 redirectTo.searchParams.delete('token_hash')16 redirectTo.searchParams.delete('type')1718 if (token_hash && type) {19 const supabase = await createClient()2021 const { error } = await supabase.auth.verifyOtp({22 type,23 token_hash,24 })25 if (!error) {26 redirectTo.searchParams.delete('next')27 return NextResponse.redirect(redirectTo)28 }29 }3031 // return the user to an error page with some instructions32 redirectTo.pathname = '/error'33 return NextResponse.redirect(redirectTo)34}账户页面 #
🌐 Account page
用户登录后,需要一种方式来编辑他们的个人资料信息并管理他们的账户。
🌐 After a user signs in, they need a way to edit their profile details and manage their accounts.
在 app/account 文件夹里为此创建一个叫做 AccountForm 的新组件。
🌐 Create a new component for that called AccountForm within the app/account folder.
1'use client'2import { useCallback, useEffect, useState } from 'react'3import { createClient } from '@/lib/supabase/client'4import Avatar from './avatar'56// ...789export default function AccountForm({ claims }: { claims: Claims | null }) {10 const supabase = createClient()11 const [loading, setLoading] = useState(true)12 const [fullname, setFullname] = useState<string | null>(null)13 const [username, setUsername] = useState<string | null>(null)14 const [website, setWebsite] = useState<string | null>(null)15 const [avatar_url, setAvatarUrl] = useState<string | null>(null)1617 const getProfile = useCallback(async () => {18 try {19 if (!claims?.sub) {20 setLoading(false)21 return22 }2324 setLoading(true)2526 const { data, error, status } = await supabase27 .from('profiles')28 .select(`full_name, username, website, avatar_url`)29 .eq('id', claims.sub)30 .single()3132 if (error && status !== 406) {33 console.log(error)34 throw error35 }3637 if (data) {38 setFullname(data.full_name)39 setUsername(data.username)40 setWebsite(data.website)41 setAvatarUrl(data.avatar_url)42 }43 } catch (error) {44 alert('Error loading user data!')45 } finally {46 setLoading(false)47 }48 }, [claims, supabase])4950 useEffect(() => {51 getProfile()52 }, [claims, getProfile])5354 async function updateProfile({55 username,56 website,57 avatar_url,58 }: {59 username: string | null60 fullname: string | null61 website: string | null62 avatar_url: string | null63 }) {64 try {65 if (!claims?.sub) {66 alert('You must be logged in to update your profile')67 return68 }6970 setLoading(true)7172 const { error } = await supabase.from('profiles').upsert({73 id: claims.sub,74 full_name: fullname,75 username,76 website,77 avatar_url,78 updated_at: new Date().toISOString(),79 })8081 // ...8283 return (84 <div className="form-widget">8586 {/* ... */}8788 <div>89 <label htmlFor="email">Email</label>90 <input id="email" type="text" value={claims?.email ?? ''} disabled />91 </div>92 <div>93 <label htmlFor="fullName">Full Name</label>94 <input95 id="fullName"96 type="text"97 value={fullname || ''}98 onChange={(e) => setFullname(e.target.value)}99 />100 </div>101 <div>102 <label htmlFor="username">Username</label>103 <input104 id="username"105 type="text"106 value={username || ''}107 onChange={(e) => setUsername(e.target.value)}108 />109 </div>110 <div>111 <label htmlFor="website">Website</label>112 <input113 id="website"114 type="url"115 value={website || ''}116 onChange={(e) => setWebsite(e.target.value)}117 />118 </div>119120 <div>121 <button122 className="button primary block"123 onClick={() => updateProfile({ fullname, username, website, avatar_url })}124 disabled={loading || !claims?.sub}125 >126 {loading ? 'Loading ...' : 'Update'}127 </button>128 </div>129130 <div>131 <form action="/auth/signout" method="post">132 <button className="button block" type="submit">133 Sign out134 </button>135 </form>136 </div>137 </div>138 )139}为你创建的 AccountForm 组件创建一个账户页面
🌐 Create an account page for the AccountForm component you created
1import AccountForm from './account-form'2import { createClient } from '@/lib/supabase/server'34export default async function Account() {5 const supabase = await createClient()67 const { data: claimsData } = await supabase.auth.getClaims()89 return <AccountForm claims={claimsData?.claims ?? null} />10}登出 #
🌐 Sign out
创建一个路由处理器来处理服务器端的登出,先确保先检查用户是否已登录。
🌐 Create a route handler to handle the sign out from the server side, making sure to check if the user is logged in first.
1import { createClient } from '@/lib/supabase/server'2import { revalidatePath } from 'next/cache'3import { type NextRequest, NextResponse } from 'next/server'45export async function POST(req: NextRequest) {6 const supabase = await createClient()78 // Check if a user's logged in9 const { data: claimsData } = await supabase.auth.getClaims()1011 if (claimsData?.claims) {12 await supabase.auth.signOut()13 }1415 revalidatePath('/', 'layout')16 return NextResponse.redirect(new URL('/login', req.url), {17 status: 302,18 })19}头像照片 #
🌐 Profile photos
接下来,添加一个让用户上传个人资料照片的方式。Supabase 会为每个项目配置 Storage,用于管理像照片和视频这样的大文件。
🌐 Next, add a way for users to upload a profile photo. Supabase configures every project with Storage for managing large files like photos and videos.
创建一个上传小工具 #
🌐 Create an upload widget
先从创建一个新组件开始:
🌐 Start by creating a new component:
1'use client'2import React, { useEffect, useState } from 'react'3import { createClient } from '@/lib/supabase/client'4import Image from 'next/image'56export default function Avatar({7 uid,8 url,9 size,10 onUpload,11}: {12 uid: string | null13 url: string | null14 size: number15 onUpload: (url: string) => void16}) {17 const supabase = createClient()18 const [avatarUrl, setAvatarUrl] = useState<string | null>(url)19 const [uploading, setUploading] = useState(false)2021 useEffect(() => {22 async function downloadImage(path: string) {23 try {24 const { data, error } = await supabase.storage.from('avatars').download(path)25 if (error) {26 throw error27 }2829 const url = URL.createObjectURL(data)30 setAvatarUrl(url)31 } catch (error) {32 console.log('Error downloading image: ', error)33 }34 }3536 if (url) downloadImage(url)37 }, [url, supabase])3839 const uploadAvatar: React.ChangeEventHandler<HTMLInputElement> = async (event) => {40 try {41 setUploading(true)4243 if (!event.target.files || event.target.files.length === 0) {44 throw new Error('You must select an image to upload.')45 }4647 const file = event.target.files[0]48 const fileExt = file.name.split('.').pop()49 const filePath = `${uid}-${Math.random()}.${fileExt}`5051 const { error: uploadError } = await supabase.storage.from('avatars').upload(filePath, file)5253 if (uploadError) {54 throw uploadError55 }5657 onUpload(filePath)58 } catch (error) {59 alert('Error uploading avatar!')60 } finally {61 setUploading(false)62 }63 }6465 return (66 <div>67 {avatarUrl ? (68 <Image69 width={size}70 height={size}71 src={avatarUrl}72 alt="Avatar"73 className="avatar image"74 style={{ height: size, width: size }}75 />76 ) : (77 <div className="avatar no-image" style={{ height: size, width: size }} />78 )}79 <div style={{ width: size }}>80 <label className="button primary block" htmlFor="single">81 {uploading ? 'Uploading ...' : 'Upload'}82 </label>83 <input84 style={{85 visibility: 'hidden',86 position: 'absolute',87 }}88 type="file"89 id="single"90 accept="image/*"91 onChange={uploadAvatar}92 disabled={uploading}93 />94 </div>95 </div>96 )97}更新账户表单 #
🌐 Update the account form
创建了 Avatar 组件后,更新 app/account/account-form.tsx 来包含它:
🌐 With the Avatar component created, update app/account/account-form.tsx to include it:
1'use client'2import { useCallback, useEffect, useState } from 'react'3import { createClient } from '@/lib/supabase/client'4import Avatar from './avatar'56type Claims = { sub: string; email?: string; [key: string]: unknown }78export default function AccountForm({ claims }: { claims: Claims | null }) {9 const supabase = createClient()10 const [loading, setLoading] = useState(true)11 const [fullname, setFullname] = useState<string | null>(null)12 const [username, setUsername] = useState<string | null>(null)13 const [website, setWebsite] = useState<string | null>(null)14 const [avatar_url, setAvatarUrl] = useState<string | null>(null)1516 const getProfile = useCallback(async () => {17 try {18 if (!claims?.sub) {19 setLoading(false)20 return21 }2223 setLoading(true)2425 const { data, error, status } = await supabase26 .from('profiles')27 .select(`full_name, username, website, avatar_url`)28 .eq('id', claims.sub)29 .single()3031 if (error && status !== 406) {32 console.log(error)33 throw error34 }3536 if (data) {37 setFullname(data.full_name)38 setUsername(data.username)39 setWebsite(data.website)40 setAvatarUrl(data.avatar_url)41 }42 } catch (error) {43 alert('Error loading user data!')44 } finally {45 setLoading(false)46 }47 }, [claims, supabase])4849 useEffect(() => {50 getProfile()51 }, [claims, getProfile])5253 async function updateProfile({54 username,55 website,56 avatar_url,57 }: {58 username: string | null59 fullname: string | null60 website: string | null61 avatar_url: string | null62 }) {63 try {64 if (!claims?.sub) {65 alert('You must be logged in to update your profile')66 return67 }6869 setLoading(true)7071 const { error } = await supabase.from('profiles').upsert({72 id: claims.sub,73 full_name: fullname,74 username,75 website,76 avatar_url,77 updated_at: new Date().toISOString(),78 })79 if (error) throw error80 alert('Profile updated!')81 } catch (error) {82 alert('Error updating the data!')83 } finally {84 setLoading(false)85 }86 }8788 return (89 <div className="form-widget">90 <Avatar91 uid={claims?.sub ?? null}92 url={avatar_url}93 size={150}94 onUpload={(url) => {95 setAvatarUrl(url)96 updateProfile({ fullname, username, website, avatar_url: url })97 }}98 />99 <div>100 <label htmlFor="email">Email</label>101 <input id="email" type="text" value={claims?.email ?? ''} disabled />102 </div>103 <div>104 <label htmlFor="fullName">Full Name</label>105 <input106 id="fullName"107 type="text"108 value={fullname || ''}109 onChange={(e) => setFullname(e.target.value)}110 />111 </div>112 <div>113 <label htmlFor="username">Username</label>114 <input115 id="username"116 type="text"117 value={username || ''}118 onChange={(e) => setUsername(e.target.value)}119 />120 </div>121 <div>122 <label htmlFor="website">Website</label>123 <input124 id="website"125 type="url"126 value={website || ''}127 onChange={(e) => setWebsite(e.target.value)}128 />129 </div>130131 <div>132 <button133 className="button primary block"134 onClick={() => updateProfile({ fullname, username, website, avatar_url })}135 disabled={loading || !claims?.sub}136 >137 {loading ? 'Loading ...' : 'Update'}138 </button>139 </div>140141 <div>142 <form action="/auth/signout" method="post">143 <button className="button block" type="submit">144 Sign out145 </button>146 </form>147 </div>148 </div>149 )150}启动 #
🌐 Launch
当所有页面、路由处理器和组件都到位后,在终端窗口中运行以下命令:
🌐 With all the pages, route handlers, and components in place, run the following in a terminal window:
1npm run dev然后打开浏览器访问 localhost:3000/login,你应该能看到完整的应用。
🌐 And then open the browser to localhost:3000/login and you should see the completed app.
当你输入你的邮箱和密码时,你会收到一封标题为 确认你的邮箱 的邮件。恭喜 🎉!!!
🌐 When you enter your email and password, you will receive an email with the title Confirm your email. Congrats 🎉!!!
在这个阶段,你已经有了一个完全可用的应用!
🌐 At this stage you have a fully functional application!
另请参阅 #
🌐 See also
- 查看完整的 GitHub 示例 并将其部署到 Vercel
- 使用 Next.js 应用路由和 Supabase 构建 Twitter 克隆 - 免费的 egghead 课程
- 探索预构建的认证组件
- 探索 Supabase 缓存助手
- 看看 GitHub 上的 Next.js 订阅支付入门 模板