用 SvelteKit 构建一个用户管理应用
本教程演示了如何构建一个基本的用户管理应用。该应用可以进行用户认证和识别,将用户的个人资料信息存储在数据库中,并允许用户登录、更新他们的个人资料信息以及上传头像。该应用使用了:
🌐 This tutorial demonstrates how to build a basic user management app. The app authenticates and identifies the user, stores their profile information in the database, and allows the user to log in, update their profile details, and upload a profile photo. The app uses:
- Supabase 数据库 - 一个用于存储用户数据的 Postgres 数据库,并且有 行级安全,所以数据是受保护的,用户只能访问自己的信息。
- Supabase Auth - 允许用户注册和登录。
- Supabase 存储 - 允许用户上传个人头像。
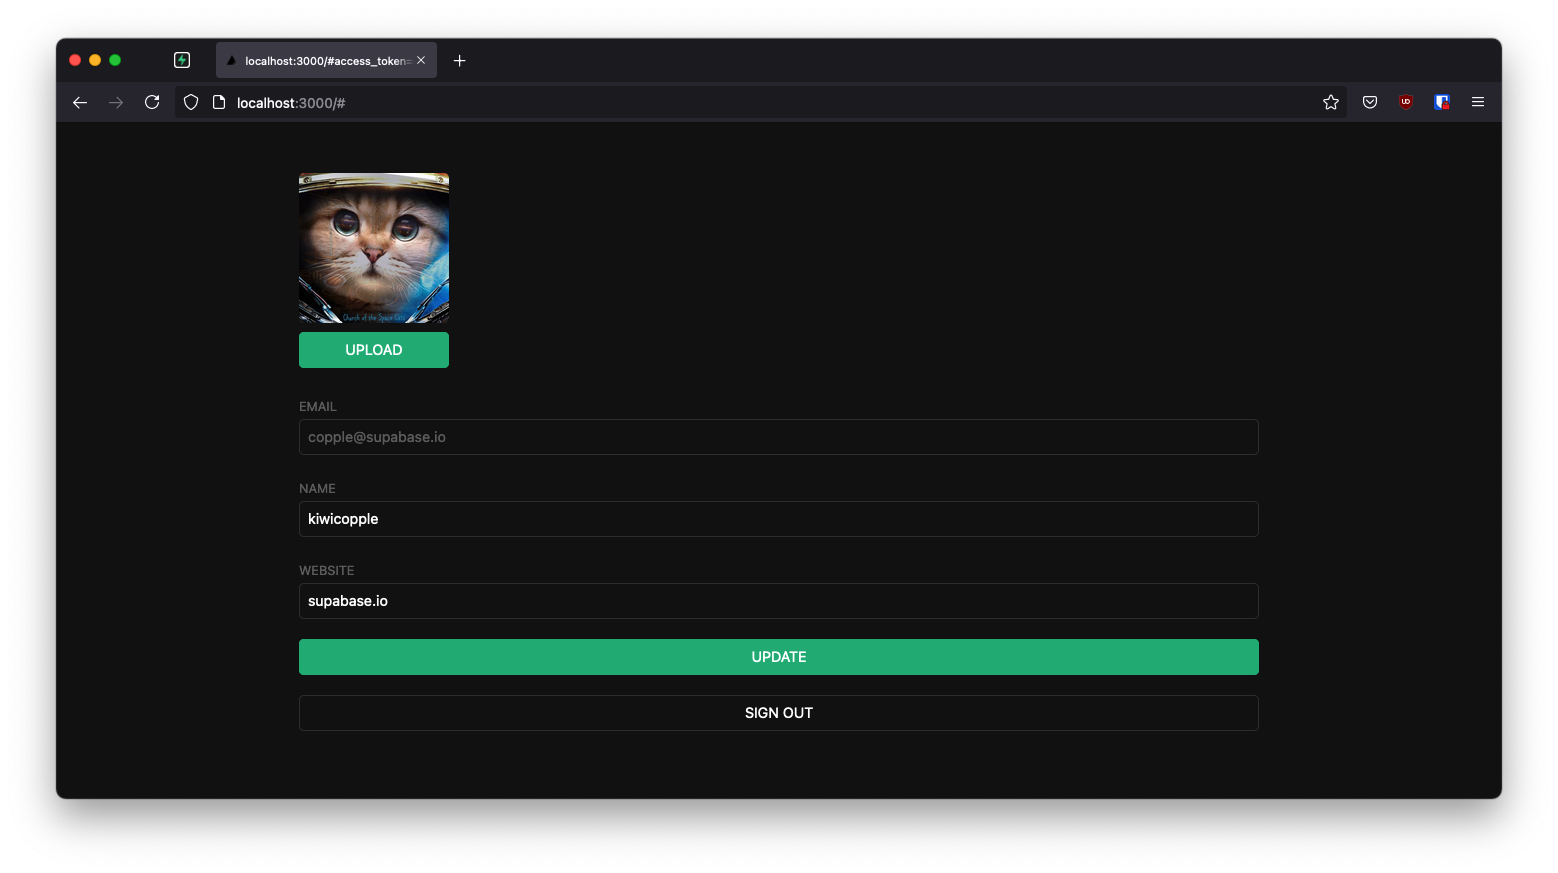
如果你在跟着这个指南操作时遇到困难,你可以在GitHub上找到完整示例。
🌐 If you get stuck while working through this guide, you can find the full example on GitHub.
项目设置 #
🌐 Project setup
在你开始构建之前,你需要先设置数据库和 API。你可以通过在 Supabase 中启动一个新项目,然后在数据库中创建一个“架构”来完成这一步。
🌐 Before you start building you need to set up the Database and API. You can do this by starting a new Project in Supabase and then creating a "schema" inside the database.
创建一个项目 #
🌐 Create a project
- 在 Supabase 仪表板中创建一个新项目。
- 输入你的项目详情。
- 等新数据库上线。
设置数据库模式 #
🌐 Set up the database schema
现在设置数据库模式。你可以在 SQL 编辑器中使用“用户管理入门”快速开始,也可以复制粘贴下面的 SQL 并运行。
🌐 Now set up the database schema. You can use the "User Management Starter" quickstart in the SQL Editor, or you can copy/paste the SQL from below and run it.
- 在仪表板中转到SQL 编辑器页面。
- 点击 社区 > 快速入门 标签下的 用户管理入门。
- 点击运行。
你可以通过运行 db pull 命令将数据库架构拉到本地项目。查看本地开发文档获取详细说明。
🌐 You can pull the database schema down to your local project by running the db pull command. Read the local development docs for detailed instructions.
1supabase link --project-ref <project-id>2# You can get <project-id> from your project's dashboard URL: https://supabase.com/dashboard/project/<project-id>3supabase db pull获取 API 详情 #
🌐 Get API details
要与数据库表中的数据进行交互,你可以使用封装了自动生成的数据 API 端点的客户端库,并使用来自项目 Connect 对话框的项目 URL 和密钥进行认证。
🌐 To interact with data in database tables, you use the client libraries that wrap the auto-generated Data API endpoints, authenticating using the Project URL and key from the project Connect dialog.
阅读 API 密钥文档 以全面了解所有密钥类型、用途以及在哪里可以找到它们。
正在构建应用 #
🌐 Building the app
从零开始构建 Svelte 应用。
🌐 Start building the Svelte app from scratch.
初始化一个 Svelte 应用 #
🌐 Initialize a Svelte app
使用 SvelteKit Skeleton Project 初始化一个名为 supabase-sveltekit 的应用(在本教程中,选择“SvelteKit minimal”并使用 TypeScript):
🌐 Use the SvelteKit Skeleton Project to initialize an app called supabase-sveltekit (for this tutorial, select "SvelteKit minimal" and use TypeScript):
1npx sv create supabase-sveltekit2cd supabase-sveltekit3npm install然后安装 Supabase 客户端库:supabase-js
🌐 Then install the Supabase client library: supabase-js
1npm install @supabase/supabase-js最后,将环境变量保存在一个 .env 文件中。你只需要 PUBLIC_SUPABASE_URL 和之前复制的密钥 earlier 就可以了。
🌐 And finally, save the environment variables in a .env file.
All you need are the PUBLIC_SUPABASE_URL and the key that you copied earlier.
1PUBLIC_SUPABASE_URL="YOUR_SUPABASE_URL"2PUBLIC_SUPABASE_PUBLISHABLE_KEY="YOUR_SUPABASE_PUBLISHABLE_KEY"应用风格(可选) #
🌐 App styling (optional)
一个可选步骤是更新 CSS 文件 src/styles.css,让应用看起来更好看。你可以在示例仓库中找到这个文件的完整内容。
🌐 An optional step is to update the CSS file src/styles.css to make the app look nice.
You can find the full contents of this file in the example repository.
为 SSR 创建 Supabase 客户端 #
🌐 Creating a Supabase client for SSR
ssr 包配置 Supabase 使用 Cookies,这对于服务器端语言和框架是必需的。
🌐 The ssr package configures Supabase to use Cookies, which are required for server-side languages and frameworks.
安装 SSR 包:
🌐 Install the SSR package:
1npm install @supabase/ssr使用 ssr 包创建 Supabase 客户端时,它会自动配置为使用 Cookies。这意味着用户的会话可以在整个 SvelteKit 栈中使用——页面、布局、服务器和钩子。
🌐 Creating a Supabase client with the ssr package automatically configures it to use Cookies. This means the user's session is available throughout the entire SvelteKit stack - page, layout, server, and hooks.
将下面的代码添加到一个 src/hooks.server.ts 文件中,以在服务器上初始化客户端:
🌐 Add the code below to a src/hooks.server.ts file to initialize the client on the server:
1// src/hooks.server.ts2import { PUBLIC_SUPABASE_URL, PUBLIC_SUPABASE_PUBLISHABLE_KEY } from '$env/static/public'3import { createServerClient } from '@supabase/ssr'4import type { Handle } from '@sveltejs/kit'56export const handle: Handle = async ({ event, resolve }) => {7 event.locals.supabase = createServerClient(PUBLIC_SUPABASE_URL, PUBLIC_SUPABASE_PUBLISHABLE_KEY, {8 cookies: {9 getAll: () => event.cookies.getAll(),10 /**11 * Note: You have to add the `path` variable to the12 * set and remove method due to sveltekit's cookie API13 * requiring this to be set, setting the path to `/`14 * will replicate previous/standard behaviour (https://kit.svelte.dev/docs/types#public-types-cookies)15 */16 setAll: (cookiesToSet, headers) => {17 cookiesToSet.forEach(({ name, value, options }) => {18 event.cookies.set(name, value, { ...options, path: '/' })19 })20 if (Object.keys(headers).length > 0) {21 event.setHeaders(headers)22 }23 },24 },25 })2627 return resolve(event, {28 filterSerializedResponseHeaders(name: string) {29 return name === 'content-range' || name === 'x-supabase-api-version'30 },31 })32}注意,auth.getSession 会从本地存储介质读取认证令牌和未编码的会话数据。除非本地会话过期,它是不会向 Supabase Auth 服务器发送请求的。
🌐 Note that auth.getSession reads the auth token and the unencoded session data from the local storage medium. It doesn't send a request back to the Supabase Auth server unless the local session is expired.
如果你在写服务器代码,绝对不要相信未编码的会话数据,因为发送方可能会篡改它。如果你需要经过验证、可靠的用户数据,应该调用 auth.getUser,它总是向认证服务器请求获取可信数据。
🌐 You should never trust the unencoded session data if you're writing server code, since it could be tampered with by the sender. If you need verified, trustworthy user data, call auth.getUser instead, which always makes a request to the Auth server to fetch trusted data.
由于本教程使用 TypeScript,编译器会对 event.locals.supabase 报错。你可以通过用下面的内容更新 src/app.d.ts 来解决这个问题:
🌐 As this tutorial uses TypeScript the compiler complains about event.locals.supabase. You can fix this by updating the src/app.d.ts with the content below:
1import type { SupabaseClient } from '@supabase/supabase-js'23import type { Database } from './database.types'45// See https://kit.svelte.dev/docs/types#app6// for information about these interfaces7declare global {8 namespace App {9 // interface Error {}10 interface Locals {11 supabase: SupabaseClient<Database>12 }13 // interface PageState {}14 // interface Platform {}15 }16}1718export {}创建一个新的 src/routes/+layout.server.ts 文件来处理服务器端的会话。
🌐 Create a new src/routes/+layout.server.ts file to handle the session on the server-side.
1// src/routes/+layout.server.ts2import type { LayoutServerLoad } from './$types'34export const load: LayoutServerLoad = async ({ cookies }) => {5 return {6 cookies: cookies.getAll(),7 }8}启动开发服务器(npm run dev)来生成我们在项目中引用的 ./$types 文件。
🌐 Start the dev server (npm run dev) to generate the ./$types files we are referencing in our project.
创建一个新的 src/routes/+layout.ts 文件来处理客户端的会话和 supabase 对象。
🌐 Create a new src/routes/+layout.ts file to handle the session and the supabase object on the client-side.
1// src/routes/+layout.ts2import { PUBLIC_SUPABASE_PUBLISHABLE_KEY, PUBLIC_SUPABASE_URL } from '$env/static/public'3import type { LayoutLoad } from './$types'4import { createBrowserClient, createServerClient, isBrowser } from '@supabase/ssr'56export const load: LayoutLoad = async ({ fetch, data, depends }) => {7 depends('supabase:auth')89 const supabase = isBrowser()10 ? createBrowserClient(PUBLIC_SUPABASE_URL, PUBLIC_SUPABASE_PUBLISHABLE_KEY, {11 global: {12 fetch,13 },14 })15 : createServerClient(PUBLIC_SUPABASE_URL, PUBLIC_SUPABASE_PUBLISHABLE_KEY, {16 global: {17 fetch,18 },19 cookies: {20 getAll() {21 return data.cookies22 },23 },24 })2526 /**27 * `getClaims` validates the JWT signature locally (for asymmetric keys) once28 * the relevant signing keys are available or cached, and returns the decoded29 * claims. While an initial or periodic network request may be required to30 * fetch or refresh keys, this is both faster and safer than `getSession`,31 * which does not validate the JWT.32 */33 const { data: claimsData, error } = await supabase.auth.getClaims()34 const claims = error ? null : claimsData?.claims3536 return { supabase, claims }37}创建 src/routes/+layout.svelte:
🌐 Create src/routes/+layout.svelte:
1<!-- src/routes/+layout.svelte -->2<script lang="ts">3 import '../styles.css'4 import { invalidate } from '$app/navigation'5 import { onMount } from 'svelte'67 let { data, children } = $props()8 let { supabase, claims } = $derived(data)910 onMount(() => {11 const { data } = supabase.auth.onAuthStateChange((event, _session) => {12 if (_session?.expires_at !== claims?.exp) {13 invalidate('supabase:auth')14 }15 })1617 return () => data.subscription.unsubscribe()18 })19</script>2021<svelte:head>22 <title>User Management</title>23</svelte:head>2425<div class="container" style="padding: 50px 0 100px 0">26 {@render children()}27</div>设置一个登录页面 #
🌐 Set up a login page
通过更新 routes/+page.svelte 文件,为你的应用创建一个魔法链接登录/注册页面:
🌐 Create a magic link login/signup page for your application by updating the routes/+page.svelte file:
1<!-- src/routes/+page.svelte -->2<script lang="ts">3 import { enhance } from '$app/forms'4 import type { ActionData, SubmitFunction } from './$types.js'56 interface Props {7 form: ActionData8 }9 let { form }: Props = $props()1011 let loading = $state(false)1213 const handleSubmit: SubmitFunction = () => {14 loading = true15 return async ({ update }) => {16 update()17 loading = false18 }19 }20</script>2122<svelte:head>23 <title>User Management</title>24</svelte:head>2526<form class="row flex flex-center" method="POST" use:enhance={handleSubmit}>27 <div class="col-6 form-widget">28 <h1 class="header">Supabase + SvelteKit</h1>29 <p class="description">Sign in via magic link with your email below</p>30 {#if form?.message !== undefined}31 <div class="success {form?.success ? '' : 'fail'}">32 {form?.message}33 </div>34 {/if}35 <div>36 <label for="email">Email address</label>37 <input 38 id="email" 39 name="email" 40 class="inputField" 41 type="email" 42 placeholder="Your email" 43 value={form?.email ?? ''} 44 />45 </div>46 {#if form?.errors?.email}47 <span class="flex items-center text-sm error">48 {form?.errors?.email}49 </span>50 {/if}51 <div>52 <button class="button primary block">53 { loading ? 'Loading' : 'Send magic link' }54 </button>55 </div>56 </div>57</form>创建一个 src/routes/+page.server.ts 文件来处理提交时的魔法链接表单。
🌐 Create a src/routes/+page.server.ts file that handles the magic link form when submitted.
1// src/routes/+page.server.ts2import { fail, redirect } from '@sveltejs/kit'3import type { Actions, PageServerLoad } from './$types'45export const load: PageServerLoad = async ({ url, locals: { supabase } }) => {6 const { data, error } = await supabase.auth.getClaims()78 // if the user is already logged in return them to the account page9 if (!error && data?.claims) {10 redirect(303, '/account')11 }1213 return { url: url.origin }14}1516export const actions: Actions = {17 default: async (event) => {18 const {19 url,20 request,21 locals: { supabase },22 } = event23 const formData = await request.formData()24 const email = formData.get('email') as string25 const validEmail = /^[\w-\.+]+@([\w-]+\.)+[\w-]{2,8}$/.test(email)2627 if (!validEmail) {28 return fail(400, { errors: { email: 'Please enter a valid email address' }, email })29 }3031 const { error } = await supabase.auth.signInWithOtp({ email })3233 if (error) {34 return fail(400, {35 success: false,36 email,37 message: `There was an issue, Please contact support.`,38 })39 }4041 return {42 success: true,43 message: 'Please check your email for a magic link to log into the website.',44 }45 },46}电子邮件模板 #
🌐 Email template
把电子邮件模板改成支持服务器端认证流程。
🌐 Change the email template to support a server-side authentication flow.
在继续之前,先修改一下邮件模板,让它支持发送令牌哈希:
🌐 Before proceeding, change the email template to support sending a token hash:
- 在项目控制面板中,进入 Auth > Emails 页面。
- 选择 确认注册 模板。
- 把
{{ .ConfirmationURL }}改成{{ .SiteURL }}/auth/confirm?token_hash={{ .TokenHash }}&type=email。 - 对 Magic link 模板重复上一步操作。
你知道吗?
你还可以自定义发送给新用户的邮件,包括邮件的外观、内容和查询参数。查看你项目的设置。
🌐 You can also customize emails sent out to new users, including the email's looks, content, and query parameters. Check out the settings of your project.
确认端点 #
🌐 Confirmation endpoint
由于这是一个服务器端渲染(SSR)环境,你需要创建一个服务器端点来负责将 token_hash 兑换为会话。
🌐 As this is a server-side rendering (SSR) environment, you need to create a server endpoint responsible for exchanging the token_hash for a session.
下面的代码片段执行以下步骤:
🌐 The following code snippet performs the following steps:
- 使用
token_hash查询参数从 Supabase Auth 服务器获取返回的token_hash。 - 用这个
token_hash交换一个会话,然后你把它存储起来(在这个例子里是存到 cookies 里)。 - 最后,把用户重定向到
account页面或error页面。
1// src/routes/auth/confirm/+server.js2import type { EmailOtpType } from '@supabase/supabase-js'3import { redirect } from '@sveltejs/kit'45import type { RequestHandler } from './$types'67export const GET: RequestHandler = async ({ url, locals: { supabase } }) => {8 const token_hash = url.searchParams.get('token_hash')9 const type = url.searchParams.get('type') as EmailOtpType | null10 const next = url.searchParams.get('next') ?? '/account'1112 /**13 * Clean up the redirect URL by deleting the Auth flow parameters.14 *15 * `next` is preserved for now, because it's needed in the error case.16 */17 const redirectTo = new URL(url)18 redirectTo.pathname = next19 redirectTo.searchParams.delete('token_hash')20 redirectTo.searchParams.delete('type')2122 if (token_hash && type) {23 const { error } = await supabase.auth.verifyOtp({ type, token_hash })24 if (!error) {25 redirectTo.searchParams.delete('next')26 redirect(303, redirectTo)27 }28 }2930 redirectTo.pathname = '/auth/error'31 redirect(303, redirectTo)32}身份验证出错页面 #
🌐 Authentication error page
如果确认令牌时出现错误,就把用户重定向到错误页面。
🌐 If there is an error with confirming the token, redirect the user to an error page.
1<p>Login error</p>账户页面 #
🌐 Account page
用户登录后,需要能够编辑他们的个人资料详情页。
创建一个新的 src/routes/account/+page.svelte 文件,内容如下。
🌐 After a user signs in, they need to be able to edit their profile details page.
Create a new src/routes/account/+page.svelte file with the content below.
1<script lang="ts">2 import { enhance } from '$app/forms';3 import type { SubmitFunction } from '@sveltejs/kit';45 // ...67 let { data, form } = $props()8 let { claims, supabase, profile } = $derived(data)9 let profileForm: HTMLFormElement10 let loading = $state(false)11 let fullName: string = profile?.full_name ?? ''12 let username: string = profile?.username ?? ''13 let website: string = profile?.website ?? ''1415 // ...1617 const handleSubmit: SubmitFunction = () => {18 loading = true19 return async ({ update }) => {20 loading = false21 update()22 }23 }2425 const handleSignOut: SubmitFunction = () => {26 loading = true27 return async ({ update }) => {28 loading = false29 update()30 }31 }32</script>3334<div class="form-widget">35 <form36 class="form-widget"37 method="post"38 action="?/update"39 use:enhance={handleSubmit}40 bind:this={profileForm}4142 // ...4344 <div>45 <label for="email">Email</label>46 <input id="email" type="text" value={claims?.email ?? ''} disabled />47 </div>4849 <div>50 <label for="fullName">Full Name</label>51 <input id="fullName" name="fullName" type="text" value={form?.fullName ?? fullName} />52 </div>5354 <div>55 <label for="username">Username</label>56 <input id="username" name="username" type="text" value={form?.username ?? username} />57 </div>5859 <div>60 <label for="website">Website</label>61 <input id="website" name="website" type="url" value={form?.website ?? website} />62 </div>6364 <div>65 <input66 type="submit"67 class="button block primary"68 value={loading ? 'Loading...' : 'Update'}69 disabled={loading}70 />71 </div>72 </form>7374 <form method="post" action="?/signout" use:enhance={handleSignOut}>75 <div>76 <button class="button block" disabled={loading}>Sign Out</button>77 </div>78 </form>79</div>现在,创建关联的 src/routes/account/+page.server.ts 文件,通过 load 函数从服务器加载数据,并通过 actions 对象处理所有表单操作。
🌐 Now, create the associated src/routes/account/+page.server.ts file that handles loading data from the server through the load function
and handle all form actions through the actions object.
1import { fail, redirect } from '@sveltejs/kit'2import type { Actions, PageServerLoad } from './$types'34export const load: PageServerLoad = async ({ locals: { supabase } }) => {5 const { data: claimsData, error } = await supabase.auth.getClaims()67 if (error || !claimsData?.claims) {8 redirect(303, '/')9 }1011 const { claims } = claimsData1213 const { data: profile } = await supabase14 .from('profiles')15 .select(`username, full_name, website, avatar_url`)16 .eq('id', claims.sub)17 .single()1819 return { claims, profile }20}2122export const actions: Actions = {23 update: async ({ request, locals: { supabase } }) => {24 const formData = await request.formData()25 const fullName = formData.get('fullName') as string26 const username = formData.get('username') as string27 const website = formData.get('website') as string28 const avatarUrl = formData.get('avatarUrl') as string2930 const { data: claimsData, error: claimsError } = await supabase.auth.getClaims()3132 if (claimsError || !claimsData?.claims) {33 return fail(401, { fullName, username, website, avatarUrl })34 }3536 const { error } = await supabase.from('profiles').upsert({37 id: claimsData.claims.sub,38 full_name: fullName,39 username,40 website,41 avatar_url: avatarUrl,42 updated_at: new Date(),43 })4445 if (error) {46 return fail(500, {47 fullName,48 username,49 website,50 avatarUrl,51 })52 }5354 return {55 fullName,56 username,57 website,58 avatarUrl,59 }60 },61 signout: async ({ locals: { supabase } }) => {62 await supabase.auth.signOut()63 redirect(303, '/')64 },65}头像照片 #
🌐 Profile photos
接下来,添加一个让用户上传个人资料照片的方式。Supabase 会为每个项目配置 Storage,用于管理像照片和视频这样的大文件。
🌐 Next, add a way for users to upload a profile photo. Supabase configures every project with Storage for managing large files like photos and videos.
创建一个上传小工具 #
🌐 Create an upload widget
首先在 src/routes/account 目录下创建一个名为 Avatar.svelte 的新组件:
🌐 Start by creating a new component called Avatar.svelte in the src/routes/account directory:
1<!-- src/routes/account/Avatar.svelte -->2<script lang="ts">3 import type { SupabaseClient } from '@supabase/supabase-js'45 interface Props {6 size?: number7 url?: string8 supabase: SupabaseClient9 onupload?: () => void10 }11 let { size = 10, url = $bindable(), supabase, onupload }: Props = $props()1213 let avatarUrl: string | null = $state(null)14 let uploading = $state(false)15 let files: FileList = $state()1617 const downloadImage = async (path: string) => {18 try {19 const { data, error } = await supabase.storage.from('avatars').download(path)2021 if (error) {22 throw error23 }2425 const url = URL.createObjectURL(data)26 avatarUrl = url27 } catch (error) {28 if (error instanceof Error) {29 console.log('Error downloading image: ', error.message)30 }31 }32 }3334 const uploadAvatar = async () => {35 try {36 uploading = true3738 if (!files || files.length === 0) {39 throw new Error('You must select an image to upload.')40 }4142 const file = files[0]43 const fileExt = file.name.split('.').pop()44 const filePath = `${Math.random()}.${fileExt}`4546 const { error } = await supabase.storage.from('avatars').upload(filePath, file)4748 if (error) {49 throw error50 }5152 url = filePath53 setTimeout(() => {54 onupload?.()55 }, 100)56 } catch (error) {57 if (error instanceof Error) {58 alert(error.message)59 }60 } finally {61 uploading = false62 }63 }6465 $effect(() => {66 if (url) downloadImage(url)67 })68</script>6970<div>71 {#if avatarUrl}72 <img73 src={avatarUrl}74 alt={avatarUrl ? 'Avatar' : 'No image'}75 class="avatar image"76 style="height: {size}em; width: {size}em;"77 />78 {:else}79 <div class="avatar no-image" style="height: {size}em; width: {size}em;"></div>80 {/if}81 <input type="hidden" name="avatarUrl" value={url} />8283 <div style="width: {size}em;">84 <label class="button primary block" for="single">85 {uploading ? 'Uploading ...' : 'Upload'}86 </label>87 <input88 style="visibility: hidden; position:absolute;"89 type="file"90 id="single"91 accept="image/*"92 bind:files93 onchange={uploadAvatar}94 disabled={uploading}95 />96 </div>97</div>更新账户页面 #
🌐 Update the account page
创建了 Avatar 组件后,更新 src/routes/account/+page.svelte 来包含它:
🌐 With the Avatar component created, update src/routes/account/+page.svelte to include it:
1<script lang="ts">2 import { enhance } from '$app/forms';3 import type { SubmitFunction } from '@sveltejs/kit';4 import Avatar from './Avatar.svelte'56 let { data, form } = $props()7 let { claims, supabase, profile } = $derived(data)8 let profileForm: HTMLFormElement9 let loading = $state(false)10 let fullName: string = profile?.full_name ?? ''11 let username: string = profile?.username ?? ''12 let website: string = profile?.website ?? ''13 let avatarUrl: string = $state(profile?.avatar_url ?? '')1415 const handleSubmit: SubmitFunction = () => {16 loading = true17 return async ({ update }) => {18 loading = false19 update()20 }21 }2223 const handleSignOut: SubmitFunction = () => {24 loading = true25 return async ({ update }) => {26 loading = false27 update()28 }29 }30</script>3132<div class="form-widget">33 <form34 class="form-widget"35 method="post"36 action="?/update"37 use:enhance={handleSubmit}38 bind:this={profileForm}39 >40 <Avatar41 {supabase}42 bind:url={avatarUrl}43 size={10}44 onupload={() => {45 profileForm.requestSubmit();46 }}47 />48 <input type="hidden" name="avatarUrl" value={avatarUrl} />49 <div>50 <label for="email">Email</label>51 <input id="email" type="text" value={claims?.email ?? ''} disabled />52 </div>5354 <div>55 <label for="fullName">Full Name</label>56 <input id="fullName" name="fullName" type="text" value={form?.fullName ?? fullName} />57 </div>5859 <div>60 <label for="username">Username</label>61 <input id="username" name="username" type="text" value={form?.username ?? username} />62 </div>6364 <div>65 <label for="website">Website</label>66 <input id="website" name="website" type="url" value={form?.website ?? website} />67 </div>6869 <div>70 <input71 type="submit"72 class="button block primary"73 value={loading ? 'Loading...' : 'Update'}74 disabled={loading}75 />76 </div>77 </form>7879 <form method="post" action="?/signout" use:enhance={handleSignOut}>80 <div>81 <button class="button block" disabled={loading}>Sign Out</button>82 </div>83 </form>84</div>触发! #
🌐 Launch!
所有页面都准备好后,在终端运行这个命令:
🌐 With all the pages in place, run this command in a terminal:
1npm run dev然后打开浏览器访问 localhost:5173,你应该能看到完成的应用。
🌐 And then open the browser to localhost:5173 and you should see the completed app.
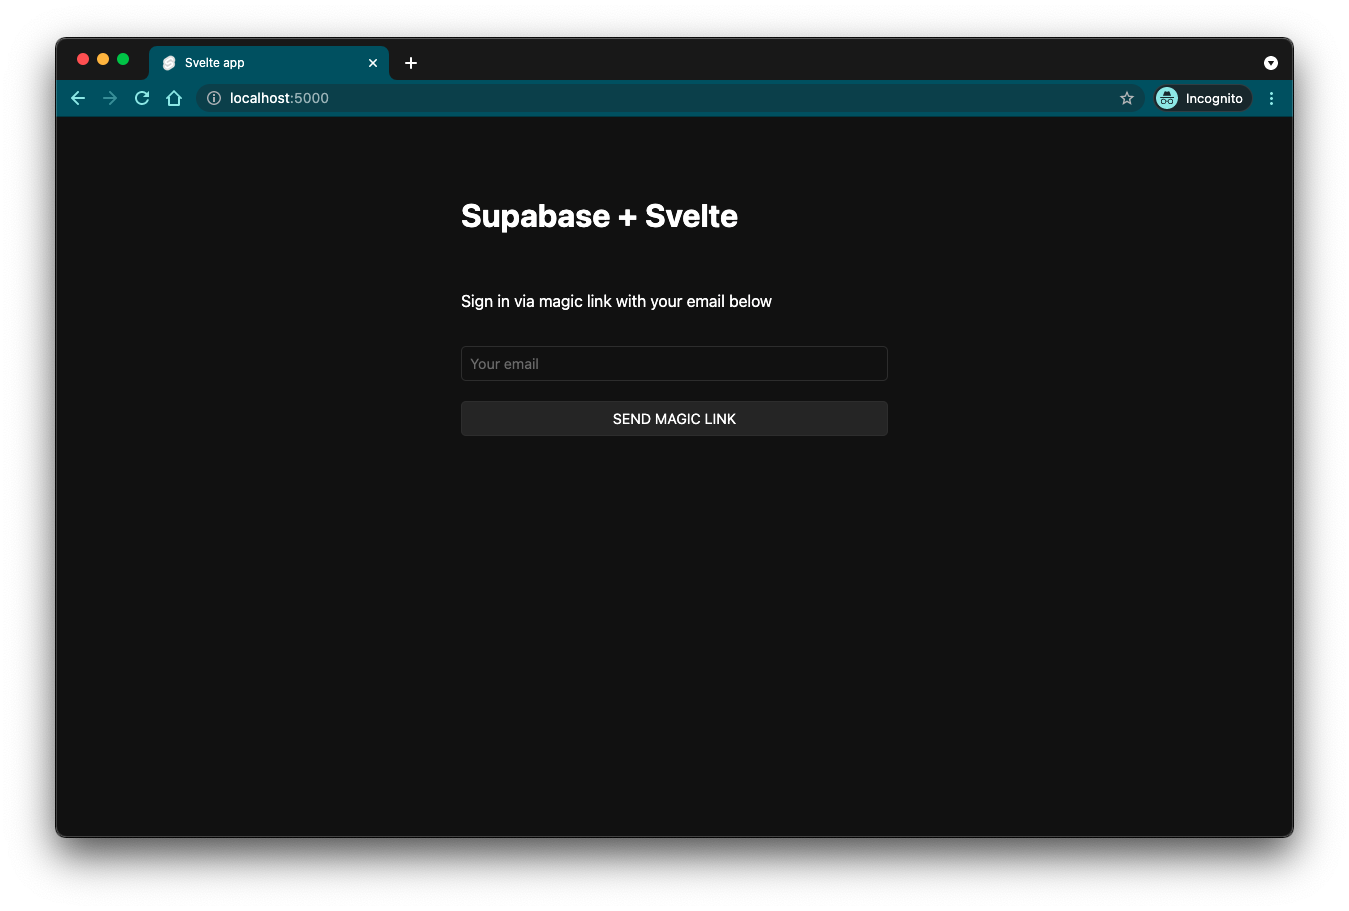
在这个阶段,你已经有了一个完全可用的应用!
🌐 At this stage you have a fully functional application!