使用 Azure AD 设置单点登录
此功能仅在团队和企业计划中可用。如果你是现有的团队或企业计划客户,请继续下面的设置。
🌐 This feature is only available on the Team and Enterprise Plans. If you are an existing Team or Enterprise Plan customer, continue with the setup below.
想找关于如何在你的 Supabase 项目中添加单点登录支持的文档吗?快去看看 项目的 SAML 2.0 单点登录 吧。
🌐 Looking for docs on how to add Single Sign-On support in your Supabase project? Head on over to Single Sign-On with SAML 2.0 for Projects.
Supabase 支持使用 Microsoft Azure AD 进行单点登录 (SSO)。
🌐 Supabase supports single sign-on (SSO) using Microsoft Azure AD.
第 1 步:添加并注册企业应用 #
🌐 Step 1: Add and register an Enterprise application [#add-and-register-enterprise-application]
打开你 Azure 账户的 Azure Active Directory 仪表板。
🌐 Open up the Azure Active Directory dashboard for your Azure account.
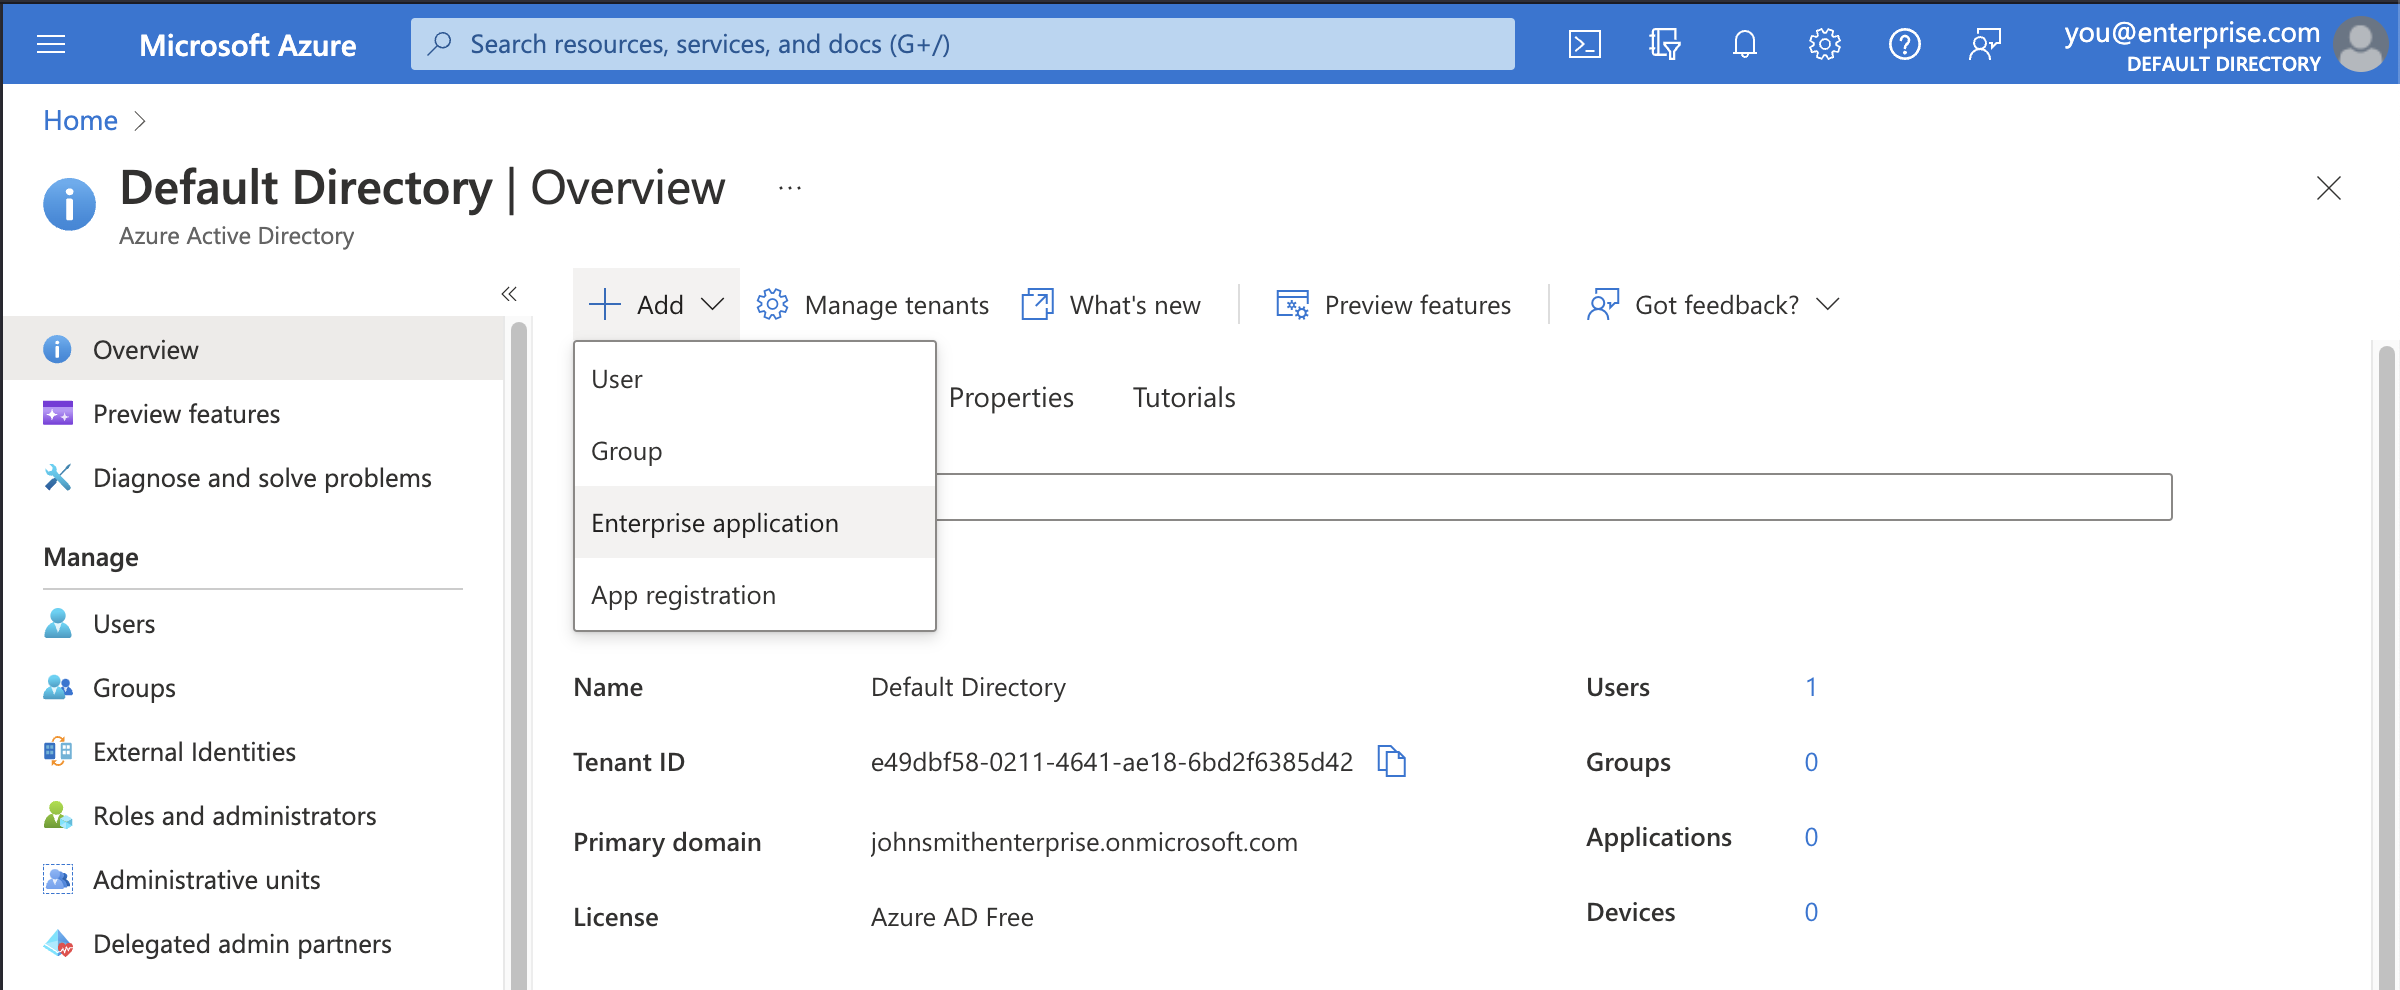
点击 添加 按钮,然后选择 企业应用。
🌐 Click the Add button then Enterprise application.
第2步:选择创建你自己的应用 #
🌐 Step 2: Choose to create your own application [#create-application]
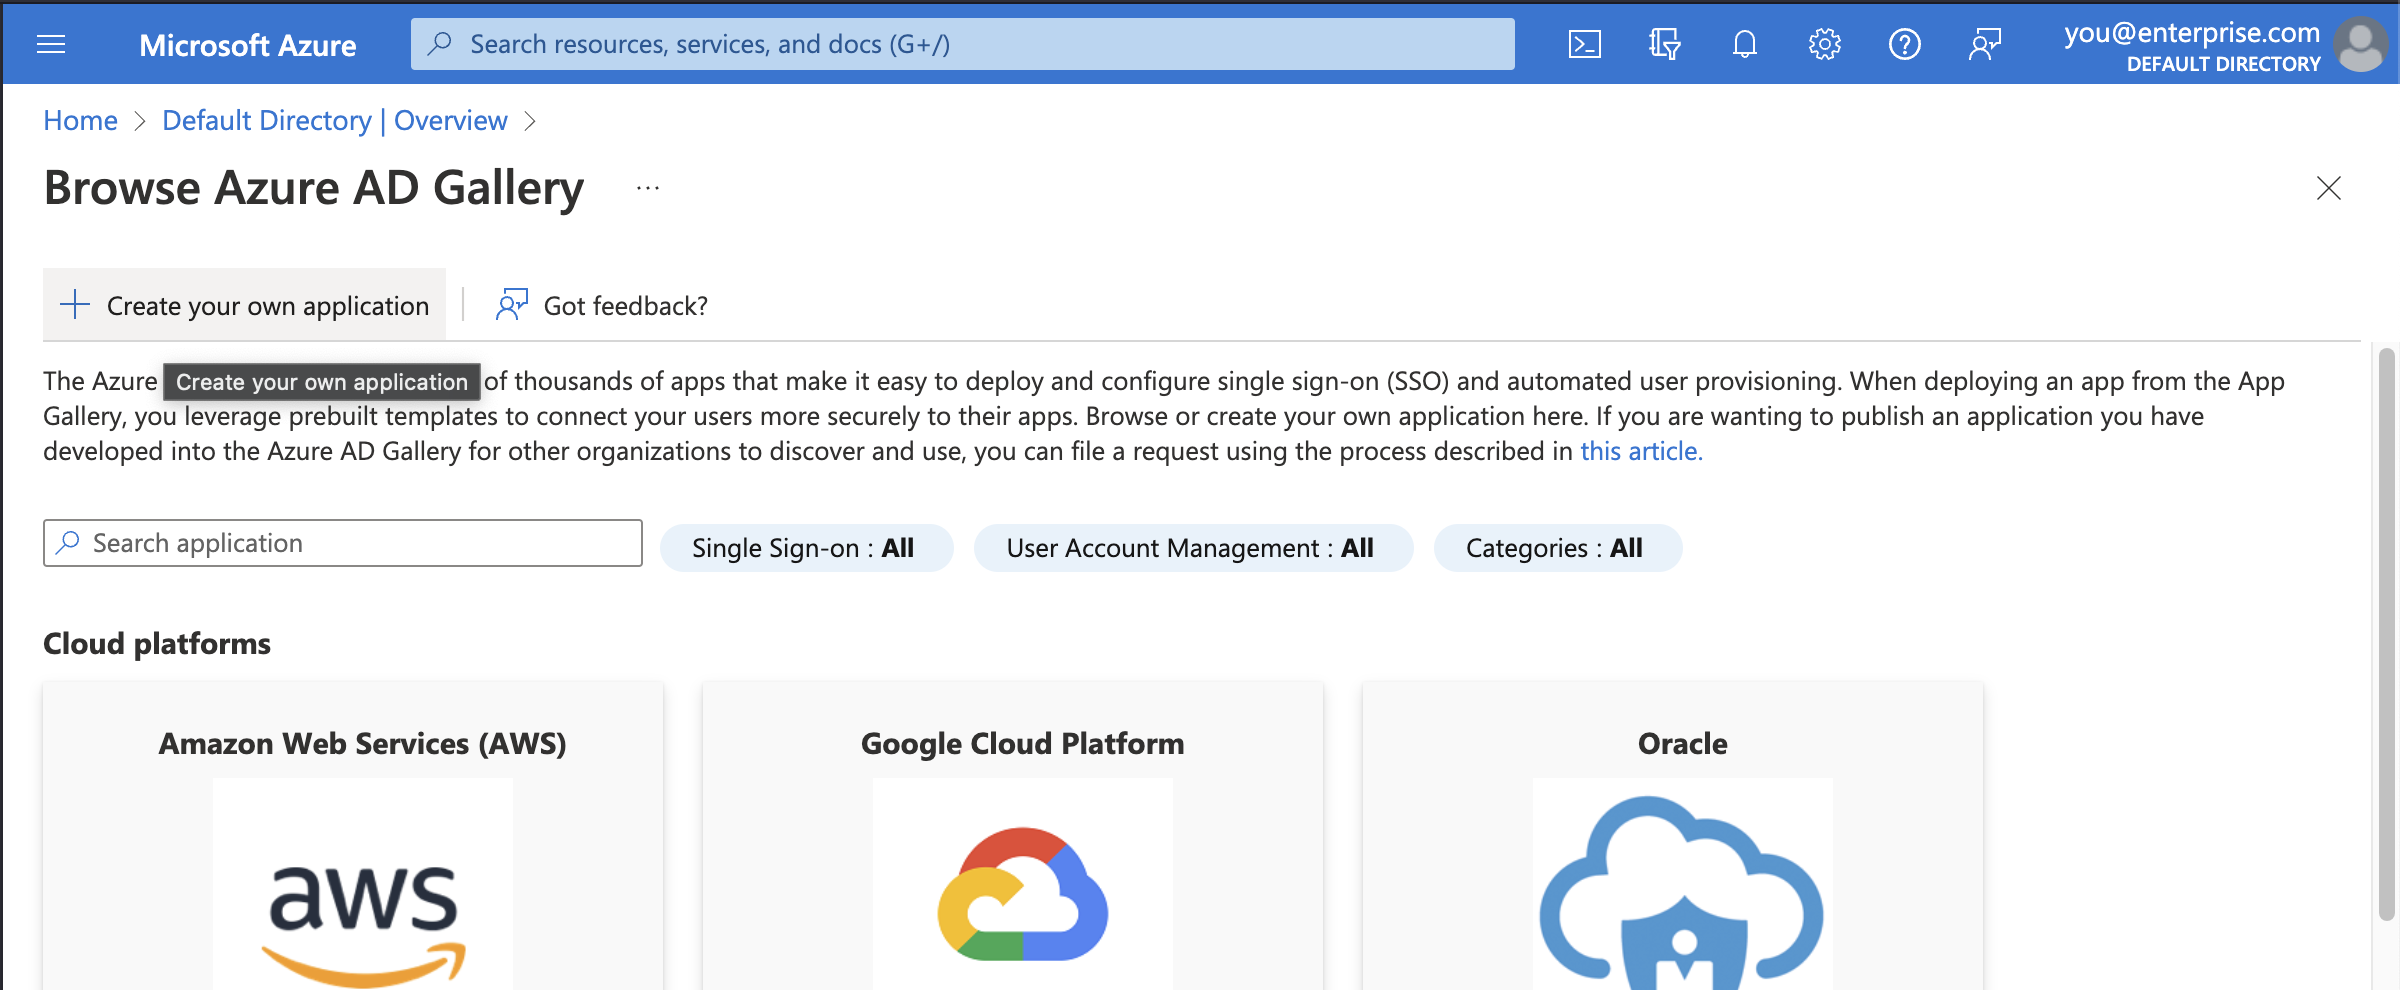
你将使用 Supabase 的自定义企业应用设置。
🌐 You'll be using the custom enterprise application setup for Supabase.
步骤3:填写申请详细信息 #
🌐 Step 3: Fill in application details [#add-application-details]
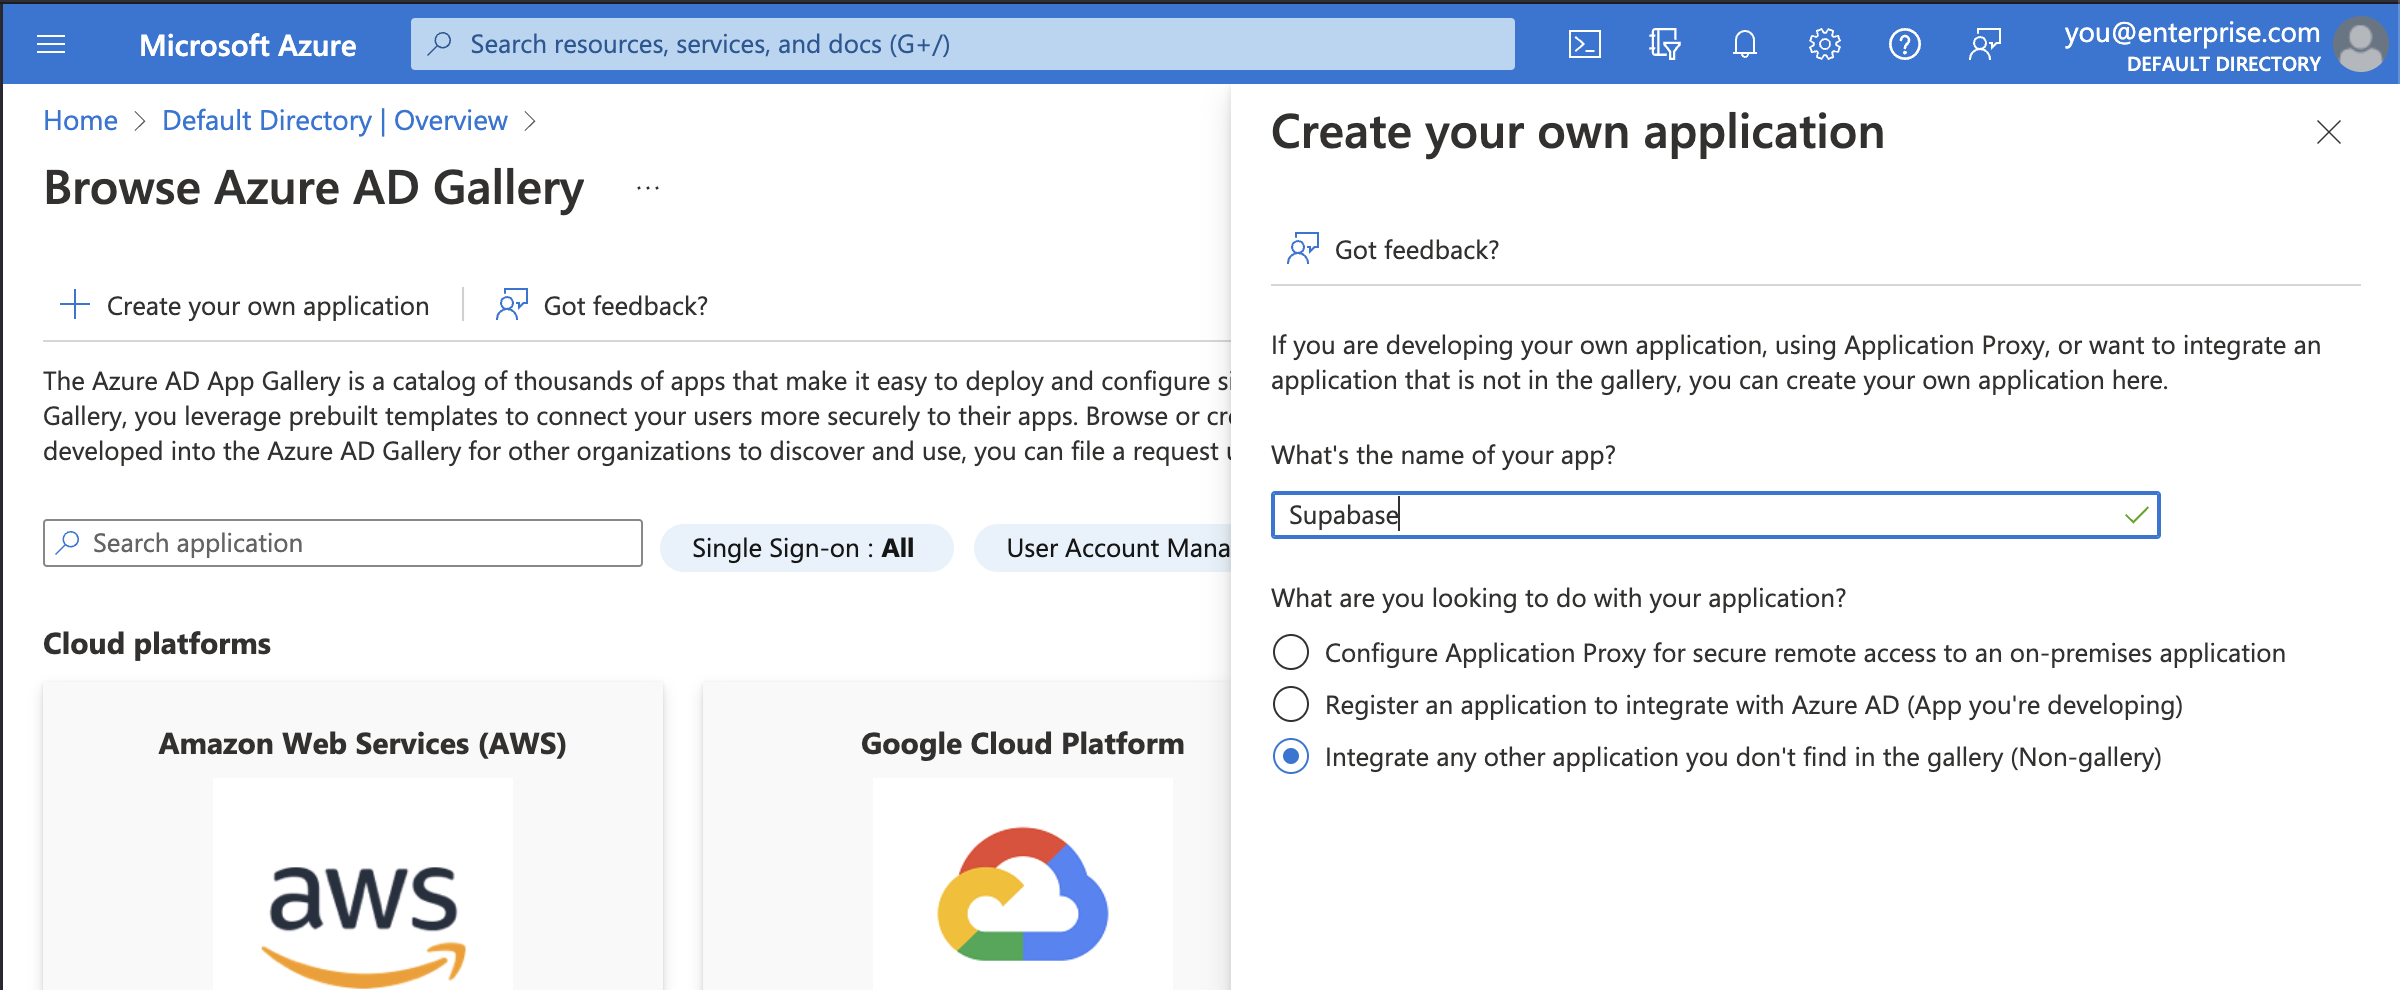
在标题为 创建你自己的应用 的模态框中,输入 Supabase 的显示名称。这是你的 Azure AD 用户从 Azure 登录 Supabase 时看到的名字。Supabase 在大多数情况下都适用。
🌐 In the modal titled Create your own application, enter a display name for Supabase. This is the name your Azure AD users will see when signing in to Supabase from Azure. Supabase works in most cases.
确保选择第三个选项:集成你在图库中找不到的任何其他应用(非图库)。
🌐 Make sure to choose the third option: Integrate any other application you don't find in the gallery (Non-gallery).
步骤 4:设置单点登录 #
🌐 Step 4: Set up single sign-on [#set-up-single-sign-on]
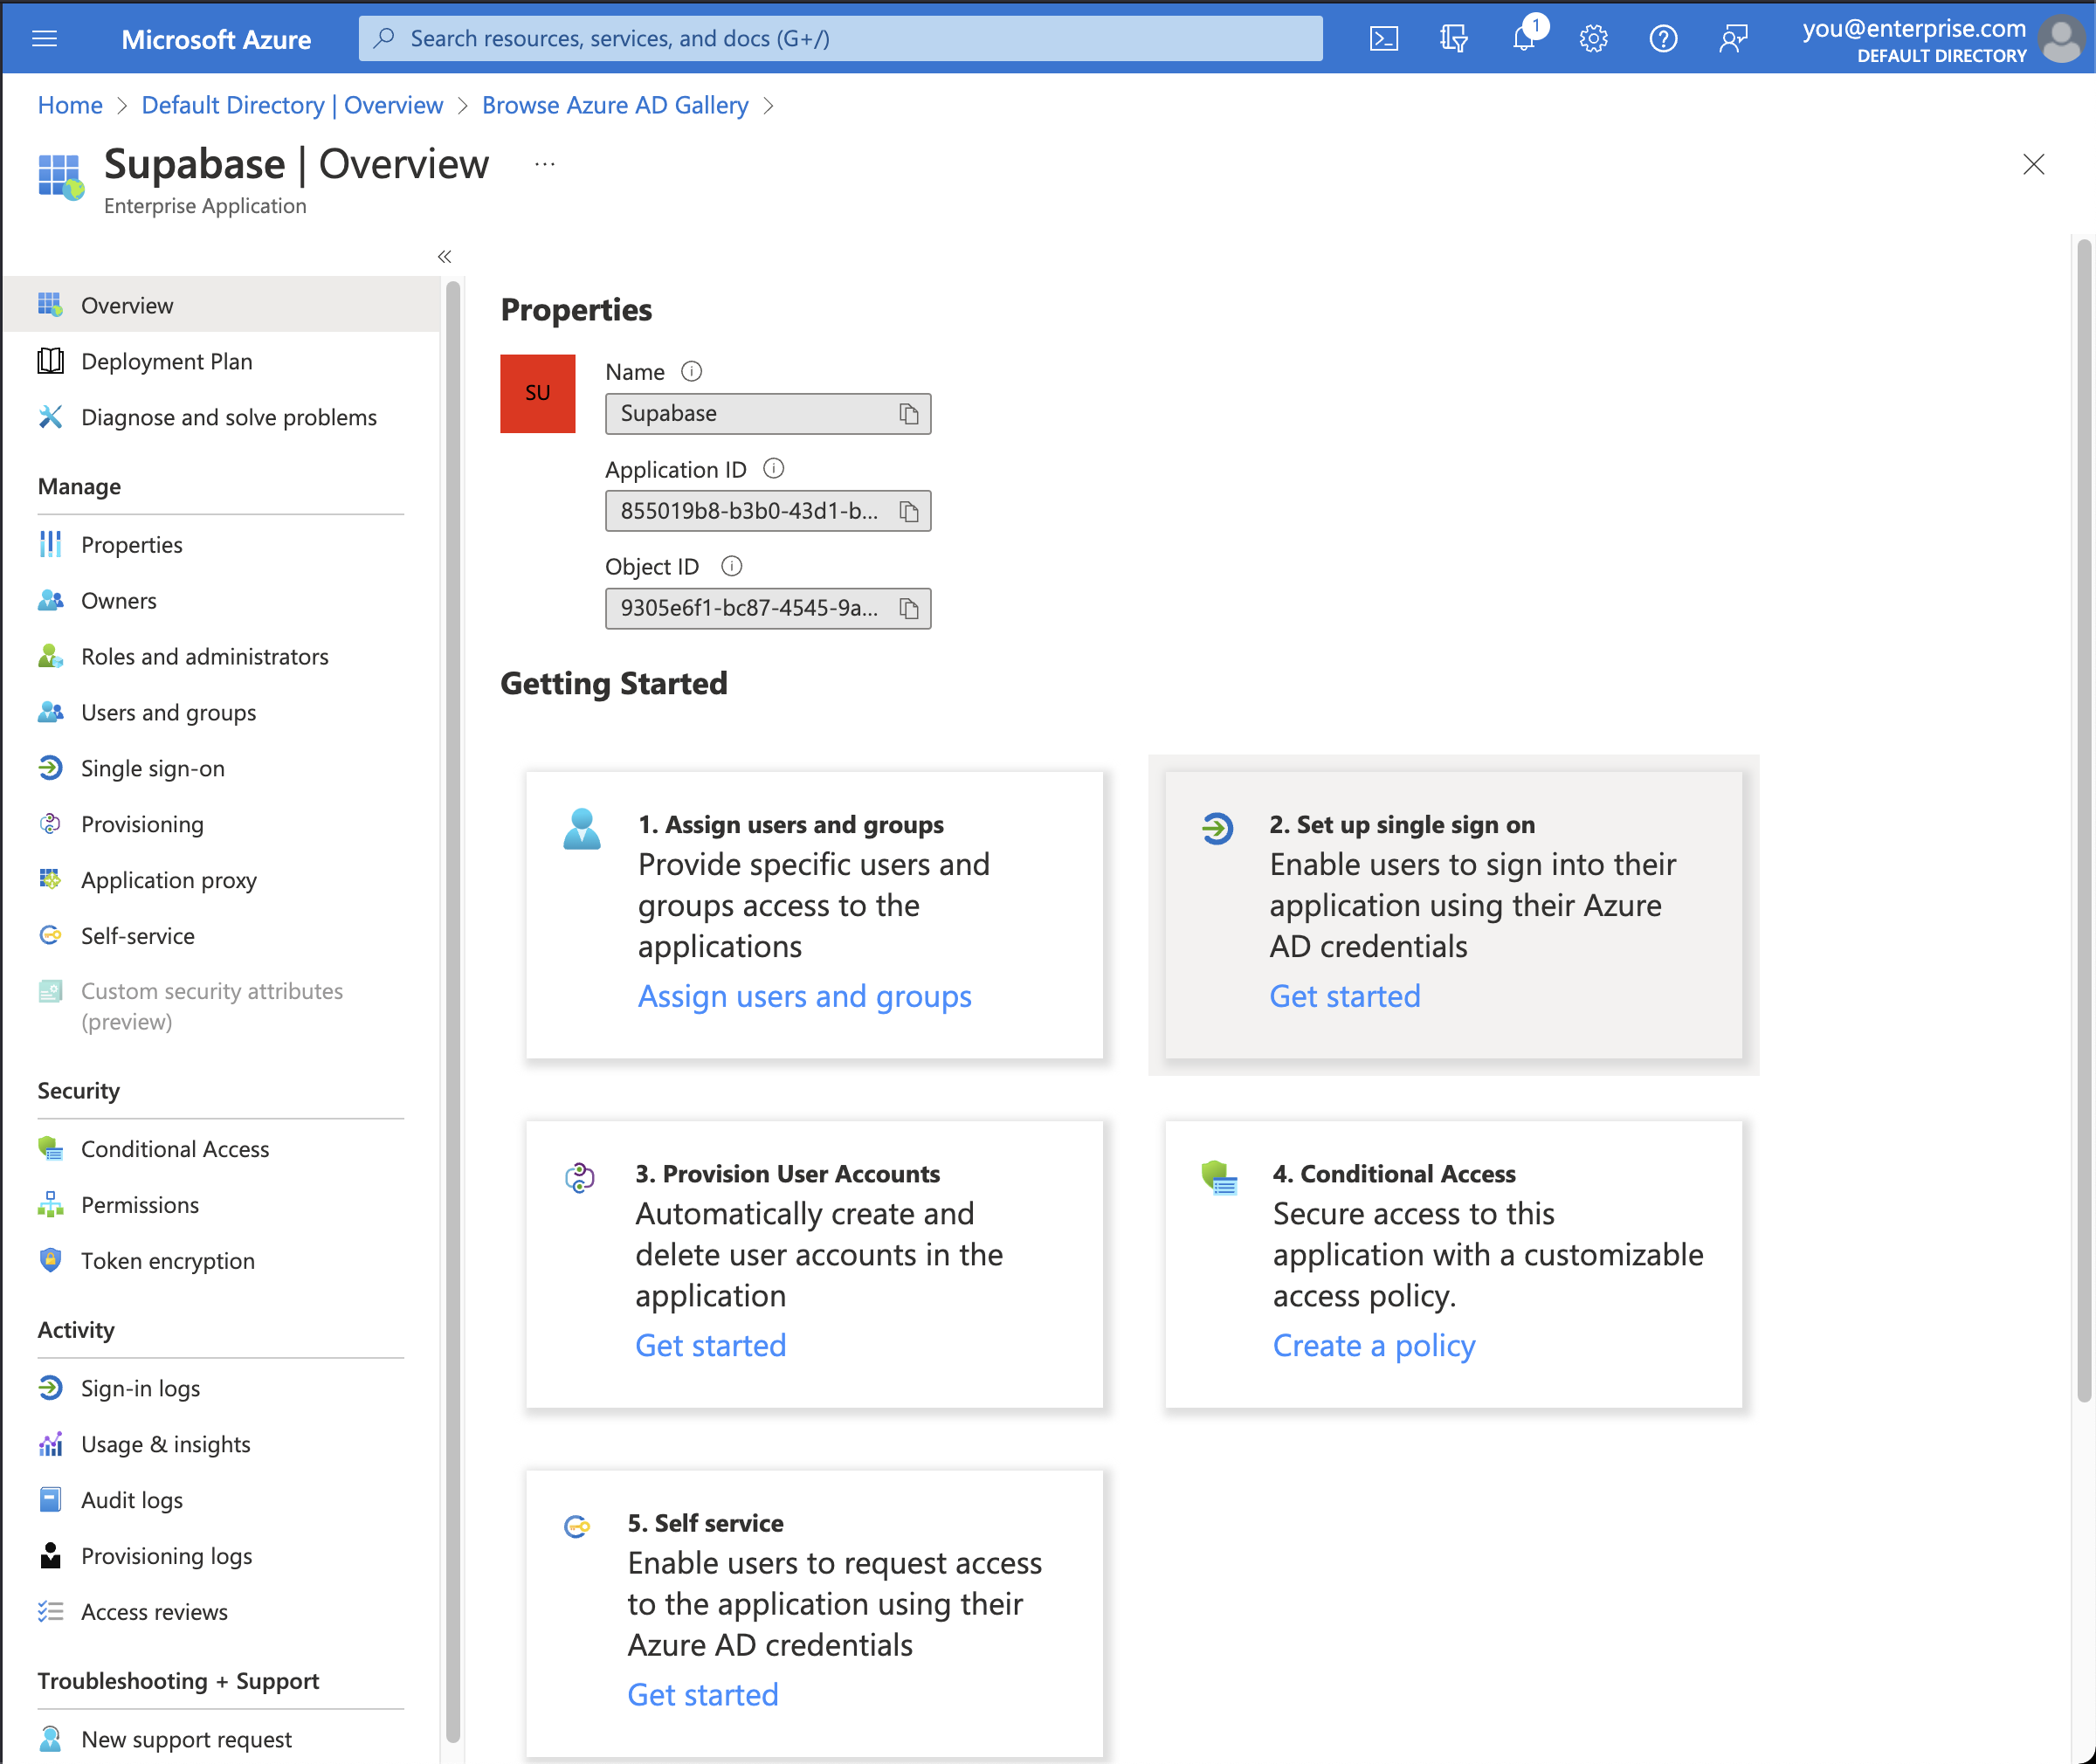
在你分配用户和组之前,这样才能让 Azure AD 的账户访问 Supabase,你需要先配置 SAML 详细信息,让 Supabase 能接受来自 Azure AD 的登录请求。
🌐 Before you get to assigning users and groups, which would allow accounts in Azure AD to access Supabase, you need to configure the SAML details that allows Supabase to accept sign in requests from Azure AD.
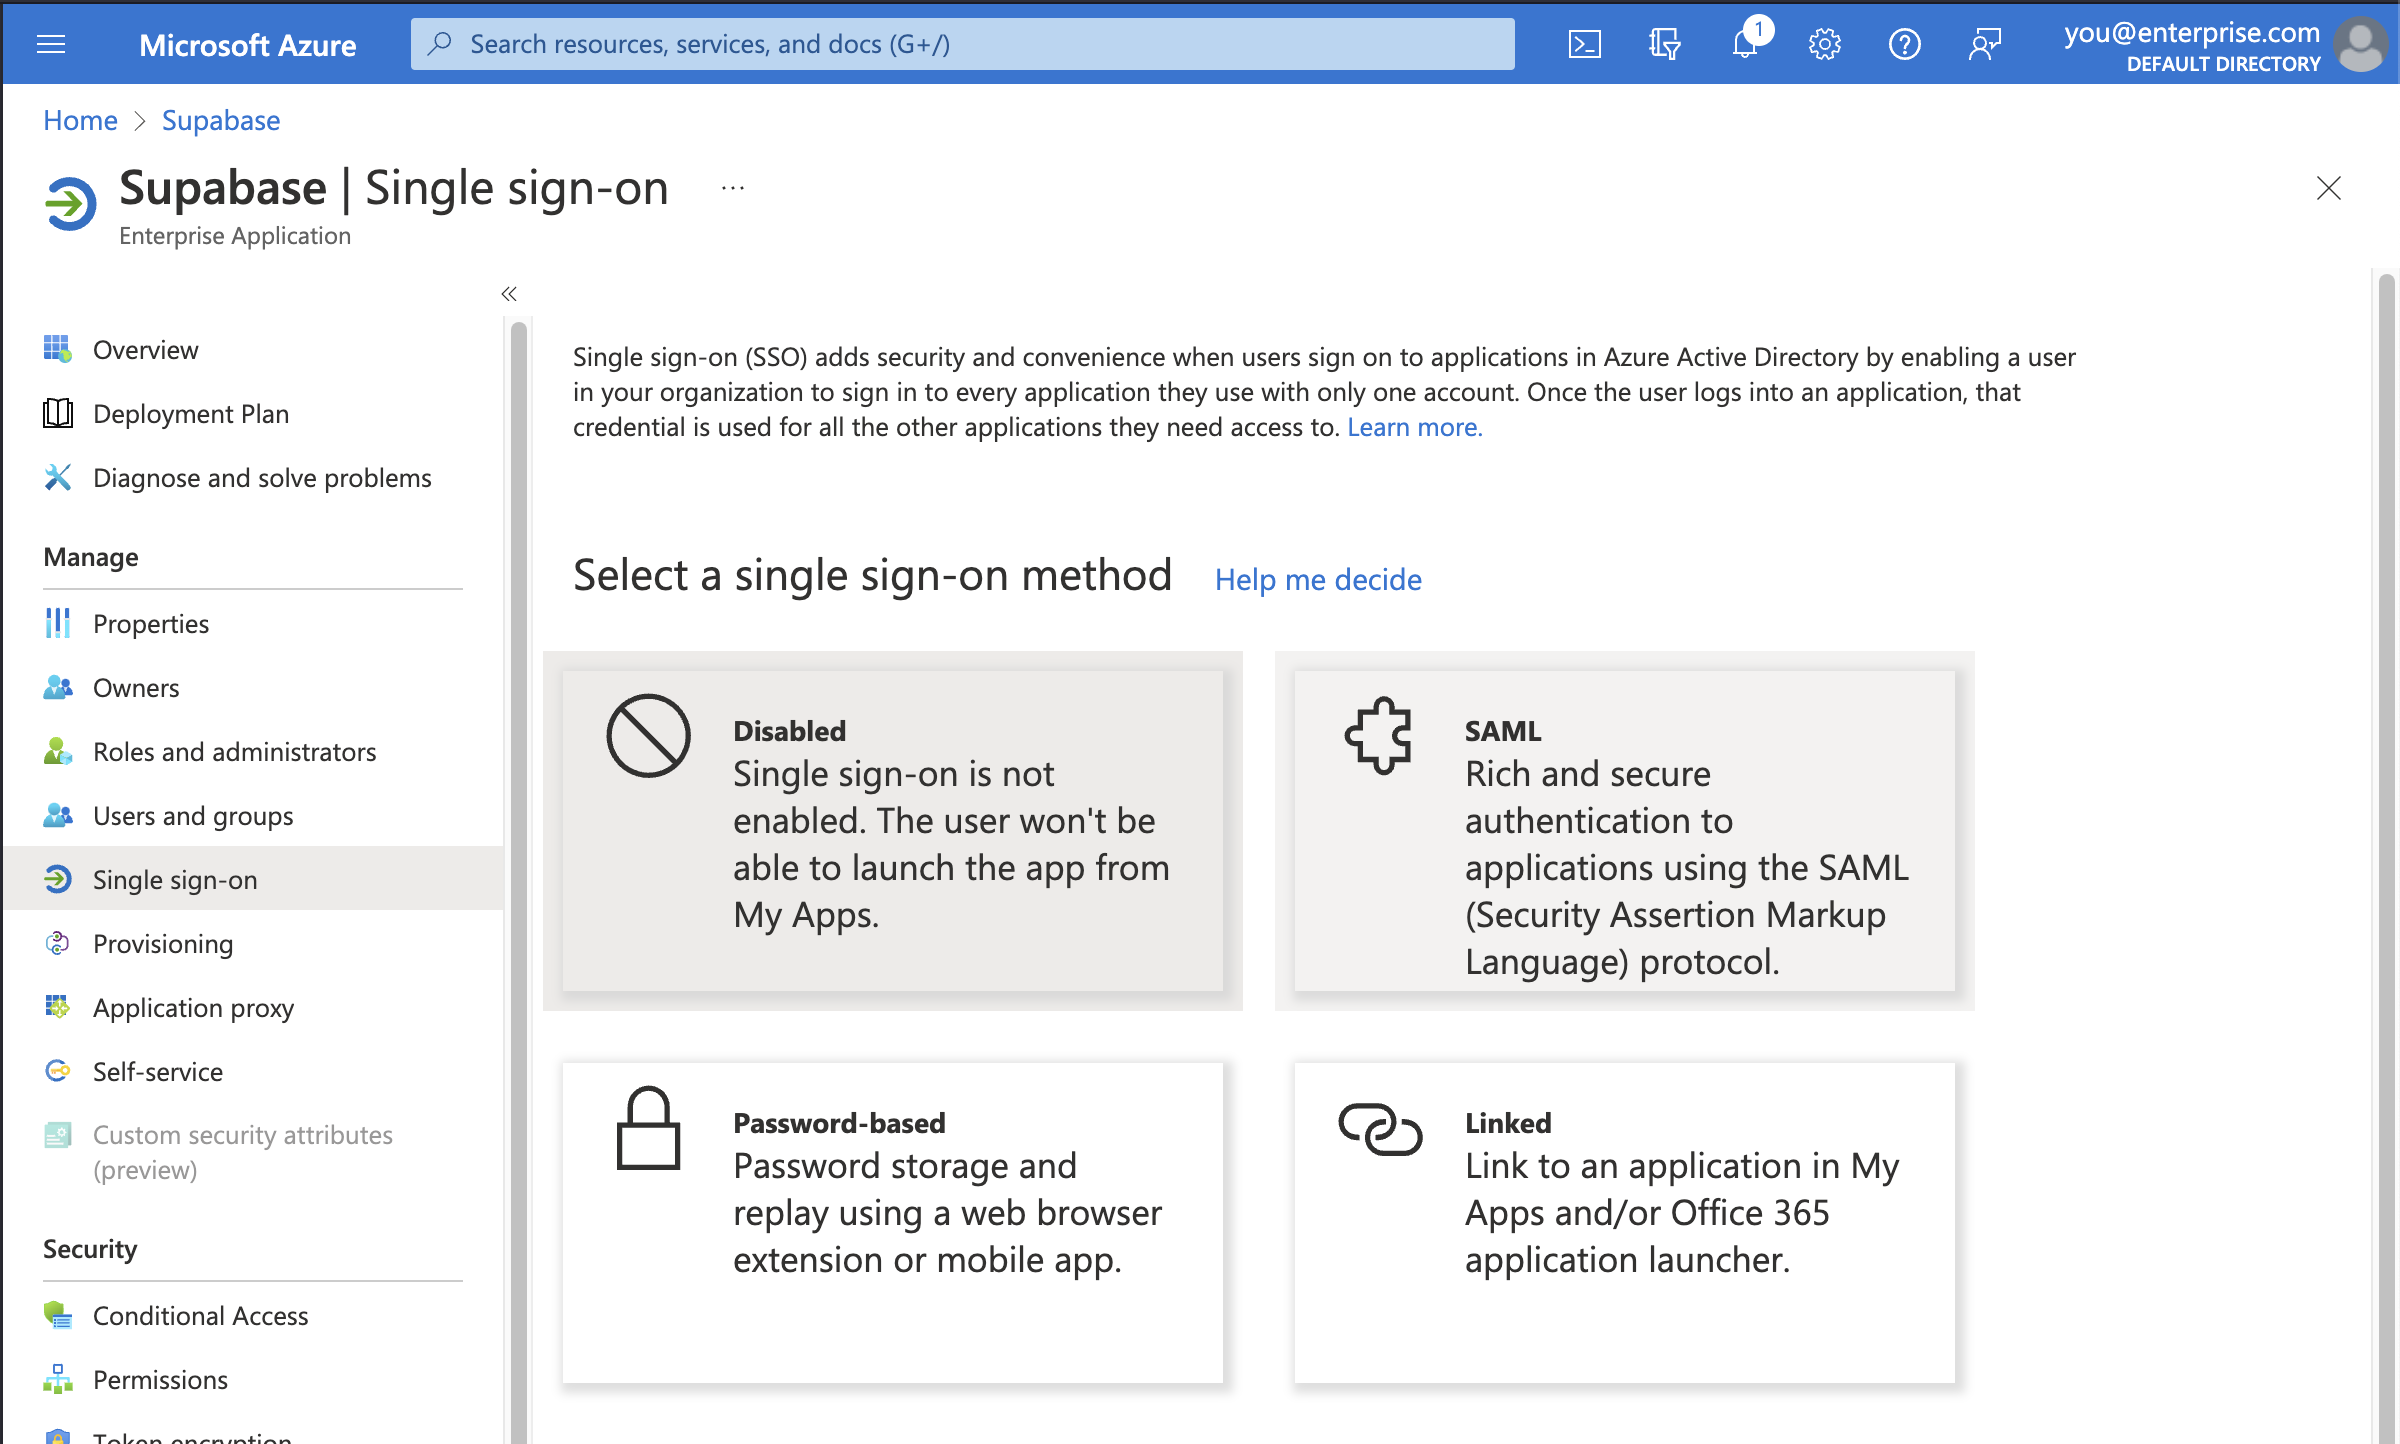
步骤5:选择SAML单点登录方法 #
🌐 Step 5: Select SAML single sign-on method [#saml-sso]
Supabase 只支持 SAML 2.0 协议进行单点登录,这是行业标准。
🌐 Supabase only supports the SAML 2.0 protocol for Single Sign-On, which is an industry standard.
第6步:上传基于SAML的单点登录元数据文件 #
🌐 Step 6: Upload SAML-based sign-on metadata file [#upload-saml-metadata]
首先,你需要下载 Supabase 的 SAML 元数据文件。点击下面的按钮即可开始下载该文件。
🌐 First you need to download Supabase's SAML metadata file. Click the button below to initiate a download of the file.
或者,访问此页面开始下载:https://alt.supabase.io/auth/v1/sso/saml/metadata?download=true
🌐 Alternatively, visit this page to initiate a download: https://alt.supabase.io/auth/v1/sso/saml/metadata?download=true
点击工具栏中的_上传元数据文件_选项,然后选择你下载的文件。
🌐 Click on the Upload metadata file option in the toolbar and select the file you downloaded.
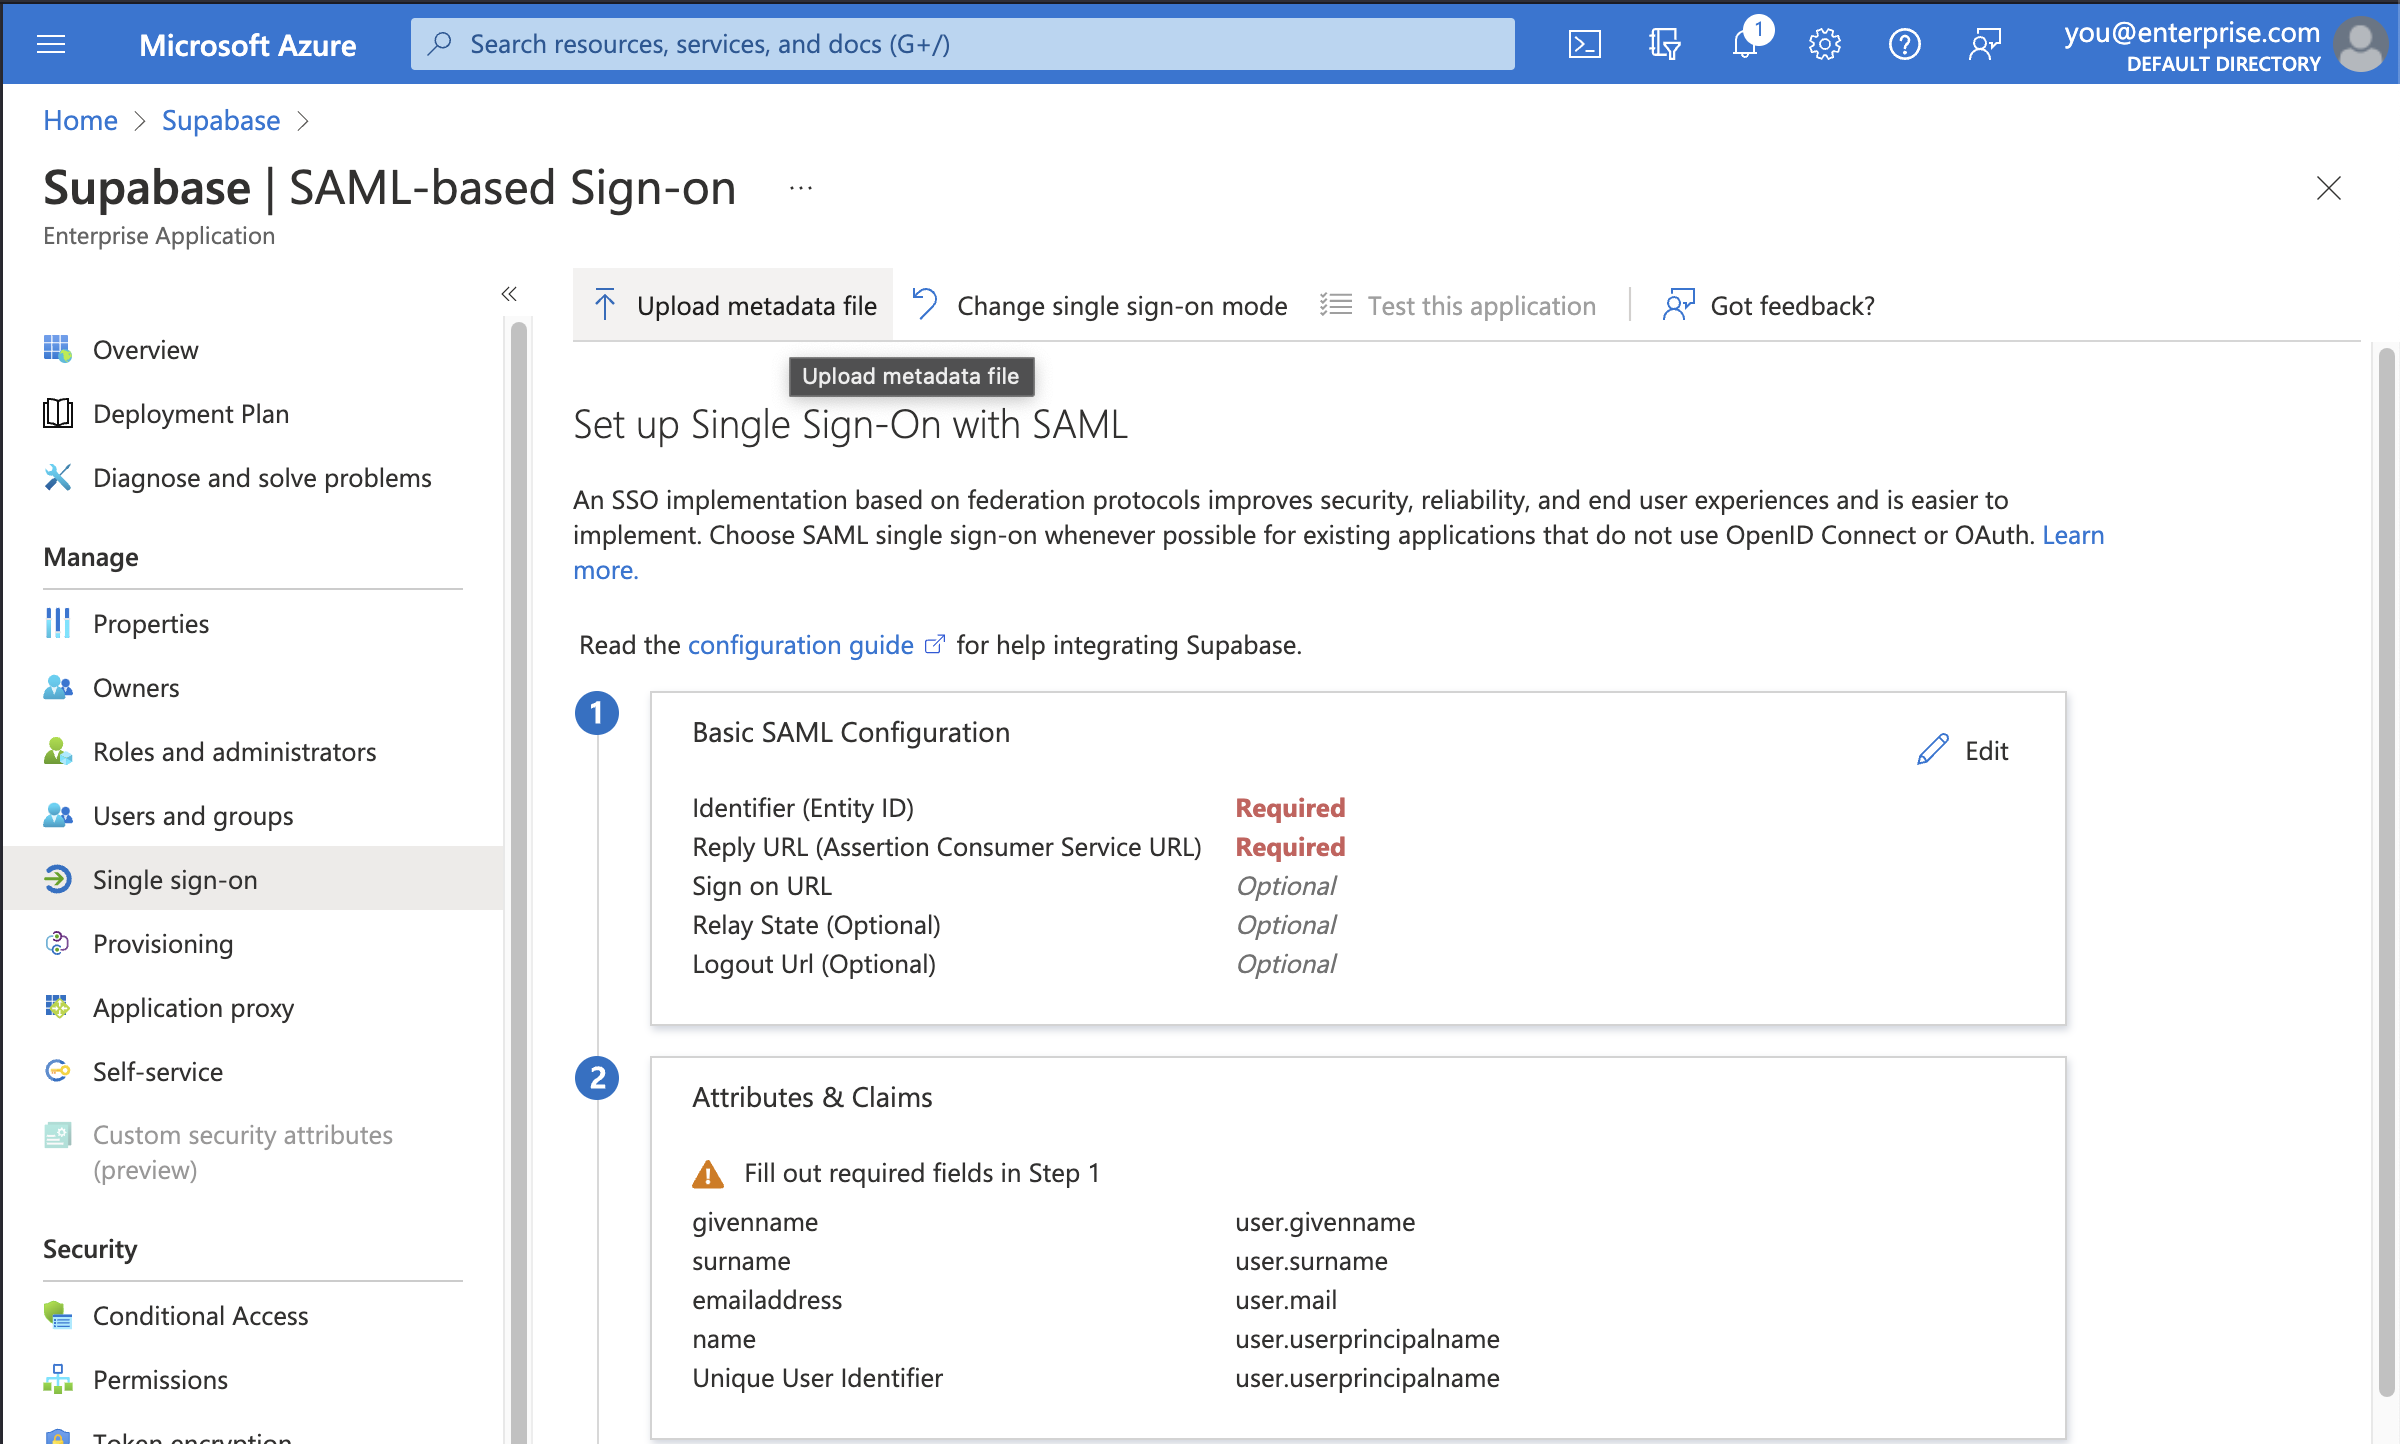
所有正确的信息应该会自动填充到如图所示的 基本 SAML 配置 页面上。
🌐 All of the correct information should automatically populate the Basic SAML Configuration screen as shown.
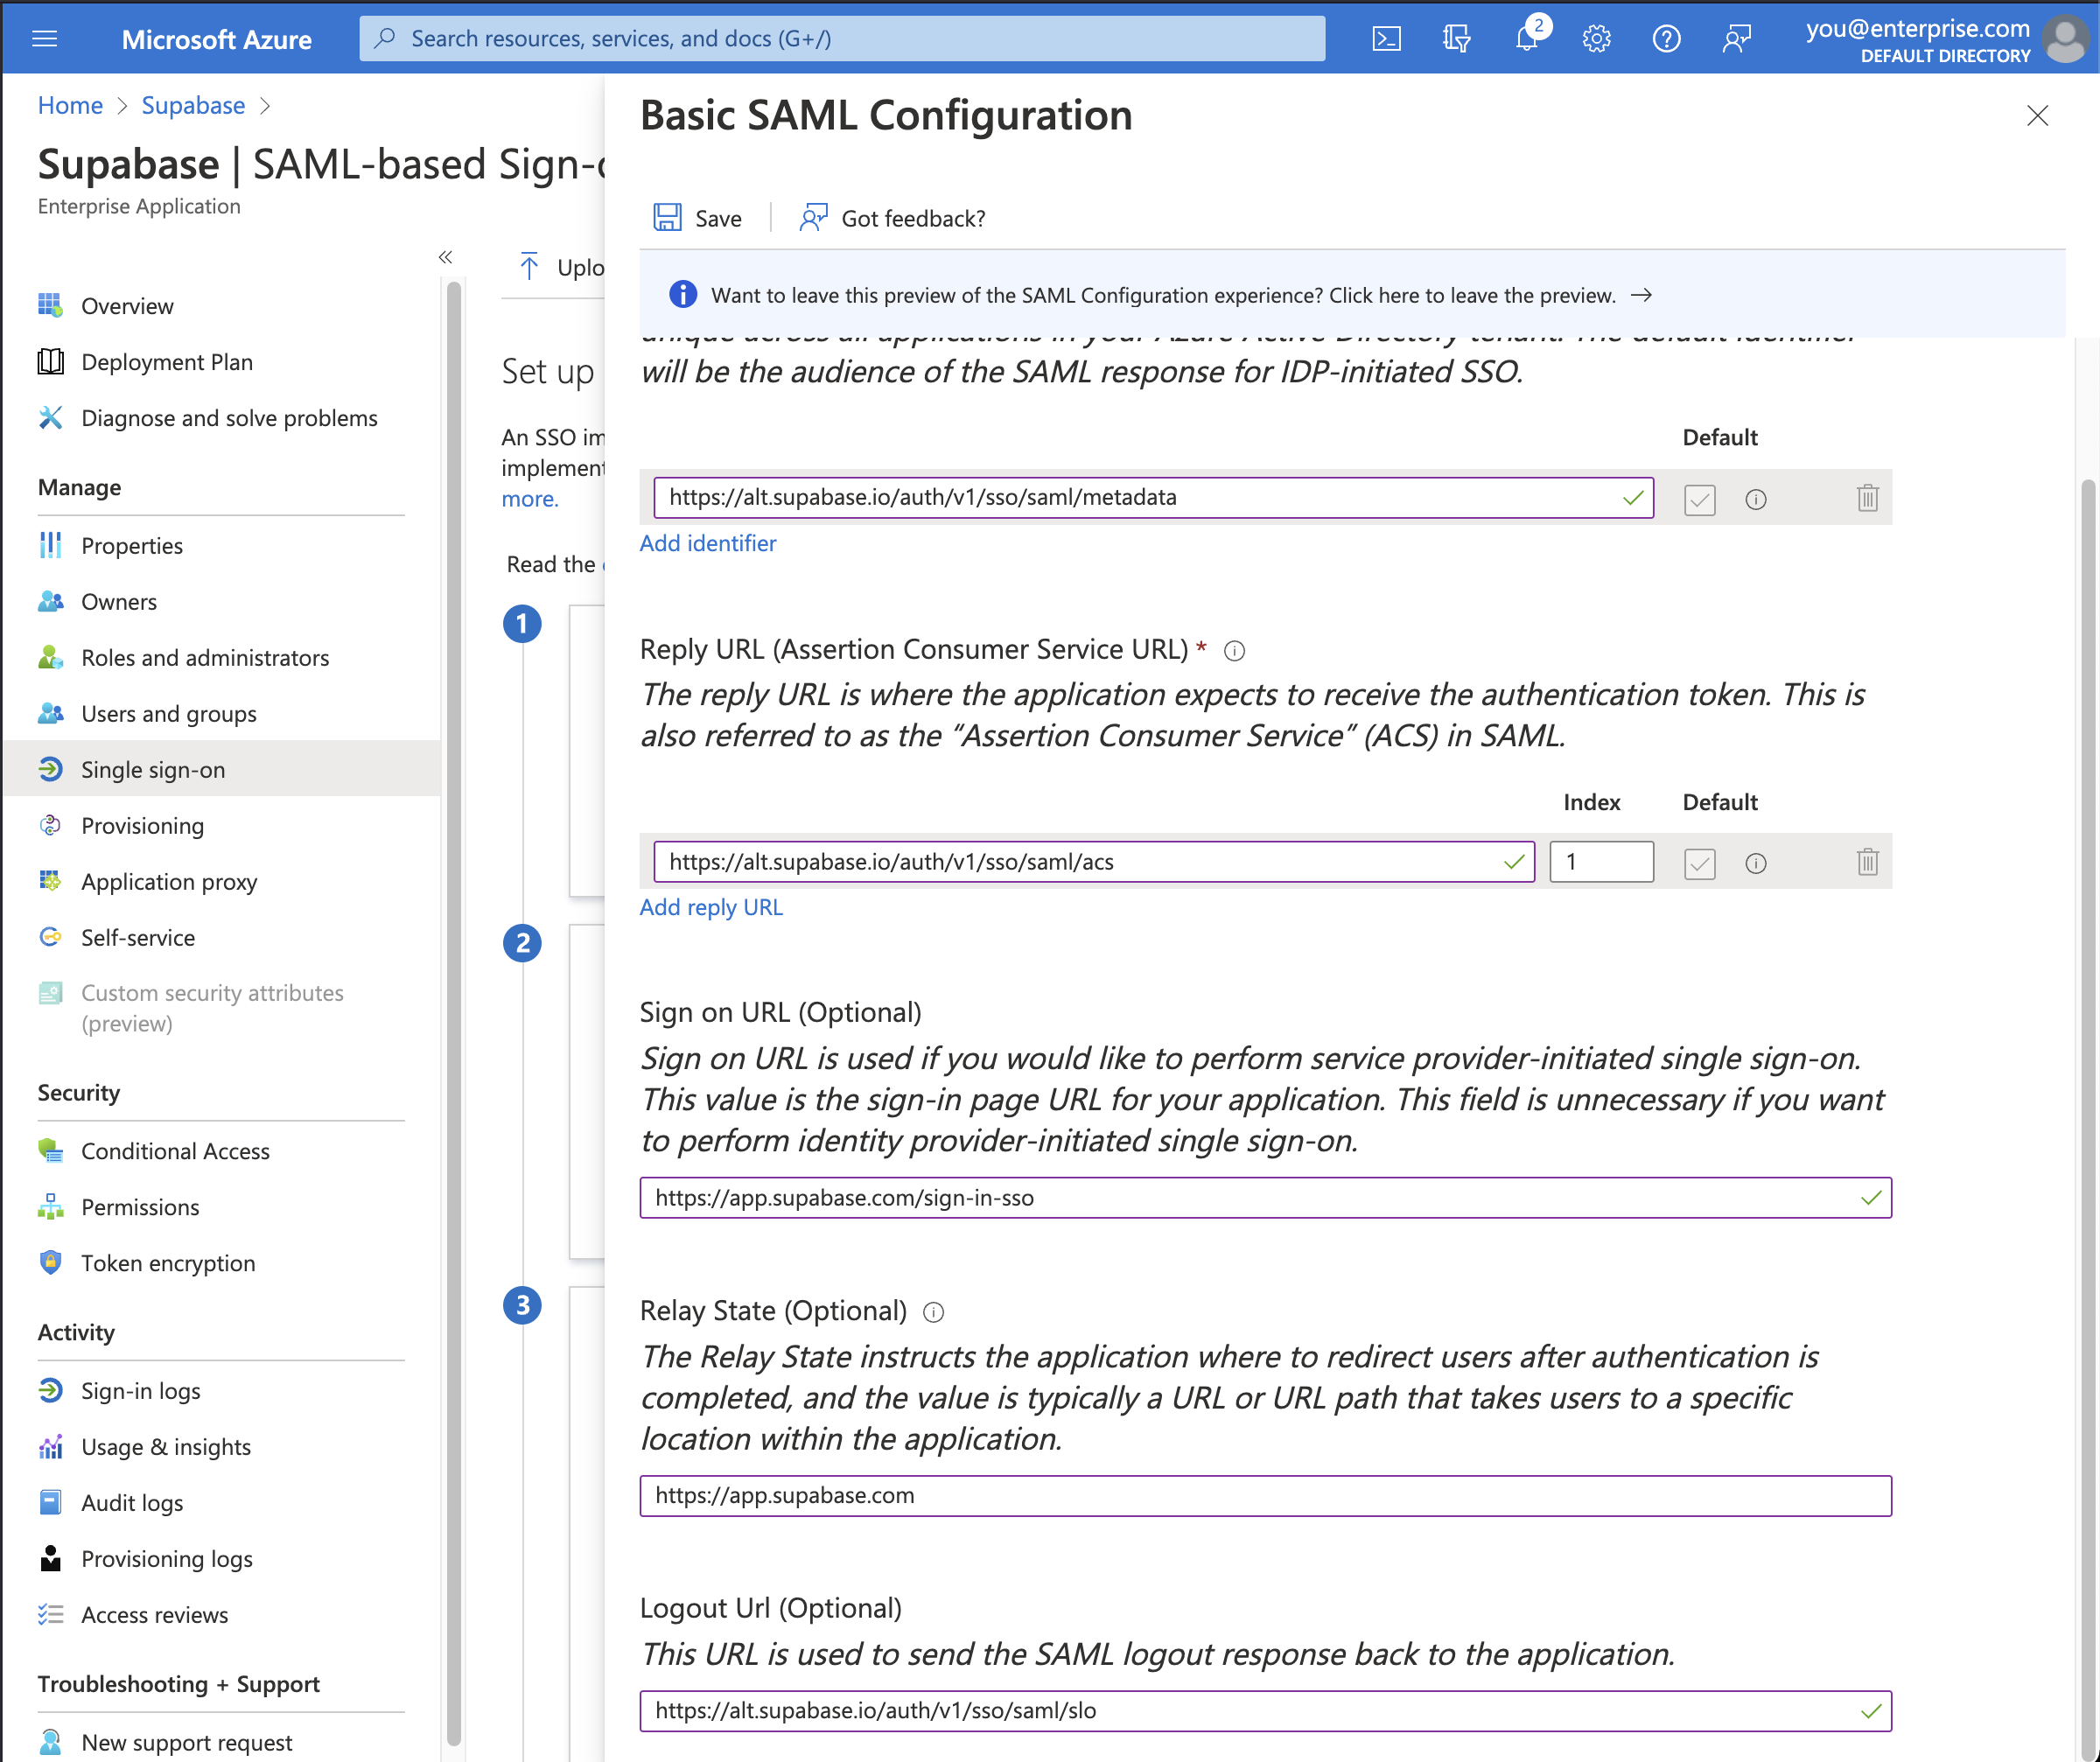
确保你输入这些额外设置。
| 设置 | 值 |
|---|---|
| 登录 URL | https://supabase.nodejs.cn/dashboard/sign-in-sso |
| 中继状态 | https://supabase.nodejs.cn/dashboard |
最后,点击 保存 按钮来保存配置。
🌐 Finally, click the Save button to save the configuration.
第7步:获取元数据网址 #
🌐 Step 7: Obtain metadata URL [#idp-metadata-url]
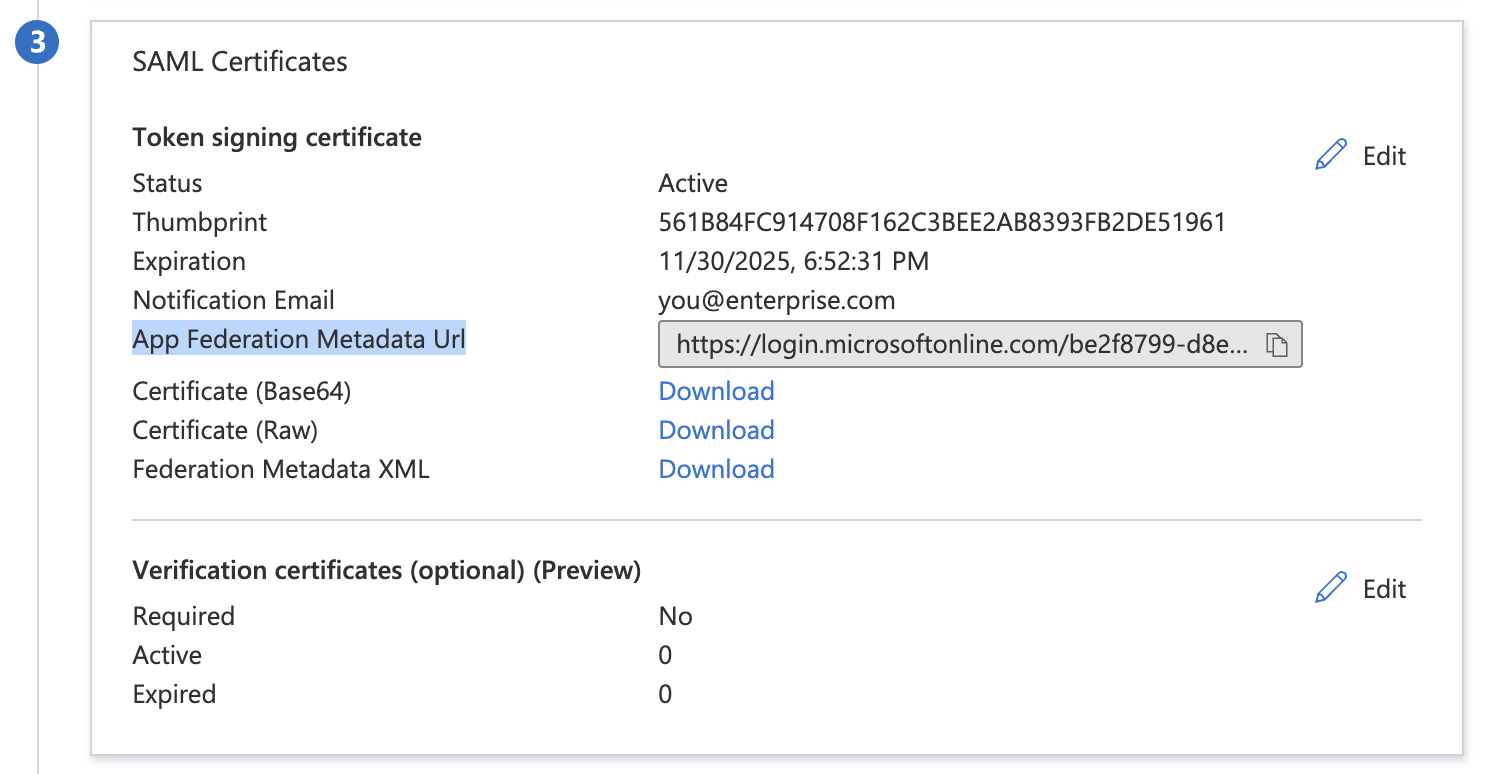
将链接保存在 App Federation Metadata URL 下,位于 第3节 SAML证书。稍后在 第10步 你需要输入这个URL。
🌐 Save the link under App Federation Metadata URL in *section 3 SAML Certificates*. You will need to enter this URL later in Step 10.
步骤 8:在控制面板中启用单点登录 #
🌐 Step 8: Enable SSO in the Dashboard [#dashboard-enable-sso]
- 访问组织设置页面下的SSO标签。
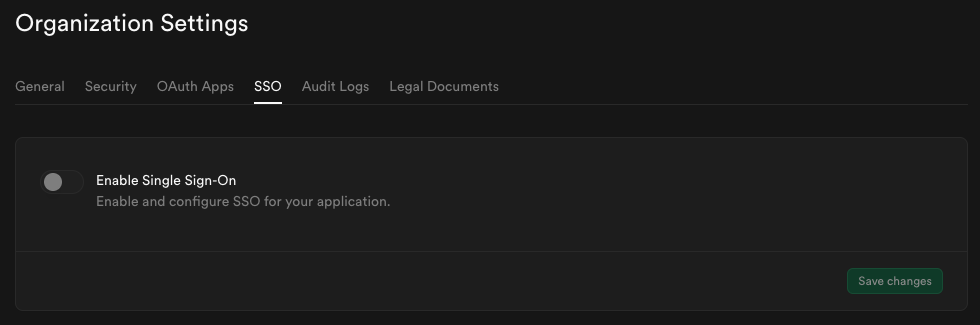
- 切换 启用单点登录 以开始配置。启用后,配置表单将会出现。
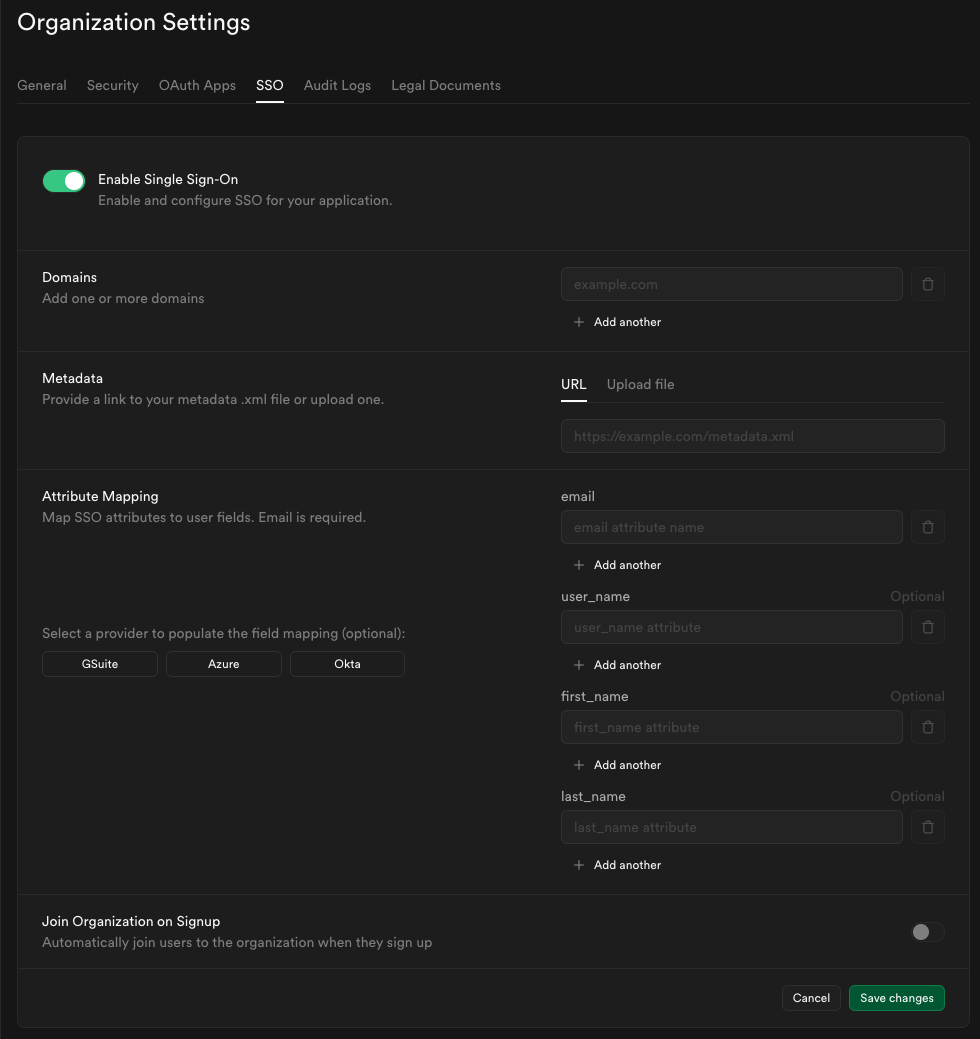
步骤9:配置域名 #
🌐 Step 9: Configure domains [#dashboard-configure-domain]
输入一个或多个与你用户邮箱地址相关的域名(例如,supabase.com)。这些域名决定哪些用户可以通过SSO登录。
🌐 Enter one or more domains associated with your users email addresses (e.g., supabase.com).
These domains determine which users are eligible to sign in via SSO.

如果你的组织使用多个电子邮件域名——例如,员工用 supabase.com,承包商用 supabase.io——你可以在这里添加多个域名。所有列出的域名都可以用于 SSO 登录。
🌐 If your organization uses more than one email domain - for example, supabase.com for staff and supabase.io for contractors - you can add multiple domains here. All listed domains will be authorized for SSO sign-in.

我们不允许使用像 gmail.com、yahoo.com 这样的公共域名。
🌐 We do not permit use of public domains like gmail.com, yahoo.com.
你可以为每个 SSO 提供商配置不同的邮箱域名。对于多环境设置(开发/预发布/生产),我们建议使用 IdP 发起的流程,并在同一个域名下使用多个 SAML 应用,而不是基于域名的路由。更多详情,请参见 多 SSO 提供商指南。
🌐 You can configure each SSO provider with different email domains. For multi-environment setups (Dev/Staging/Prod), we recommend using IdP-initiated flow with multiple SAML apps under the same domain rather than domain-based routing. For more details, see the Multiple SSO Providers guide.
第10步:配置元数据 #
🌐 Step 10: Configure metadata [#dashboard-configure-metadata]
在“元数据 URL”字段中输入你从 步骤 7 获取的元数据 URL:
🌐 Enter the metadata URL you obtained from Step 7 into the Metadata URL field:

第11步:配置属性映射 #
🌐 Step 11: Configure attribute mapping [#dashboard-configure-attributes]
使用 Azure 预设填写属性映射部分。
🌐 Fill out the Attribute Mapping section using the Azure preset.
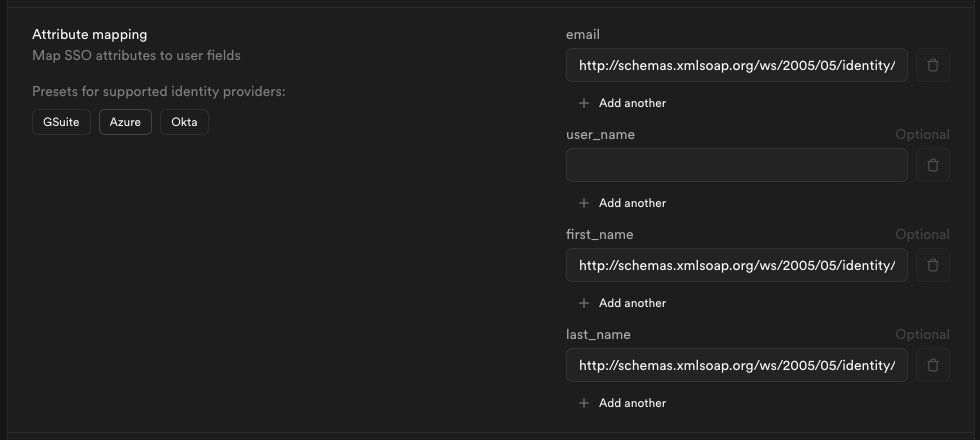
第12步:注册时加入组织(可选)#
🌐 Step 12: Join organization on sign-up (optional) [#dashboard-configure-autojoin]
默认情况下,这个设置是关闭的,通过 SSO 登录的用户不会自动被添加到你的组织中。
🌐 By default this setting is disabled, users signing in via SSO will not be added to your organization automatically.

如果你希望通过 SSO 登录的用户在登录时自动加入你的组织,请开启此选项。自动加入会在每次登录时生效,不仅仅是首次注册——这样可以在启用此功能前安全地测试 SSO。
🌐 Toggle this on if you want SSO-authenticated users to be automatically added to your organization when they sign in via SSO. Auto-join applies on every sign-in, not only on first sign-up - this makes it safe to test SSO before enabling this feature.

开启自动加入后,你可以为新用户选择默认角色:
🌐 When auto-join is enabled, you can choose the default role for new users:
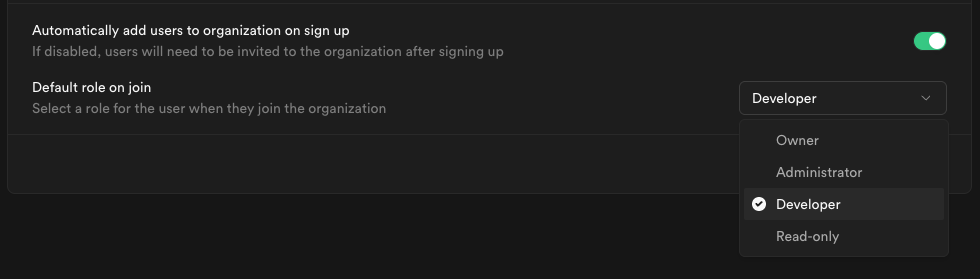
我们建议将 开发者 作为默认角色(最小权限原则),并根据需要单独提升用户权限。
🌐 We recommend choosing Developer as the default role (principle of least privilege) and promoting users individually as needed.
查看访问控制文档了解每个角色的详细信息。
🌐 Read the Access Control documentation for details about each role.
步骤 13:保存更改 #
🌐 Step 13: Save changes [#dashboard-configure-save]
当你点击 保存更改 时,你的新 SSO 配置会立即生效。从那一刻起,任何使用与你配置的域名匹配的邮箱地址的用户访问你们组织的登录网址时,都会通过 SSO 流程进行。
🌐 When you click Save changes, your new SSO configuration is applied immediately. From that moment, any user with an email address matching one of your configured domains who visits your organization's sign-in URL will be routed through the SSO flow.
第14步:测试你的单点登录配置 #
🌐 Step 14: Test your SSO configuration
在向你的组织推出单点登录(SSO)之前,我们强烈建议进行彻底测试。阅读SSO 测试和最佳实践指南了解:
🌐 Before rolling out SSO to your organization, we strongly recommend thorough testing. Read the SSO Testing and Best Practices guide for:
- 逐步测试说明
- 如何确认自动加入功能正常工作
- 常见问题与解决方法
- 安全最佳实践
- 预发布清单
在 Azure 沙箱中测试
如果你的组织有 Azure 沙箱或测试租户,可以先在那里测试你的 SSO 配置,再应用到生产环境。
🌐 If your organization has an Azure sandbox or test tenant, consider testing your SSO configuration there first before applying to production.