使用命令行进行备份和恢复
Learn how to backup and restore projects using the Supabase CLI
迁移数据库 #
🌐 Migrating the database
使用命令行备份数据库 #
🌐 Back up database using the CLI
在你的项目仪表板上,点击 连接。
会话池连接字符串:
1postgresql://postgres.[PROJECT-REF]:[YOUR-PASSWORD]@aws-0-us-east-1.pooler.supabase.com:5432/postgres直接连接字符串:
1postgresql://postgres.[PROJECT-REF]:[YOUR-PASSWORD]@db.[PROJECT-REF].supabase.com:5432/postgres在运行这些命令之前,请将 [CONNECTION_STRING] 替换为上一步中的连接字符串:
1supabase db dump --db-url [CONNECTION_STRING] -f roles.sql --role-only1supabase db dump --db-url [CONNECTION_STRING] -f schema.sql1supabase db dump --db-url [CONNECTION_STRING] -f data.sql --use-copy --data-only -x "storage.buckets_vectors" -x "storage.vector_indexes"在你开始之前 #
🌐 Before you begin
使用命令行恢复备份 #
🌐 Restore backup using CLI
这些步骤涵盖了将手动逻辑恢复(pg_dump / psql)到你自己创建的项目中。恢复到新项目 和 分支 流程会自动将你的加密根密钥复制到新项目,所以下面的密钥复制步骤不适用于它们。
🌐 These steps cover a manual logical restore (pg_dump / psql) into a project you create yourself. The Restore to a new project and Branching flows copy your encryption root key to the new project automatically, so the key-copy step below does not apply to them.
在新项目中:
- 如果旧数据库中使用了 Webhooks,请启用 数据库 Webhooks。
- 如果旧数据库中使用了任何非默认扩展,请启用 扩展。
前往连接面板获取连接字符串。
默认使用会话池连接字符串。如果你的 ISP 支持 IPv6,就用直接连接字符串。
会话池连接字符串:
1postgresql://postgres.[PROJECT-REF]:[YOUR-PASSWORD]@aws-0-us-east-1.pooler.supabase.com:5432/postgres直接连接字符串:
1postgresql://postgres.[PROJECT-REF]:[YOUR-PASSWORD]@db.[PROJECT-REF].supabase.com:5432/postgres在运行这些命令之前,把 [CONNECTION_STRING] 替换成你在前面步骤中得到的连接字符串:
1psql \2 --single-transaction \3 --variable ON_ERROR_STOP=1 \4 --file roles.sql \5 --file schema.sql \6 --command 'SET session_replication_role = replica' \7 --file data.sql \8 --dbname [CONNECTION_STRING]特别注意事项 #
🌐 Special considerations
保存迁移历史 #
🌐 Preserving migration history
如果你以前使用 Supabase CLI 来管理旧数据库的迁移,并且想在新恢复的项目中保留迁移历史,你需要使用以下命令单独插入迁移记录。
🌐 If you were using Supabase CLI for managing migrations on your old database and would like to preserve the migration history in your newly restored project, you need to insert the migration records separately using the following commands.
1supabase db dump --db-url "$OLD_DB_URL" -f history_schema.sql --schema supabase_migrations2supabase db dump --db-url "$OLD_DB_URL" -f history_data.sql --use-copy --data-only --schema supabase_migrations3psql \4 --single-transaction \5 --variable ON_ERROR_STOP=1 \6 --file history_schema.sql \7 --file history_data.sql \8 --dbname "$NEW_DB_URL"对 auth 和 storage#
🌐 Schema changes to auth and storage
如果你在旧项目中修改了 auth 和 storage 模式,比如添加了触发器或行级安全(RLS)策略,你需要单独恢复它们。Supabase CLI 可以帮你使用以下命令对这些模式的更改进行比对。
🌐 If you have modified the auth and storage schemas in your old project, such as adding triggers or Row Level Security(RLS) policies, you have to restore them separately. The Supabase CLI can help you diff the changes to these schemas using the following commands.
1supabase link --project-ref "$OLD_PROJECT_REF"2supabase db diff --linked --schema auth,storage > changes.sql故障排查注意 #
🌐 Troubleshooting notes
恢复期间禁用触发器: #
🌐 Disabling triggers during restore:
将 session_replication_role 设置为 replica 会在迁移过程中禁用触发器,防止列被重复加密。
🌐 Setting session_replication_role to replica disables triggers during the migration, preventing columns from being double encrypted.
自定义角色需要密码 #
🌐 Custom roles require passwords
如果你创建了任何带有 LOGIN 属性的 自定义角色,你必须在新项目中手动设置它们的密码。这可以通过 SQL 命令来完成:
🌐 If you created any custom roles with the LOGIN attribute, you must manually set their passwords in the new project. This can be done with the SQL command:
1alter user "YOUR_USER" with password 'SOME_NEW_PASSWORD';supabase_admin#
🌐 supabase_admin permission errors
如果在恢复过程中遇到与 supabase_admin 相关的权限错误:
🌐 If you encounter permission errors related to supabase_admin during restore:
- 打开
schema.sql - 注释掉包含以下内容的任何行:
1ALTER ... OWNER TO "supabase_admin"cli_login_postgres#
🌐 cli_login_postgres role grant error
如果你遇到这个错误:
🌐 If you encounter the error:
1ERROR: permission denied to grant role "postgres"2DETAIL: Only roles with the ADMIN option on role "postgres" may grant this role.- 打开
roles.sql - 把这一行注释掉:
1GRANT "postgres" TO "cli_login_postgres" WITH INHERIT FALSE GRANTED BY "supabase_admin";克隆后cli_login_postgres角色问题#
🌐 cli_login_postgres role issues after cloning
cli_login_role 必须由 supabase_admin 角色创建。如果在 CLI 能生成自己的版本之前迁移过程克隆了该角色,可能会遇到以下错误:
🌐 The cli_login_role must be created by the supabase_admin role. If the migration process cloned over the role before the CLI could generate its own version, it may encounter the error:
1"message":"Failed to create login role:2ERROR: 0LP01: role "postgres" is a member of role "cli_login_postgres"要解决这个问题,先删除自定义的 cli_login_postgres 角色。然后 CLI 就可以用正确的权限重新创建它:
🌐 To resolve the issue, drop the custom cli_login_postgres role. Then the CLI can recreate it with the right privileges:
1DROP ROLE IF EXISTS cli_login_postgres;迁移边缘函数 #
🌐 Migrating edge functions
步骤(使用 Supabase CLI): #
🌐 Steps (using the Supabase CLI):
1supabase functions list --project-ref your_project_refYou can download an individual function with the following command:
1supabase functions download YOUR_FUNCTION_NAME --project-ref your_project_ref该命令不会下载 import maps 或 deno.json 文件。如果你的边缘函数依赖它们来管理依赖,你需要手动把它们加回来。
1supabase functions deploy --project-ref your_target_project_refThis deploys all functions within the supabase/functions to the target project. You can confirm by checking your Edge Functions on the project dashboard
步骤(使用 Supabase 控制面板): #
🌐 Steps (using the Supabase Dashboard):
通过 import maps 和 deno.json 文件定义的依赖,在使用这种方法时需要重写为依赖它们的 直接导入路径。
🌐 Dependencies defined through import maps and deno.json files will need to be rewritten to rely on their direct import paths when using this approach.
在源项目中,从侧边菜单进入 Edge Functions
使用 Download 按钮,将你想要的功能下载为 zip 文件: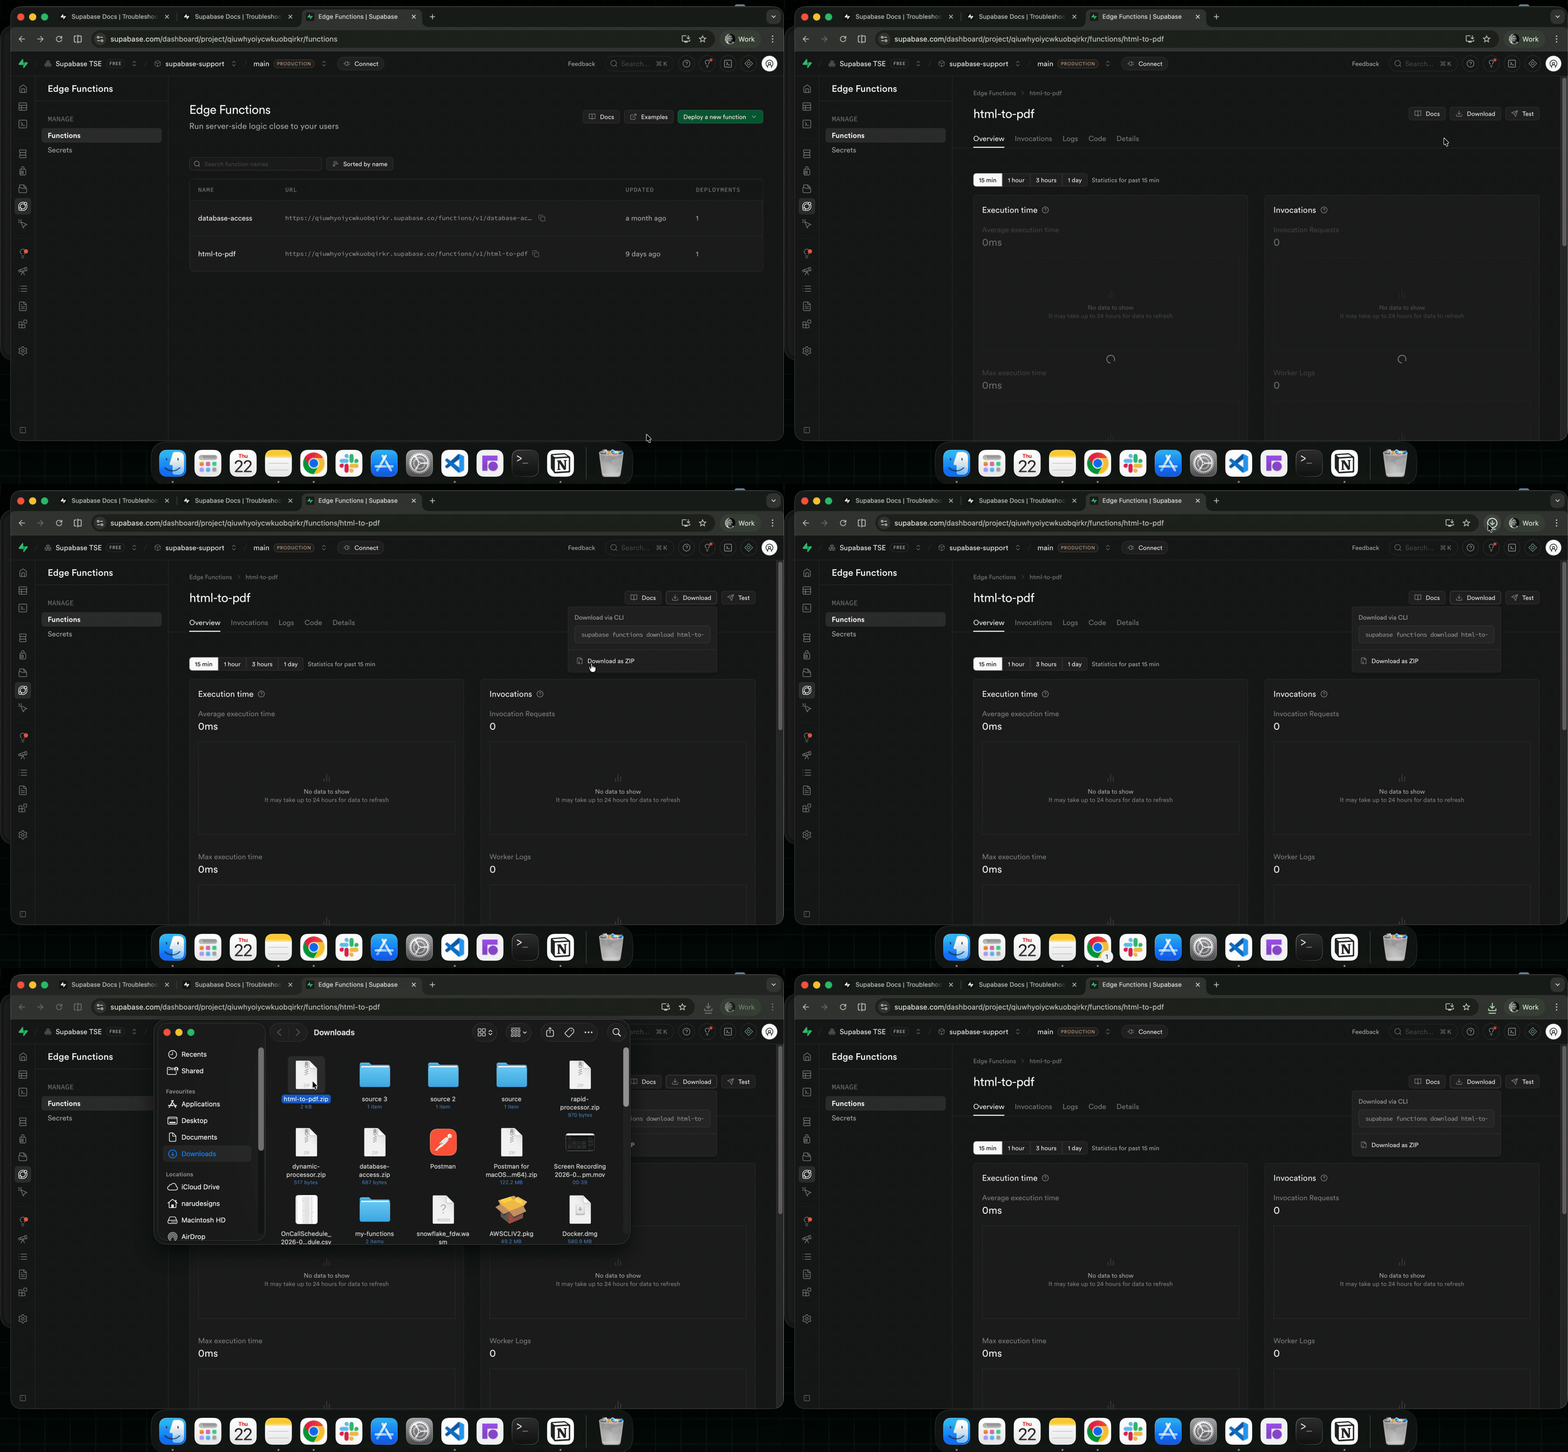
在目标项目中,从侧边菜单进入 Edge Functions
点击 Deploy a new function 按钮,选择 通过编辑器 操作
将你下载的功能(第 2 步的 zip 文件)拖放到编辑器中
添加你的函数名称,然后点击 Deploy function 按钮部署函数: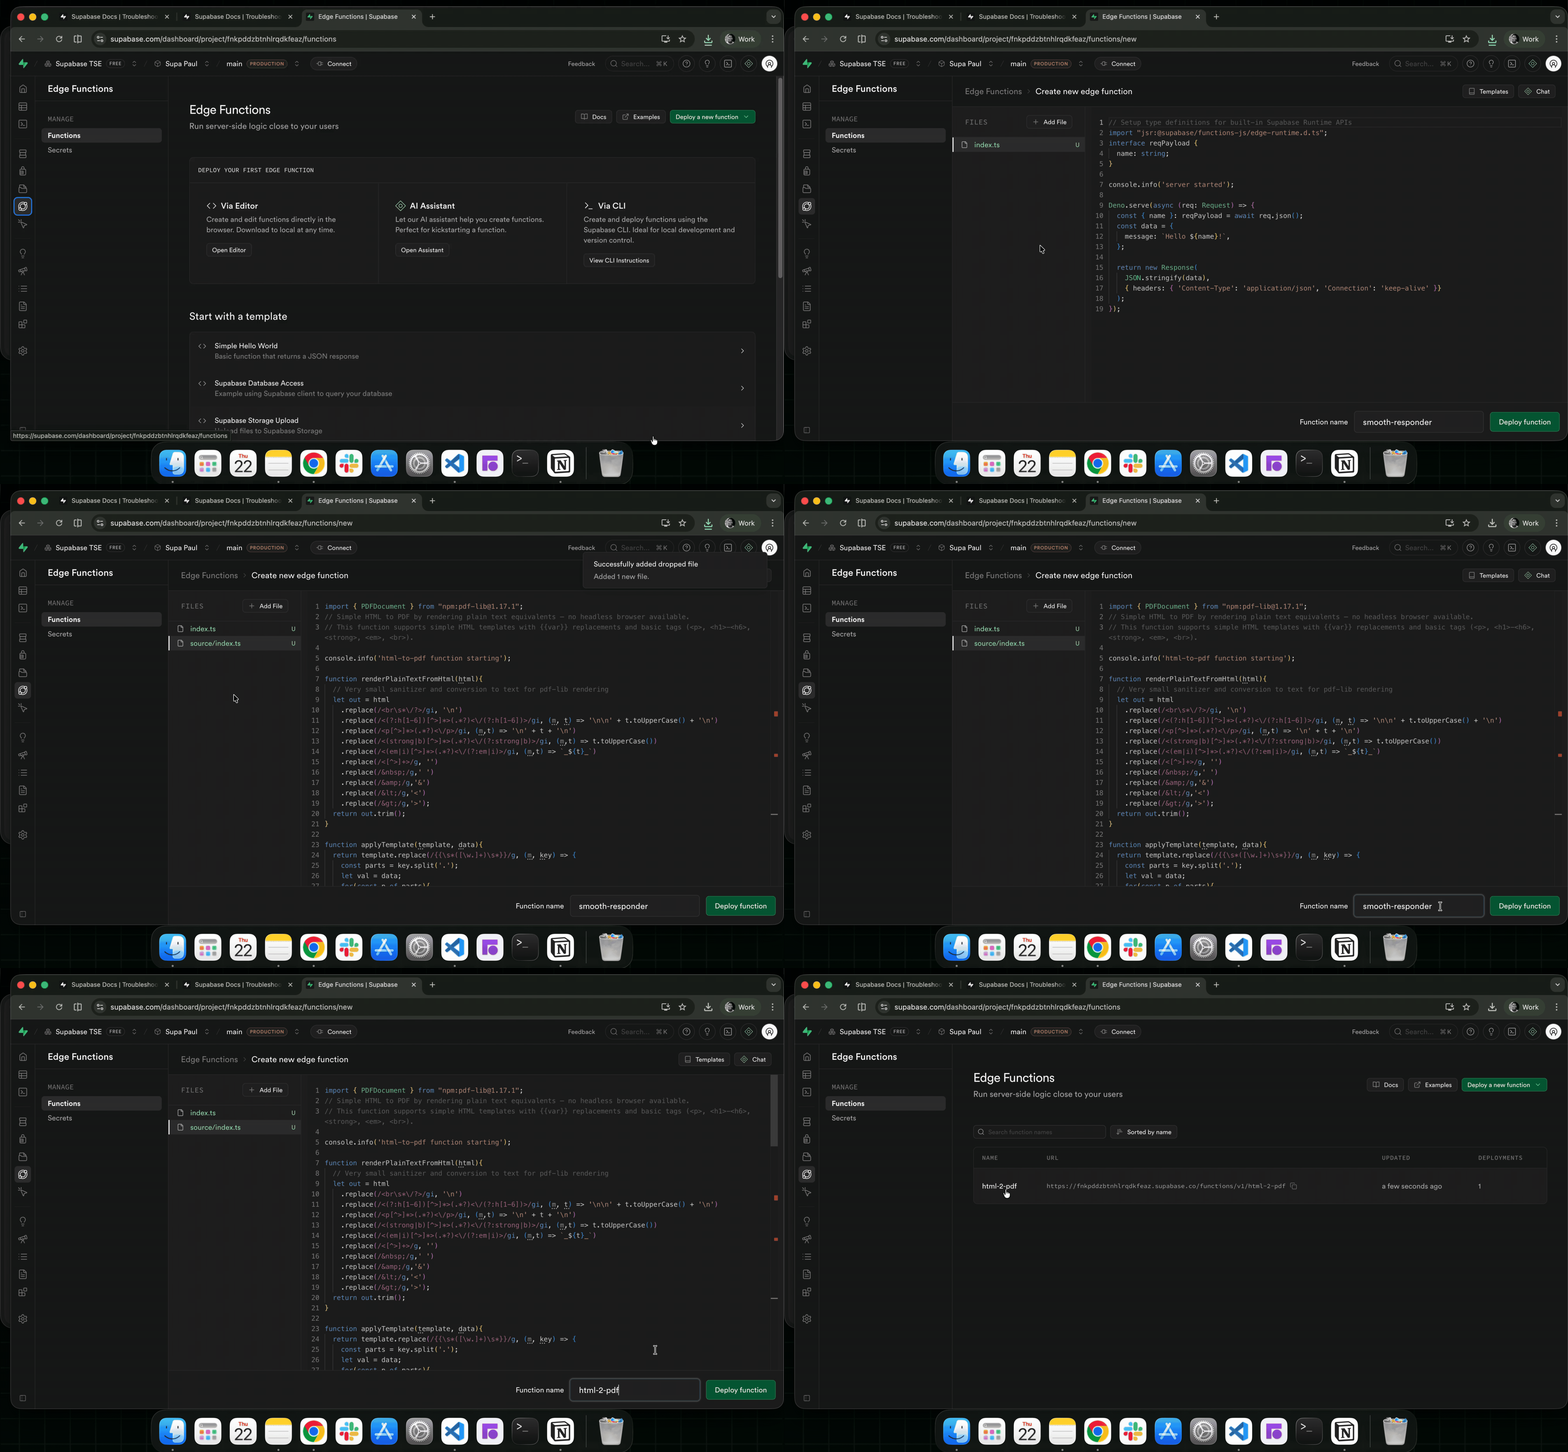
迁移存储对象 #
🌐 Migrating storage objects
使用你喜欢的 JavaScript 包管理器,创建一个包含 supabase 客户端包的新项目
1npm init -y2npm install @supabase/supabase-js把示例脚本加进去。
1// npm install @supabase/supabase-js@22const { createClient } = require('@supabase/supabase-js')34const OLD_PROJECT_URL = 'https://xxx.supabase.co'5const OLD_PROJECT_SERVICE_KEY = 'old-project-service-key-xxx'67const NEW_PROJECT_URL = 'https://yyy.supabase.co'8const NEW_PROJECT_SERVICE_KEY = 'new-project-service-key-yyy'910const oldSupabase = createClient(OLD_PROJECT_URL, OLD_PROJECT_SERVICE_KEY)11const newSupabase = createClient(NEW_PROJECT_URL, NEW_PROJECT_SERVICE_KEY)1213function createLoadingAnimation(message) {14 const readline = require('readline')15 const frames = ['⠋', '⠙', '⠹', '⠸', '⠼', '⠴', '⠦', '⠧', '⠇', '⠏']16 let i = 017 let timer18 let stopped = false1920 const animate = () => {21 if (stopped) return22 process.stdout.write(`\r${frames[i]} ${message}`)23 i = (i + 1) % frames.length24 timer = setTimeout(animate, 80)25 }2627 animate()2829 return {30 stop: (finalMessage = '') => {31 stopped = true32 clearTimeout(timer)33 readline.clearLine(process.stdout, 0)34 readline.cursorTo(process.stdout, 0)35 process.stdout.write(`✓ ${finalMessage || message}\n`)36 },37 }38}3940/**41* Lists all files in a bucket, handling nested folders recursively.42*/43async function listAllFiles(bucket, path = '') {44 const loader = createLoadingAnimation(`Listing files in '${bucket}${path ? '/' + path : ''}'...`)4546 try {47 const { data, error } = await oldSupabase.storage.from(bucket).list(path, { limit: 1000 })48 if (error) {49 loader.stop(`Error listing files in '${bucket}${path ? '/' + path : ''}'`)50 throw new Error(`❌ Error listing files in bucket '${bucket}': ${error.message}`)51 }5253 if (!data || data.length === 0) {54 loader.stop(`No files found in '${bucket}${path ? '/' + path : ''}'`)55 return []56 }5758 let files = []59 for (const item of data) {60 if (!item.metadata) {61 loader.stop(`Found folder '${item.name}' in '${bucket}${path ? '/' + path : ''}'`)62 const subFiles = await listAllFiles(bucket, `${path}${item.name}/`)63 files = files.concat(subFiles)64 } else {65 files.push({ fullPath: `${path}${item.name}`, metadata: item.metadata })66 }67 }6869 loader.stop(`Found ${files.length} files in '${bucket}${path ? '/' + path : ''}'`)70 return files71 } catch (error) {72 loader.stop()73 throw error74 }75}7677/**78* Creates a bucket in the new Supabase project if it doesn't exist.79*/80async function ensureBucketExists(bucketName, options = {}) {81 const { data: existingBucket, error: getBucketError } =82 await newSupabase.storage.getBucket(bucketName)8384 if (getBucketError && !getBucketError.message.includes('not found')) {85 throw new Error(`❌ Error checking if bucket '${bucketName}' exists: ${getBucketError.message}`)86 }8788 if (!existingBucket) {89 console.log(`🪣 Creating bucket '${bucketName}' in new project...`)90 const { error } = await newSupabase.storage.createBucket(bucketName, options)91 if (error) throw new Error(`❌ Failed to create bucket '${bucketName}': ${error.message}`)92 console.log(`✅ Created bucket '${bucketName}'`)93 } else {94 console.log(`ℹ️ Bucket '${bucketName}' already exists in new project`)95 }96}9798/**99* Migrates a single file from the old project to the new one.100*/101async function migrateFile(sourceBucketName, targetBucketName, file) {102 const loader = createLoadingAnimation(103 `Migrating ${file.fullPath} in bucket '${sourceBucketName}' to '${targetBucketName}'...`104 )105106 try {107 const { data, error: downloadError } = await oldSupabase.storage108 .from(sourceBucketName)109 .download(file.fullPath)110 if (downloadError) {111 loader.stop(`Failed to migrate ${file.fullPath}: Download error`)112 throw new Error(`Download failed: ${downloadError.message}`)113 }114115 // Preserve all available metadata from the original file116 const uploadOptions = {117 upsert: true,118 contentType: file.metadata?.mimetype,119 cacheControl: file.metadata?.cacheControl,120 }121122 const { error: uploadError } = await newSupabase.storage123 .from(targetBucketName)124 .upload(file.fullPath, data, uploadOptions)125 if (uploadError) {126 loader.stop(`Failed to migrate ${file.fullPath}: Upload error`)127 throw new Error(`Upload failed: ${uploadError.message}`)128 }129130 loader.stop(131 `Migrated ${file.fullPath} in bucket '${sourceBucketName}' to '${targetBucketName}'`132 )133 return { success: true, path: file.fullPath }134 } catch (err) {135 console.error(136 `❌ Error migrating ${file.fullPath} in bucket '${targetBucketName}':`,137 err.message138 )139 return { success: false, path: file.fullPath, error: err.message }140 }141}142143function chunkArray(array, size) {144 const chunks = []145 for (let i = 0; i < array.length; i += size) {146 chunks.push(array.slice(i, i + size))147 }148 return chunks149}150151/**152* Migrates all buckets and files from the old Supabase project to the new one.153* Processes files in parallel within batches for efficiency.154*/155async function migrateBuckets() {156 console.log('🔄 Starting Supabase Storage migration...')157 console.log(`📦 Source project: ${OLD_PROJECT_URL}`)158 console.log(`📦 Target project: ${NEW_PROJECT_URL}`)159160 const readline = require('readline').createInterface({161 input: process.stdin,162 output: process.stdout,163 })164165 console.log(166 '\n⚠️ WARNING: This migration may overwrite files in the target project if they have the same paths.'167 )168 console.log('⚠️ It is recommended to back up your target project before proceeding.')169170 const answer = await new Promise((resolve) => {171 readline.question('Do you want to proceed with the migration? (yes/no): ', resolve)172 })173174 readline.close()175176 if (answer.toLowerCase() !== 'yes') {177 console.log('Migration canceled by user.')178 return { canceled: true }179 }180181 console.log('\n📦 Fetching all buckets from old project...')182183 const { data: oldBuckets, error: bucketListError } = await oldSupabase.storage.listBuckets()184185 if (bucketListError) throw new Error(`❌ Error fetching buckets: ${bucketListError.message}`)186 console.log(`✅ Found ${oldBuckets.length} buckets to migrate.`)187188 const { data: existingBuckets, error: existingBucketsError } =189 await newSupabase.storage.listBuckets()190 if (existingBucketsError)191 throw new Error(`❌ Error fetching existing buckets: ${existingBucketsError.message}`)192193 const existingBucketNames = existingBuckets.map((b) => b.name)194 const conflictingBuckets = oldBuckets.filter((b) => existingBucketNames.includes(b.name))195196 let conflictStrategy = 2197198 if (conflictingBuckets.length > 0) {199 console.log('\n⚠️ The following buckets already exist in the target project:')200 conflictingBuckets.forEach((b) => console.log(` - ${b.name}`))201202 const conflictAnswer = await new Promise((resolve) => {203 const rl = require('readline').createInterface({204 input: process.stdin,205 output: process.stdout,206 })207 rl.question(208 '\nHow do you want to handle existing buckets?\n' +209 '1. Skip existing buckets\n' +210 '2. Merge files (may overwrite existing files)\n' +211 '3. Rename buckets in target (add suffix "_migrated")\n' +212 '4. Cancel migration\n' +213 'Enter your choice (1-4): ',214 (answer) => {215 rl.close()216 resolve(answer)217 }218 )219 })220221 if (conflictAnswer === '4') {222 console.log('Migration canceled by user.')223 return { canceled: true }224 }225226 conflictStrategy = parseInt(conflictAnswer)227 if (isNaN(conflictStrategy) || conflictStrategy < 1 || conflictStrategy > 3) {228 console.log('Invalid choice. Migration canceled.')229 return { canceled: true }230 }231 }232233 const migrationStats = {234 totalBuckets: oldBuckets.length,235 processedBuckets: 0,236 skippedBuckets: 0,237 totalFiles: 0,238 successfulFiles: 0,239 failedFiles: 0,240 failedFilesList: [],241 }242243 for (const bucket of oldBuckets) {244 const bucketName = bucket.name245 console.log(`\n📁 Processing bucket: ${bucketName}`)246247 let targetBucketName = bucketName248249 if (existingBucketNames.includes(bucketName)) {250 if (conflictStrategy === 1) {251 console.log(`⏩ Skipping bucket '${bucketName}' as it already exists in target project`)252 migrationStats.skippedBuckets++253 continue254 } else if (conflictStrategy === 3) {255 targetBucketName = `${bucketName}_migrated`256 console.log(`🔄 Renaming bucket to '${targetBucketName}' in target project`)257 } else {258 console.log(`🔄 Merging files into existing bucket '${bucketName}' in target project`)259 }260 }261262 // Preserve bucket configuration when creating in the new project263 if (targetBucketName !== bucketName || !existingBucketNames.includes(bucketName)) {264 await ensureBucketExists(targetBucketName, {265 public: bucket.public,266 fileSizeLimit: bucket.file_size_limit,267 allowedMimeTypes: bucket.allowed_mime_types,268 })269 }270271 const files = await listAllFiles(bucketName)272 console.log(`✅ Found ${files.length} files in bucket '${bucketName}'.`)273 migrationStats.totalFiles += files.length274275 const batches = chunkArray(files, 10)276277 for (let i = 0; i < batches.length; i++) {278 console.log(`\n🚀 Processing batch ${i + 1}/${batches.length} (${batches[i].length} files)`)279280 const results = await Promise.all(281 batches[i].map((file) => migrateFile(bucketName, targetBucketName, file))282 )283284 const batchSuccesses = results.filter((r) => r.success).length285 const batchFailures = results.filter((r) => !r.success)286287 migrationStats.successfulFiles += batchSuccesses288 migrationStats.failedFiles += batchFailures.length289 migrationStats.failedFilesList.push(...batchFailures.map((f) => f.path))290291 console.log(292 `✅ Completed batch ${i + 1}/${batches.length}: ${batchSuccesses} succeeded, ${batchFailures.length} failed`293 )294 }295296 migrationStats.processedBuckets++297 console.log(`✅ Completed bucket '${bucketName}' migration`)298 }299300 console.log('\n📊 Migration Summary:')301 console.log(302 `Buckets: ${migrationStats.processedBuckets}/${migrationStats.totalBuckets} processed, ${migrationStats.skippedBuckets} skipped`303 )304 console.log(305 `Files: ${migrationStats.successfulFiles} succeeded, ${migrationStats.failedFiles} failed (${migrationStats.totalFiles} total)`306 )307308 if (migrationStats.failedFiles > 0) {309 console.log('\n⚠️ Failed files:')310 migrationStats.failedFilesList.forEach((path) => console.log(` - ${path}`))311 return migrationStats312 }313314 return migrationStats315}316317migrateBuckets()318 .then((stats) => {319 if (stats.failedFiles > 0) {320 console.log(`\n⚠️ Migration completed with ${stats.failedFiles} failed files.`)321 process.exit(1)322 } else {323 console.log('\n🎉 Migration completed successfully!')324 process.exit(0)325 }326 })327 .catch((err) => {328 console.error('❌ Fatal error during migration:', err.message)329 process.exit(1)330 })获取你新项目和旧项目的秘密密钥或服务角色密钥,然后将它们替换到脚本中。
从数据 API 设置中复制你的项目 URL 并添加到脚本里。
1//rest of code2...34// add relevant details for old project5const OLD_PROJECT_URL = 'https://xxx.supabase.co'6const OLD_PROJECT_SERVICE_KEY = 'old-project-service-key-xxx'78// add relevant details for new project9const NEW_PROJECT_URL = 'https://yyy.supabase.co'10const NEW_PROJECT_SERVICE_KEY = 'new-project-service-key-yyy'1112...13//rest of code1node index.js资源 #
🌐 Resources