使用 Azure(微软)登录
要为你的项目启用 Azure(微软)认证,你需要设置一个 Azure OAuth 应用,然后将应用的凭证添加到你的 Supabase 控制面板。
🌐 To enable Azure (Microsoft) Auth for your project, you need to set up an Azure OAuth application and add the application credentials to your Supabase Dashboard.
概览 #
🌐 Overview
在 Azure 上设置 OAuth 包含四个大致步骤:
🌐 Setting up OAuth with Azure consists of four broad steps:
- 在 Azure Entra ID 下创建一个 OAuth 应用。
- 在应用中添加一个密钥。
- 在 Azure 的 OAuth 应用中,把 Supabase Auth 回调 URL 添加到允许列表里。
- 在 Supabase Auth 仪表板中配置 OAuth 应用的客户端 ID 和密钥。
访问你的 Azure 开发者账户 #
🌐 Access your Azure Developer account
- 去 portal.azure.com 。
- 登录并在 Azure 服务列表中选择 Microsoft Entra ID。
注册一个应用 #
🌐 Register an application
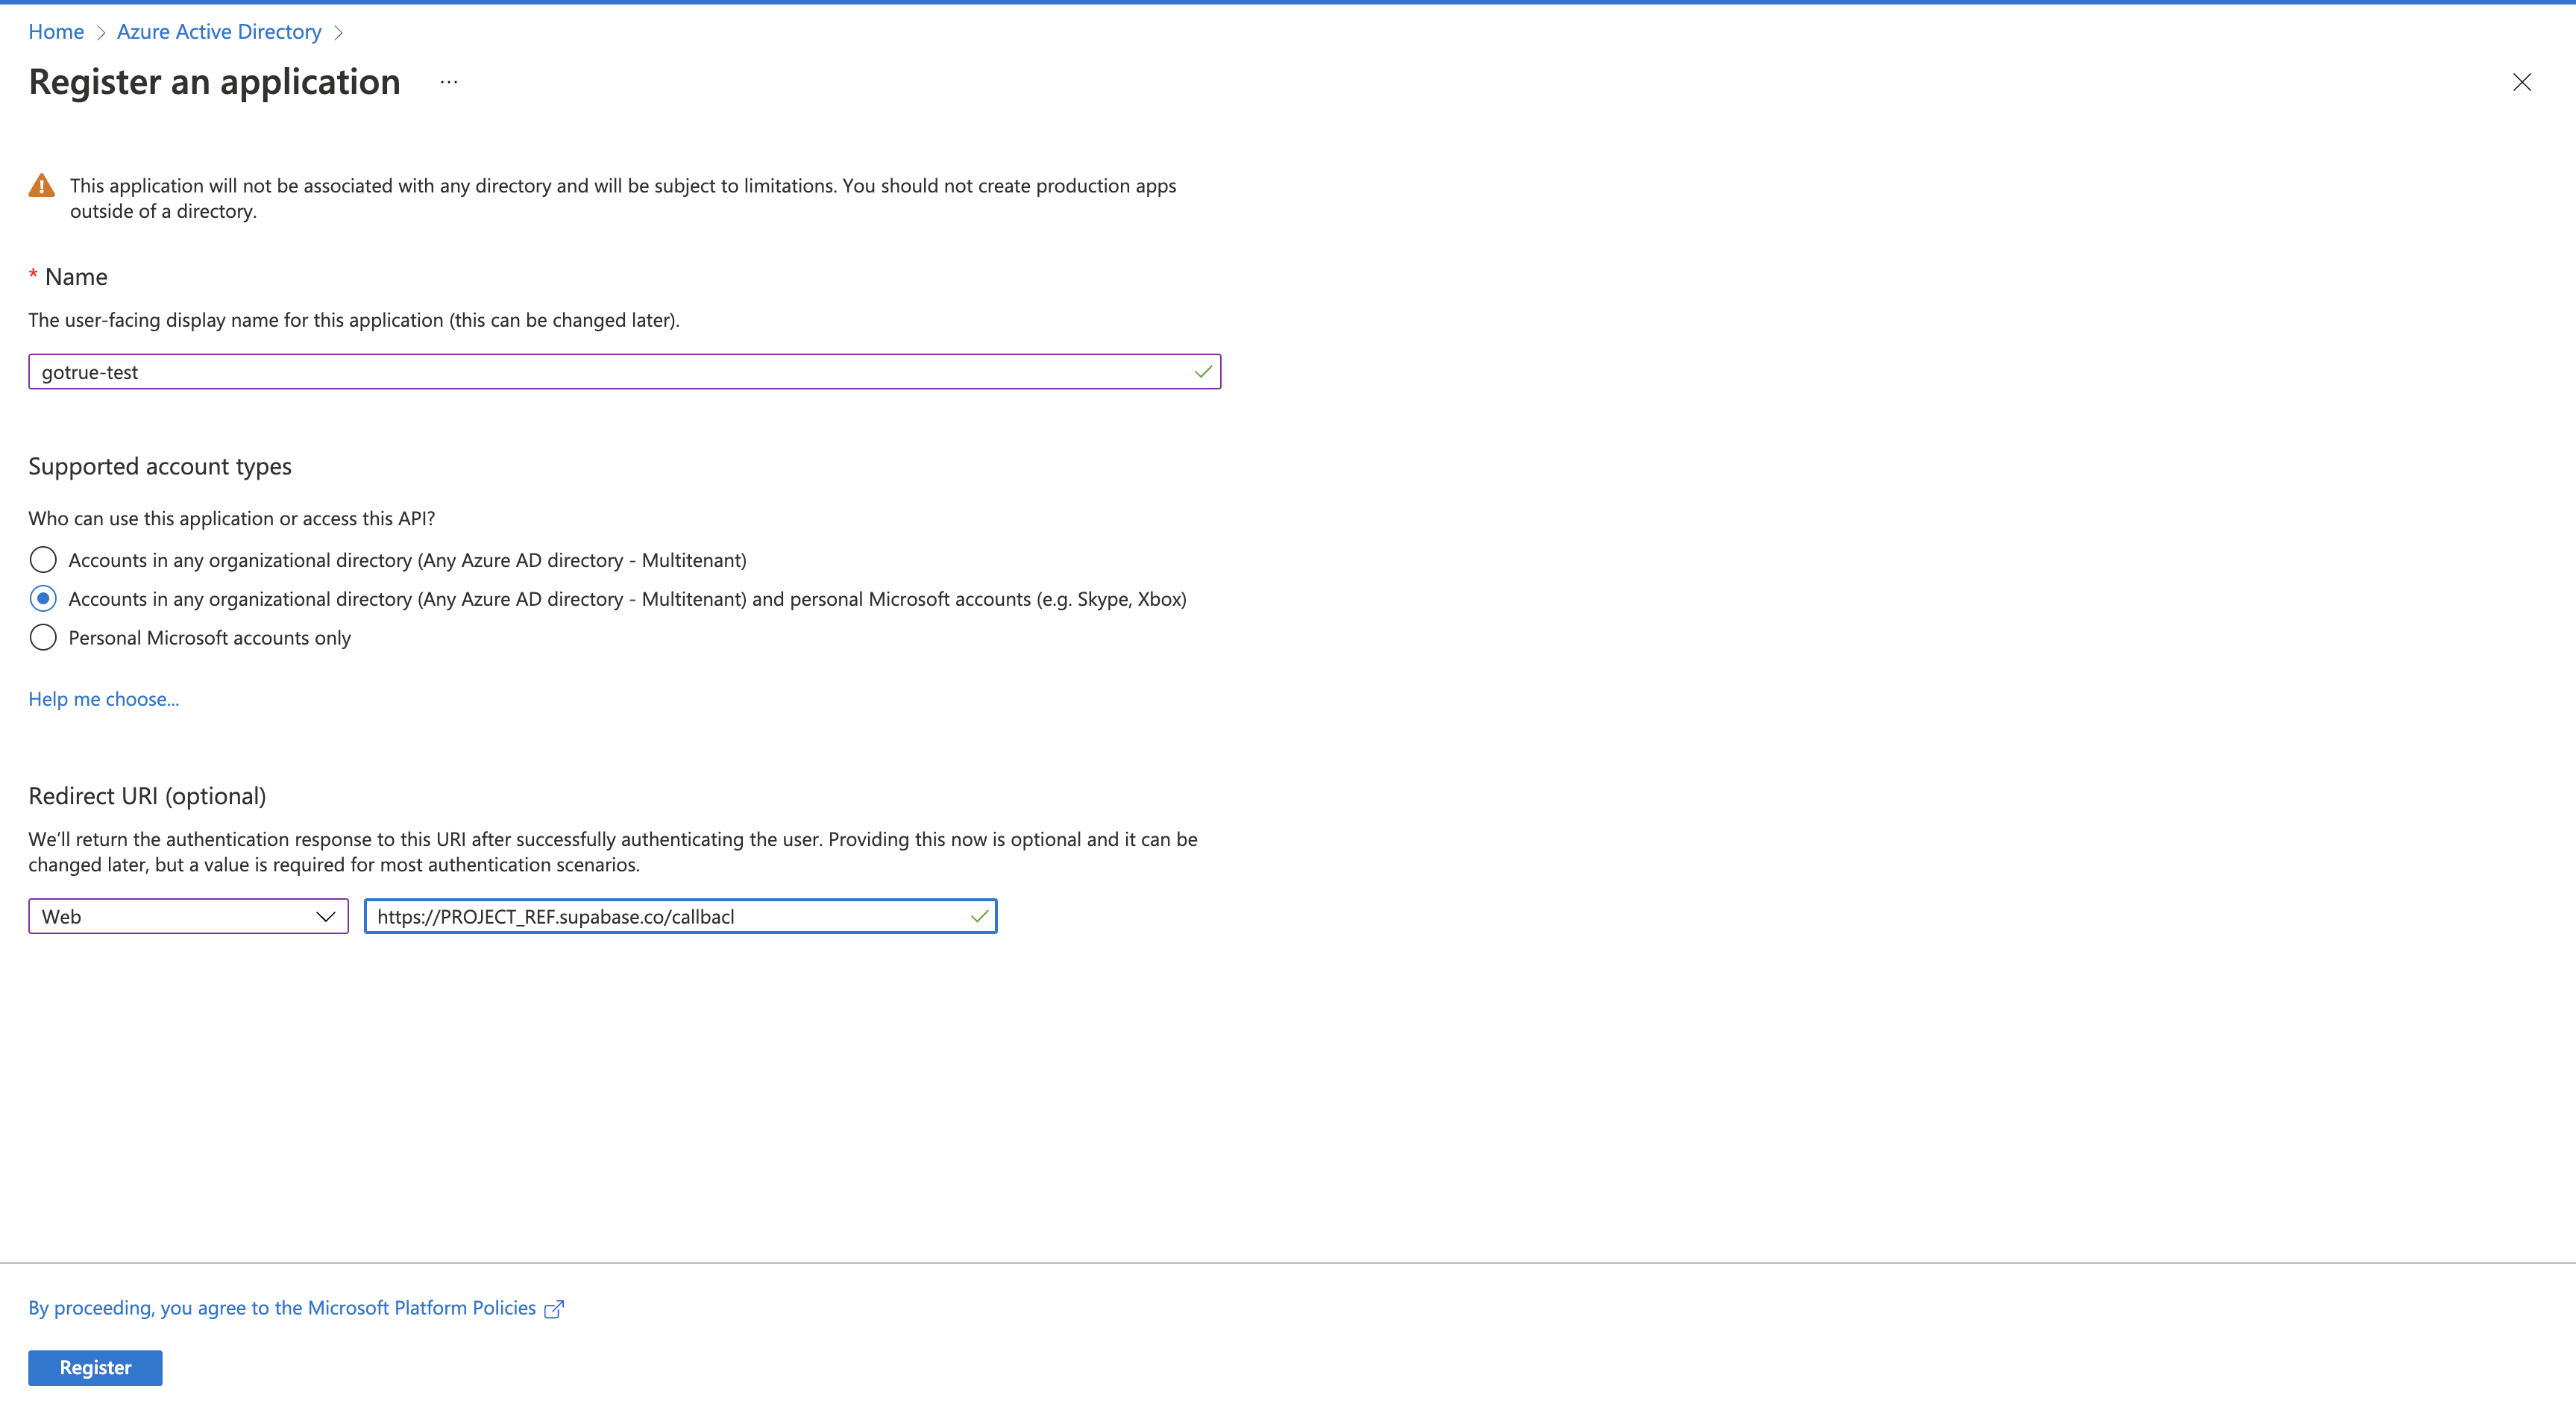
- 在 Microsoft Entra ID 中,点击侧边栏的 应用注册,然后选择 新注册。
- 选择一个名字,然后选择你偏好的支持账户类型。
- 指定一个_Web_ 重定向 URI。它看起来应该像这样:
https://<project-ref>.supabase.co/auth/v1/callback - 最后,在屏幕底部选择 注册。
获取客户端 ID 和密钥 #
🌐 Obtain a client ID and secret
使用 Azure OAuth 进行本地开发 #
🌐 Local development with Azure OAuth
Azure 不允许将 127.0.0.1 作为重定向 URI 的主机名,需要使用 localhost。
🌐 Azure does not allow 127.0.0.1 as a redirect URI hostname and requires
the use of localhost.
要在本地 Supabase 开发中启用 Azure OAuth,请在你的 config.toml 中配置 Supabase API 外部 URL:
🌐 To enable Azure OAuth during local Supabase development, configure the
Supabase API external URL in your config.toml:
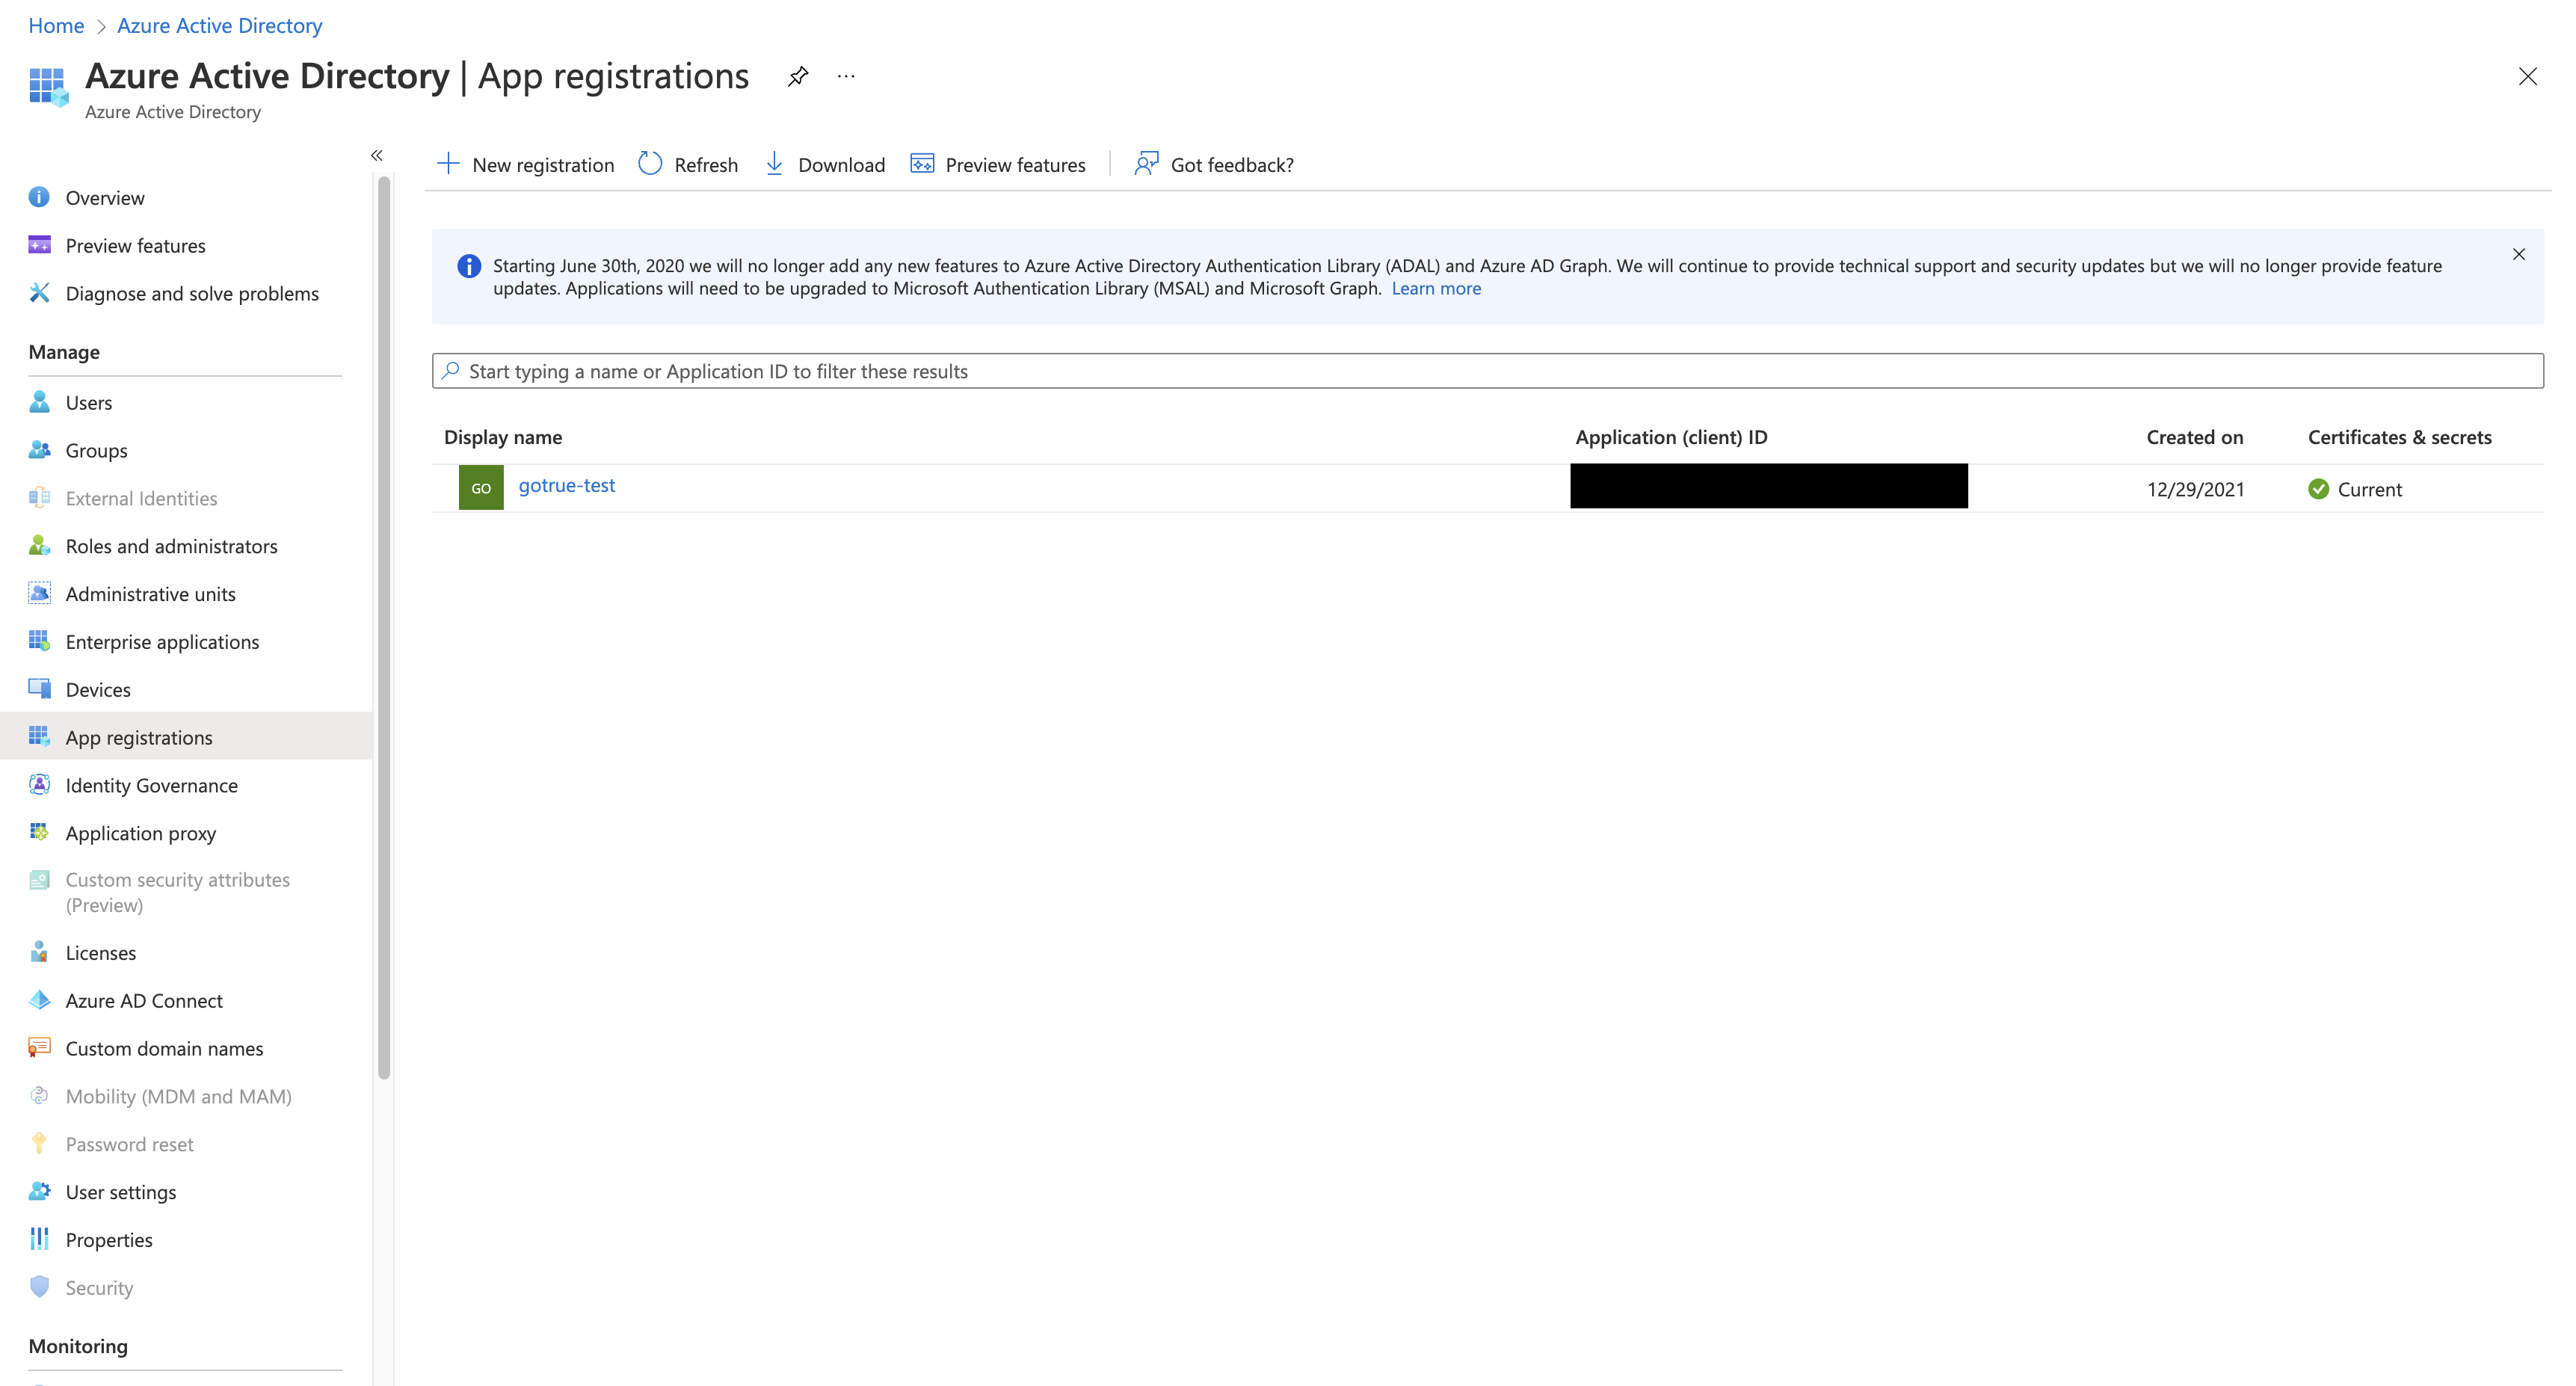
1[api]2external_url = "http://localhost:54321"- 一旦你的应用注册完成,客户端 ID 可以在 应用注册列表 中的 应用(客户端)ID 列下找到。
- 你也可以在应用概览屏幕上找到它。
- 把客户端 ID 放到 Supabase Auth 仪表板的 Azure 配置界面里。
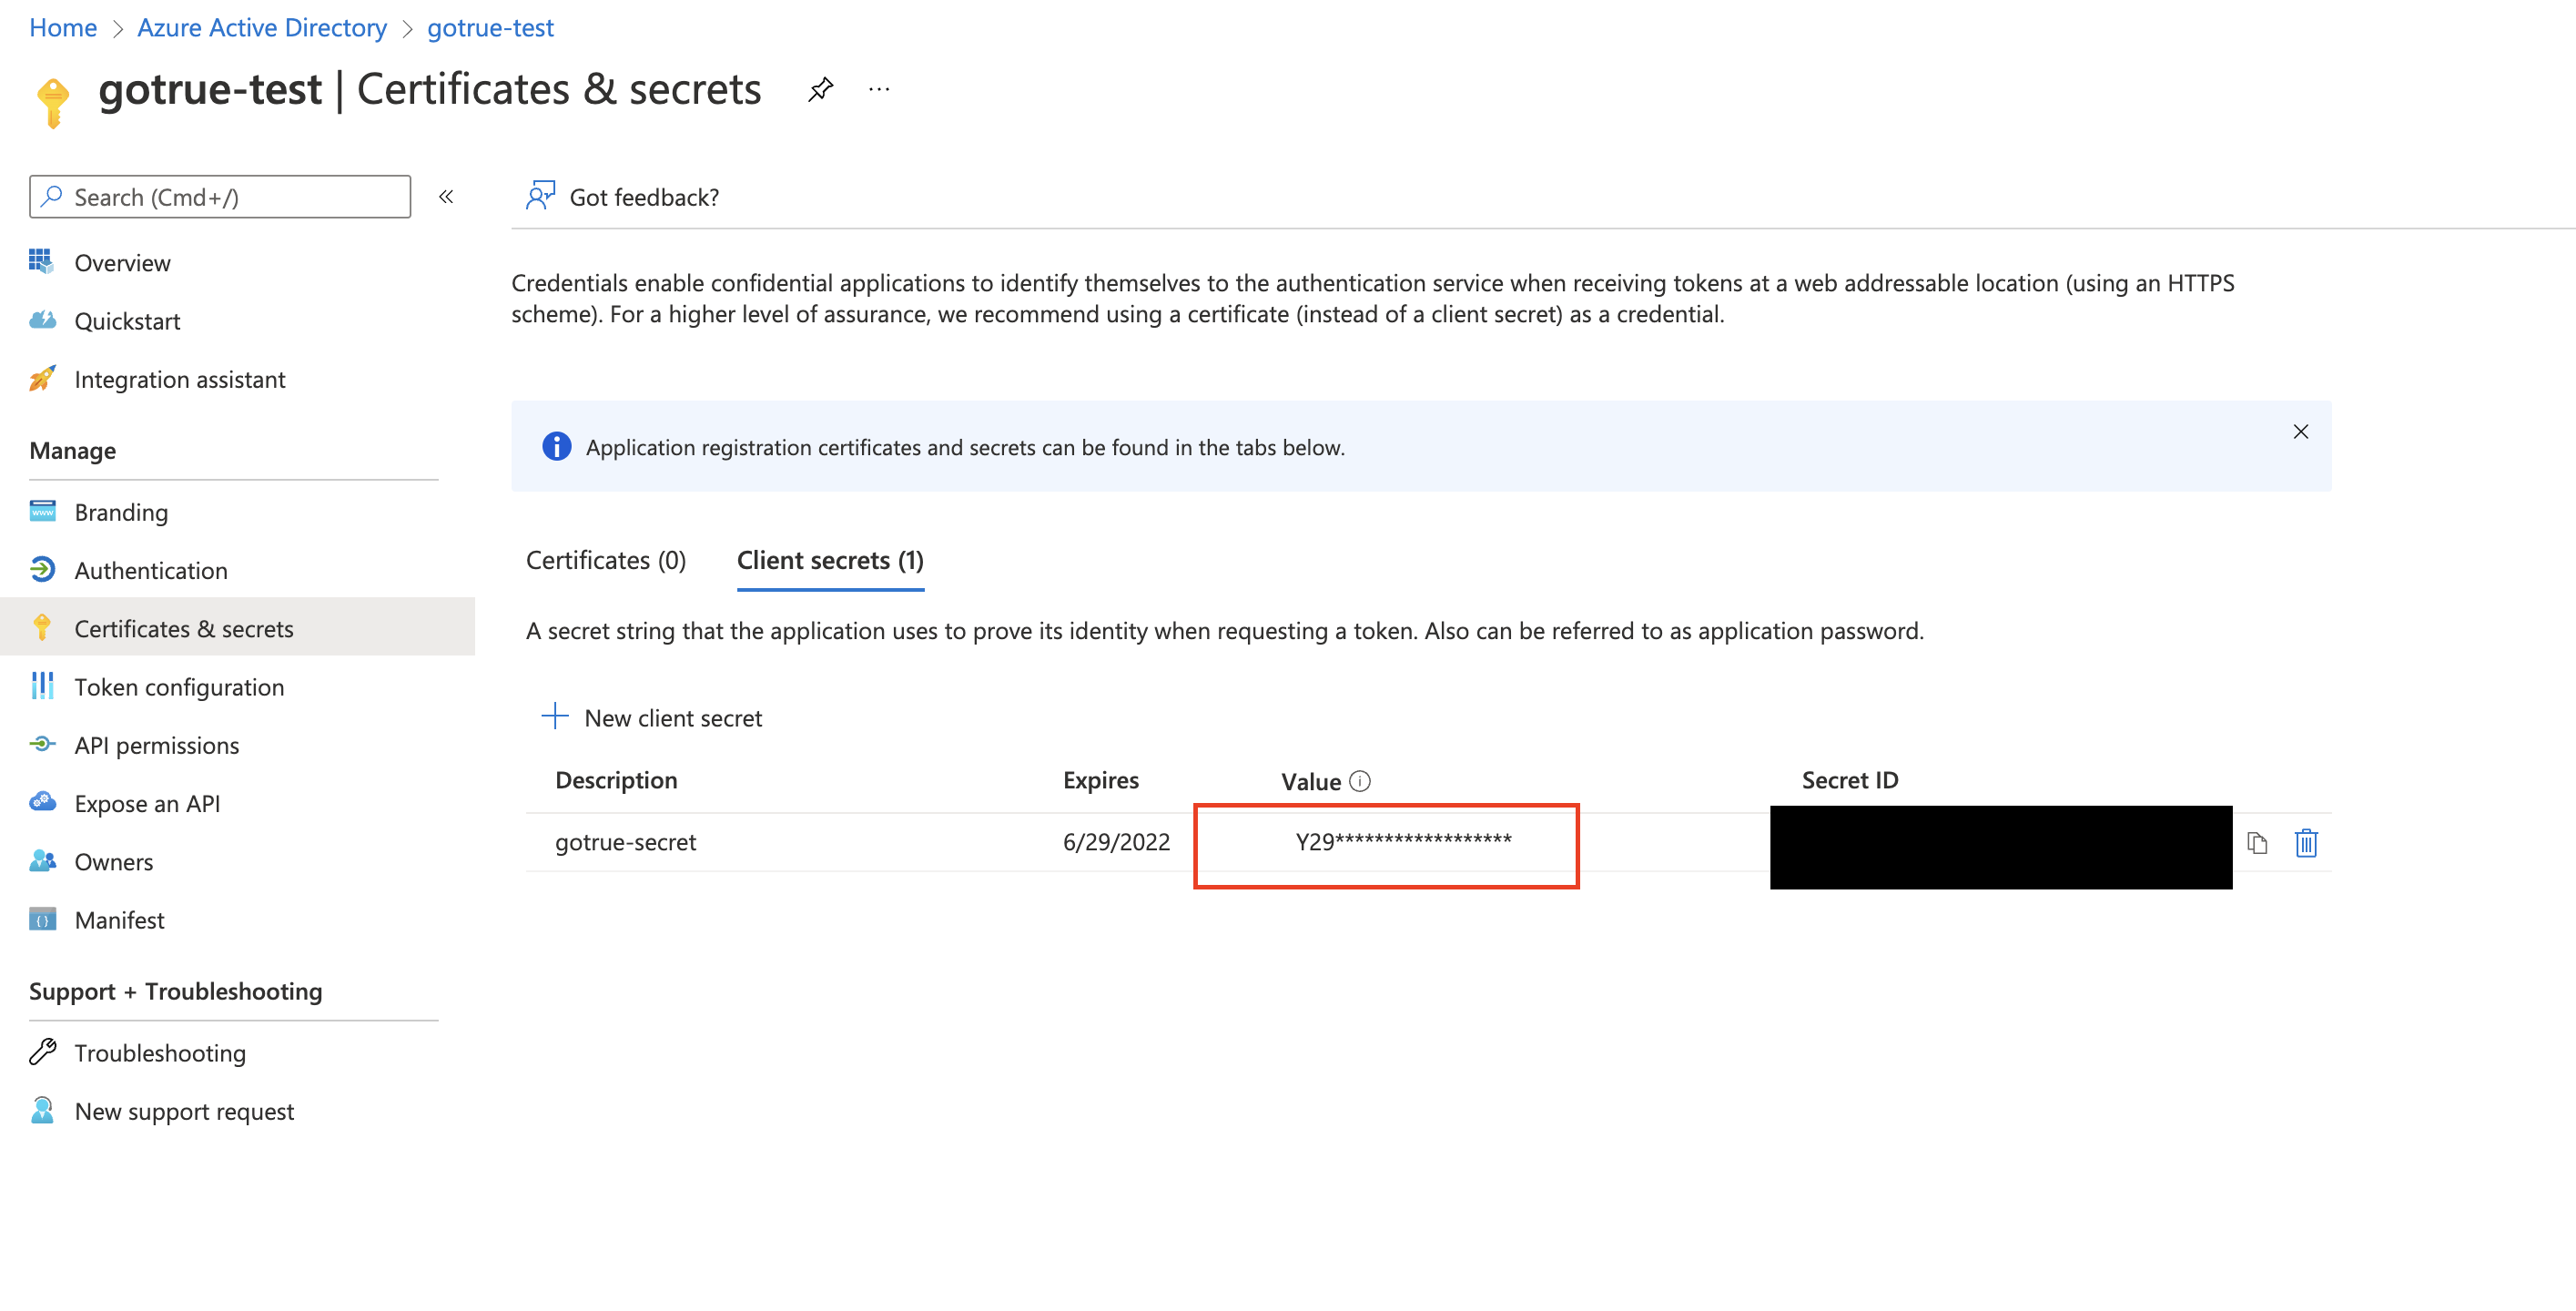
- 在应用概览屏幕中选择 添加证书或密钥,然后打开 客户端密钥 标签。
- 选择“新建客户端密钥”来创建一个新的客户端密钥。
- 选择一个你希望的密钥过期时间。记得提前几天在日历上记录,这样你有足够时间创建一个新的密钥,而不会遇到任何停机问题。
- 生成密钥后,在 Supabase Auth 仪表板的 Azure 配置界面中填写 Value 列(不是 Secret ID)。
你也可以使用管理 API 来配置 Azure 身份验证提供程序:
🌐 You can also configure the Azure auth provider using the Management API:
1# Get your access token from https://supabase.com/dashboard/account/tokens2export SUPABASE_ACCESS_TOKEN="your-access-token"3export PROJECT_REF="your-project-ref"45# Configure Azure auth provider6curl -X PATCH "https://api.supabase.com/v1/projects/$PROJECT_REF/config/auth" \7 -H "Authorization: Bearer $SUPABASE_ACCESS_TOKEN" \8 -H "Content-Type: application/json" \9 -d '{10 "external_azure_enabled": true,11 "external_azure_client_id": "your-azure-client-id",12 "external_azure_secret": "your-azure-client-secret",13 "external_azure_url": "your-azure-url"14 }'防范未经验证的邮箱域名 #
🌐 Guarding against unverified email domains
在某些情况下,Microsoft Entra ID 可能会发送未经验证的邮箱域名。这可能会让你的项目面临一个漏洞,恶意用户可能会冒充你项目中已经存在的账户。
🌐 Microsoft Entra ID can send out unverified email domains in certain cases. This may open up your project to a vulnerability where a malicious user can impersonate already existing accounts on your project.
这只适用于以下至少一种情况:
🌐 This only applies in at least one of these cases:
- 你已经将 OAuth 应用的
authenticationBehaviors设置配置为允许未验证的邮箱域名 - 你正在使用一个配置为单租户的 OAuth 应用,适用于支持的账户类型
- 你的 OAuth 应用是在 2023 年 6 月 20 日之前创建的,那时微软已经宣布了这个漏洞,而且这个应用之前使用过未经验证的邮箱
这意味着大多数 OAuth 应用不容易受到这个漏洞的影响。
🌐 This means that most OAuth apps are not susceptible to this vulnerability.
尽管如此,我们还是建议在 OAuth 应用上配置可选的 xms_edov 声明。这个声明可以让 Supabase Auth 确认微软 Entra ID 提供的邮箱地址是否已验证。
🌐 Despite this, we recommend configuring the optional xms_edov claim on the OAuth app. This claim allows Supabase Auth to identify with certainty whether the email address sent over by Microsoft Entra ID is verified or not.
按以下方式配置这个:
🌐 Configure this in the following way:
-
在 Azure 门户的 Microsoft Entra ID 中选择“应用注册”菜单。
-
选择 OAuth 应用。
-
在侧边栏中选择 Manifest 菜单。
-
备份一下 JSON,以防你以后需要用到。
-
找出
optionalClaims键。 -
通过指定以下对象来编辑它:
1"optionalClaims": {2"idToken": [3{4"name": "xms_edov",5"source": null,6"essential": false,7"additionalProperties": []8},9{10"name": "email",11"source": null,12"essential": false,13"additionalProperties": []14}15],16"accessToken": [17{18"name": "xms_edov",19"source": null,20"essential": false,21"additionalProperties": []22}23],24"saml2Token": []25}, -
选择 保存 以应用新的配置。
配置租户网址(可选) #
🌐 Configure a tenant URL (optional)
Microsoft Entra 租户是被允许访问你项目的用户目录。这个部分取决于你的 OAuth 注册使用的 支持的账户类型。
🌐 A Microsoft Entra tenant is the directory of users who are allowed to access your project. This section depends on what your OAuth registration uses for Supported account types.
默认情况下,Supabase Auth 使用常用的 Microsoft 租户(https://login.microsoftonline.com/common),通常允许任何 Microsoft 账户登录到你的项目。Microsoft Entra 会根据你注册的 OAuth 应用类型,进一步限制哪些账户可以访问你的项目。
🌐 By default, Supabase Auth uses the common Microsoft tenant (https://login.microsoftonline.com/common) which generally allows any Microsoft account to sign in to your project. Microsoft Entra further limits what accounts can access your project depending on the type of OAuth application you registered.
如果你的应用在“支持的账户类型”中注册为“仅个人 Microsoft 账户”,请将 Microsoft 租户设置为“消费者”(https://login.microsoftonline.com/consumers)。
🌐 If your app is registered as Personal Microsoft accounts only for the Supported account types set Microsoft tenant to consumers (https://login.microsoftonline.com/consumers).
如果你的应用在“支持的账户类型”中注册为“仅限我的组织”,你可能想用组织的租户网址来配置 Supabase Auth。这样会使用租户的授权流程,并且在 Supabase Auth 层面只允许来自指定租户的 Microsoft 账户访问。
🌐 If your app is registered as My organization only for the Supported account types you may want to configure Supabase Auth with the organization's tenant URL. This will use the tenant's authorization flows instead, and will limit access at the Supabase Auth level to Microsoft accounts arising from only the specified tenant.
通过在 Supabase 的 Azure 身份验证提供程序配置页面中,将一个值存储在 Azure Tenant URL 下进行配置,该值的格式如下 https://login.microsoftonline.com/<tenant-id>。
🌐 Configure this by storing a value under Azure Tenant URL in the Supabase Auth provider configuration page for Azure that has the following format https://login.microsoftonline.com/<tenant-id>.
在你的客户端应用中添加登录代码 #
🌐 Add login code to your client app
Supabase 认证要求 Azure 返回一个有效的电子邮件地址。因此,你必须在 signInWithOAuth 方法中请求 email 范围。
🌐 Supabase Auth requires that Azure returns a valid email address. Therefore you must request the email scope in the signInWithOAuth method.
确保你在以下代码中使用了正确的 supabase 客户端。
🌐 Make sure you're using the right supabase client in the following code.
如果你没有使用服务器端渲染或基于 Cookie 的认证,你可以直接从 @supabase/supabase-js 使用 createClient。如果你在使用服务器端渲染,请查看 服务器端认证指南 获取创建 Supabase 客户端的说明。
🌐 If you're not using Server-Side Rendering or cookie-based Auth, you can directly use the createClient from @supabase/supabase-js. If you're using Server-Side Rendering, see the Server-Side Auth guide for instructions on creating your Supabase client.
当你的用户登录时,用 azure 作为 provider 调用 signInWithOAuth() :
🌐 When your user signs in, call signInWithOAuth() with azure as the provider:
1import { createClient } from '@supabase/supabase-js'23const supabase = createClient('https://your-project-id.supabase.co', 'sb_publishable_...')45// ---cut---6async function signInWithAzure() {7 const { data, error } = await supabase.auth.signInWithOAuth({8 provider: 'azure',9 options: {10 scopes: 'email',11 },12 })13}以 PKCE 流程为例,比如在服务端认证中,你需要一个额外的步骤来处理代码交换。在调用 signInWithOAuth 时,提供一个指向回调路由的 redirectTo URL。这个重定向 URL 应该添加到你的 重定向允许列表 中。
🌐 For a PKCE flow, for example in Server-Side Auth, you need an extra step to handle the code exchange. When calling signInWithOAuth, provide a redirectTo URL which points to a callback route. This redirect URL should be added to your redirect allow list.
在浏览器中,signInWithOAuth 会自动重定向到 OAuth 提供商的认证端点,然后再重定向到你的端点。
🌐 In the browser, signInWithOAuth automatically redirects to the OAuth provider's authentication endpoint, which then redirects to your endpoint.
1import { createClient, type Provider } from '@supabase/supabase-js';2const supabase = createClient('https://your-project-id.supabase.co', 'sb_publishable_...')3const provider = 'provider' as Provider45// ---cut---6await supabase.auth.signInWithOAuth({7 provider,8 options: {9 redirectTo: `http://example.com/auth/callback`,10 },11})在回调端点,处理代码交换以保存用户会话。
🌐 At the callback endpoint, handle the code exchange to save the user session.
在 app/auth/callback/route.ts 创建一个新文件,并填入以下内容:
🌐 Create a new file at app/auth/callback/route.ts and populate with the following:
1import { NextResponse } from 'next/server'23// The client you created from the Server-Side Auth instructions4import { createClient } from '@/utils/supabase/server'56export async function GET(request: Request) {7 const { searchParams, origin } = new URL(request.url)8 const code = searchParams.get('code')9 // if "next" is in param, use it as the redirect URL10 let next = searchParams.get('next') ?? '/'11 if (!next.startsWith('/')) {12 // if "next" is not a relative URL, use the default13 next = '/'14 }1516 if (code) {17 const supabase = await createClient()18 const { error } = await supabase.auth.exchangeCodeForSession(code)19 if (!error) {20 const forwardedHost = request.headers.get('x-forwarded-host') // original origin before load balancer21 const isLocalEnv = process.env.NODE_ENV === 'development'22 if (isLocalEnv) {23 // we can be sure that there is no load balancer in between, so no need to watch for X-Forwarded-Host24 return NextResponse.redirect(`${origin}${next}`)25 } else if (forwardedHost) {26 return NextResponse.redirect(`https://${forwardedHost}${next}`)27 } else {28 return NextResponse.redirect(`${origin}${next}`)29 }30 }31 }3233 // return the user to an error page with instructions34 return NextResponse.redirect(`${origin}/auth/auth-code-error`)35}当你的用户注销时,调用 signOut() 来将他们从浏览器会话中移除,并清除 localStorage 中的任何对象:
🌐 When your user signs out, call signOut() to remove them from the browser session and any objects from localStorage:
1import { createClient } from '@supabase/supabase-js'23const supabase = createClient('https://your-project-id.supabase.co', 'sb_publishable_...')45// ---cut---6async function signOut() {7 const { error } = await supabase.auth.signOut()8}获取提供者刷新令牌 #
🌐 Obtain the provider refresh token
Azure OAuth2.0 默认不会返回 provider_refresh_token。如果你需要返回 provider_refresh_token,你需要包含以下权限范围:
🌐 Azure OAuth2.0 doesn't return the provider_refresh_token by default. If you need the provider_refresh_token returned, you will need to include the following scope:
1import { createClient } from '@supabase/supabase-js'23const supabase = createClient('https://your-project-id.supabase.co', 'sb_publishable_...')45// ---cut---6async function signInWithAzure() {7 const { data, error } = await supabase.auth.signInWithOAuth({8 provider: 'azure',9 options: {10 scopes: 'offline_access',11 },12 })13}资源 #
🌐 Resources