用 Expo React Native 构建一个社交登录应用
本教程演示了如何使用 Expo 构建一个实现社交认证的 React Native 应用。该应用展示了完整的认证流程,并使用以下方式实现受保护的导航:
🌐 This tutorial demonstrates how to build a React Native app with Expo that implements social authentication. The app showcases a complete authentication flow with protected navigation using:
- Supabase 数据库 - 一个用于存储用户数据的 Postgres 数据库,带有 行级安全,确保数据受到保护,用户只能访问自己的信息。
- Supabase Auth - 让用户可以通过社交认证提供商(Apple 和 Google)登录。
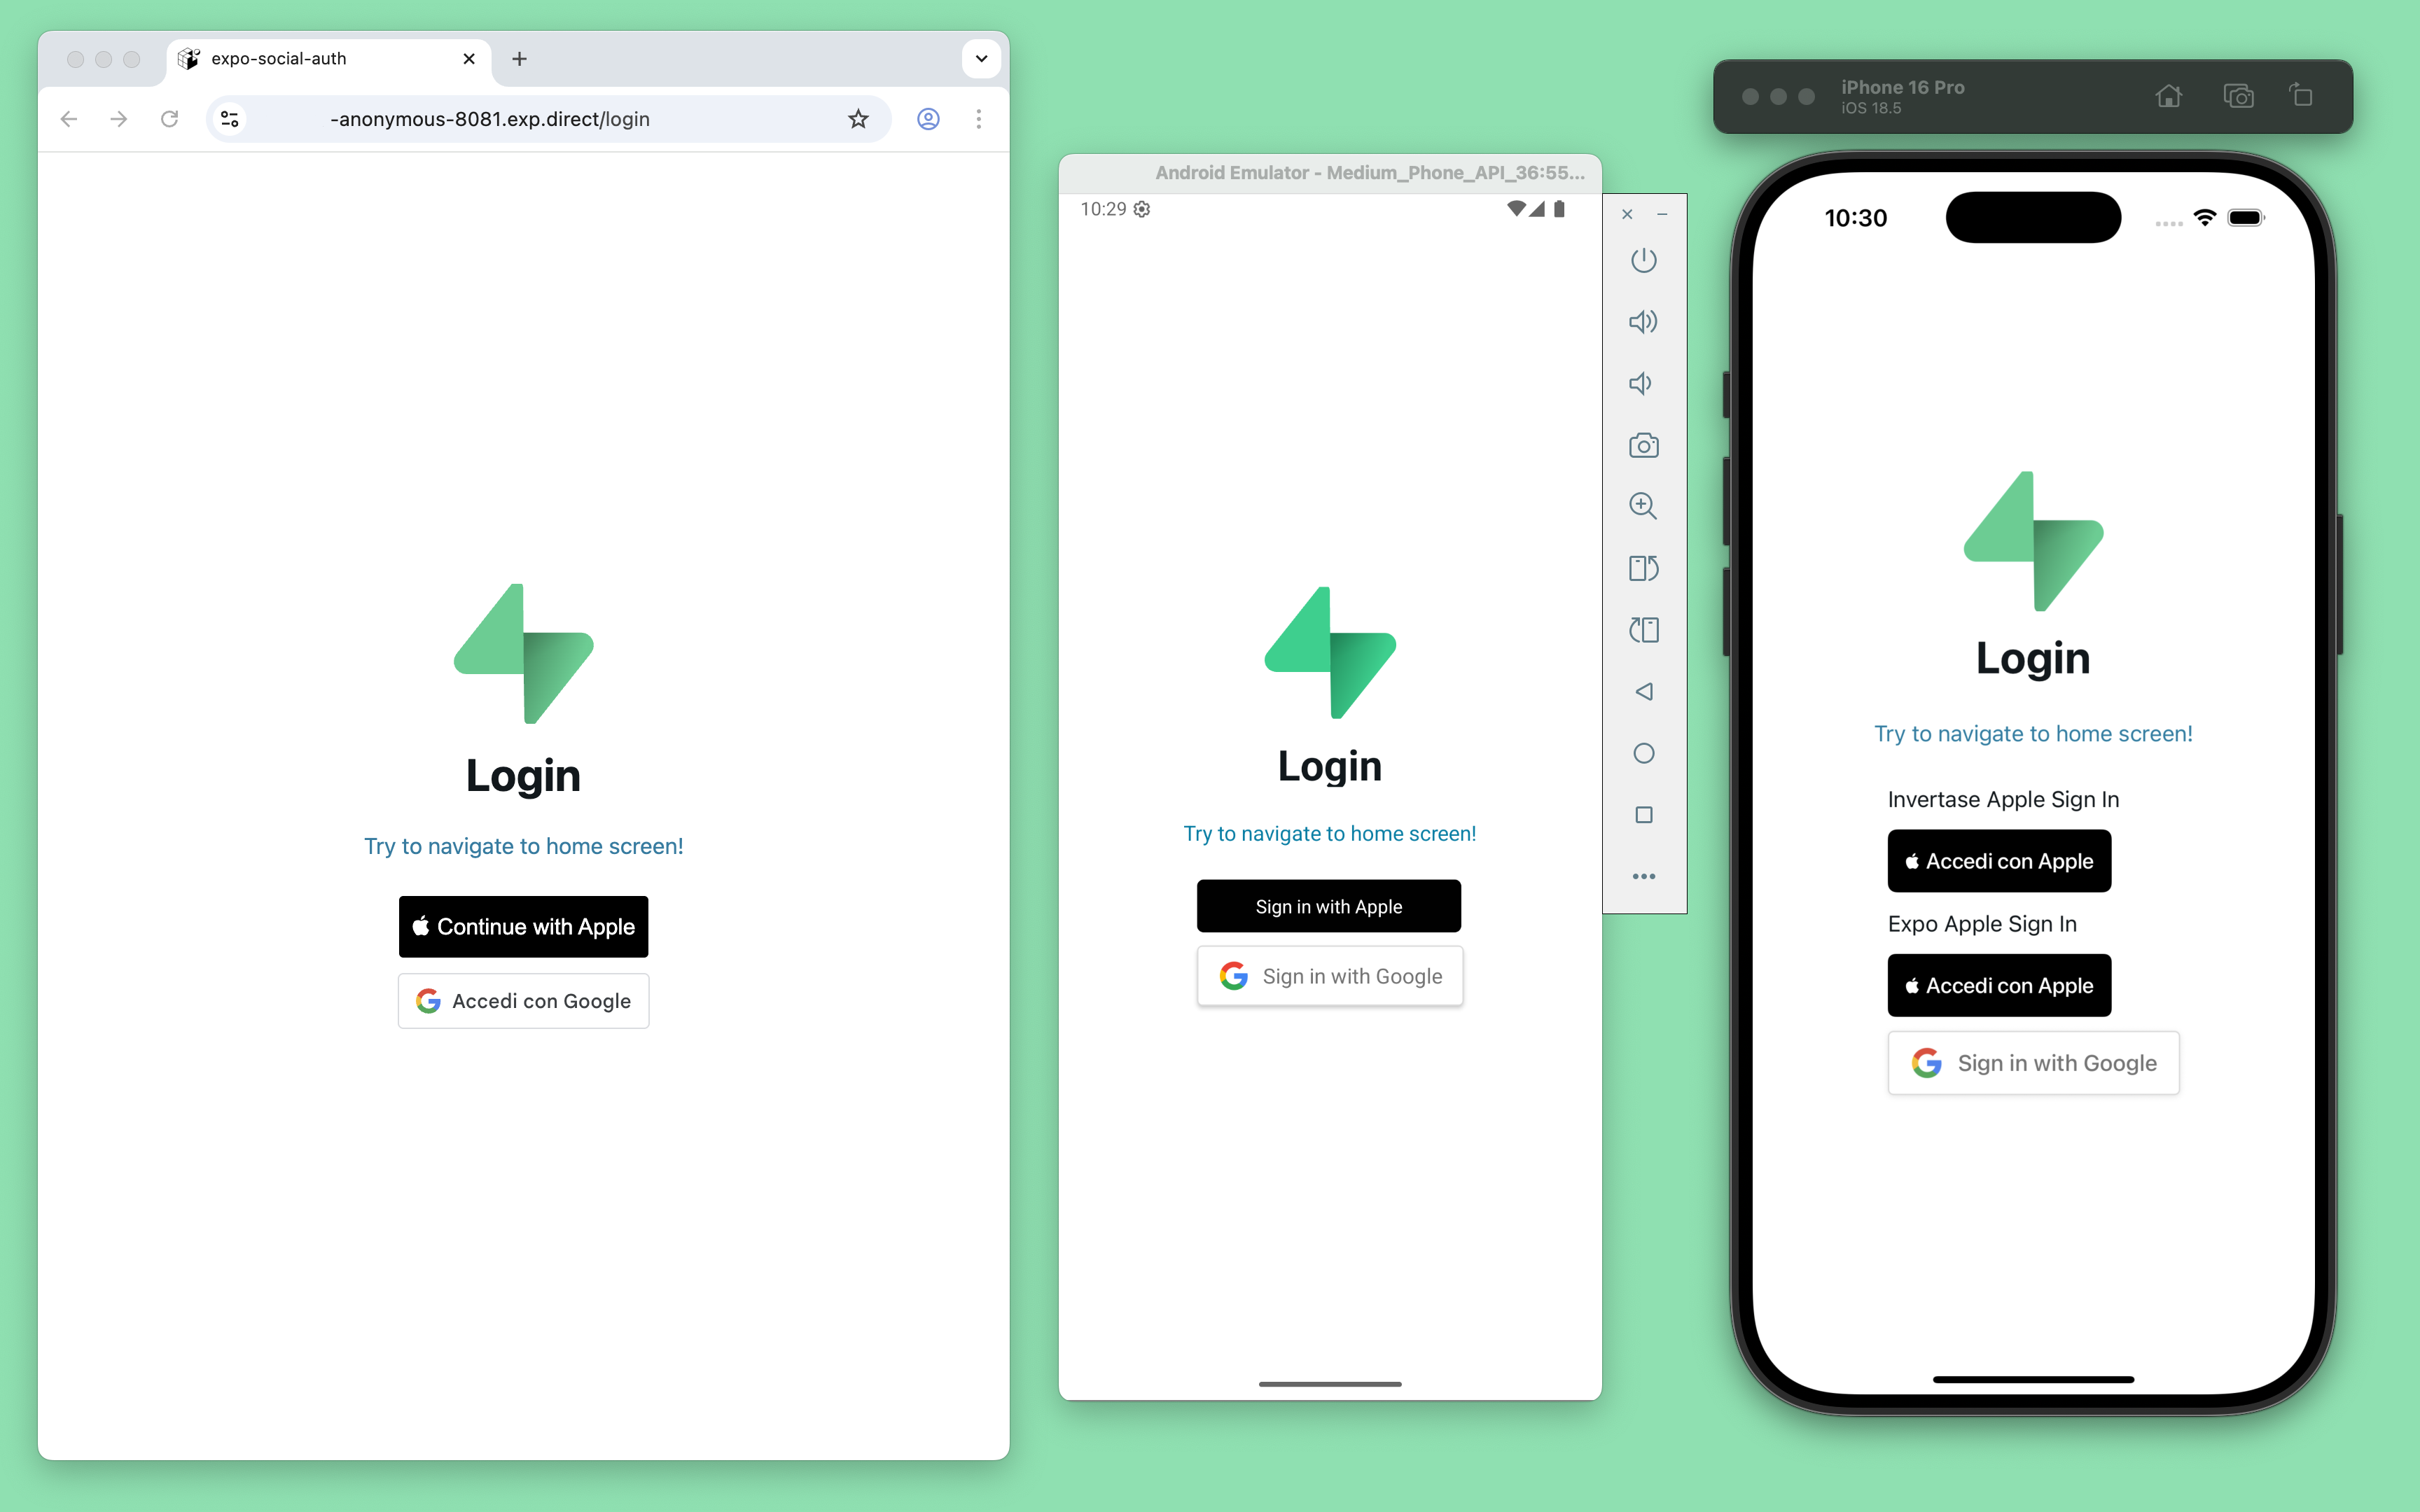
如果你在使用本指南的过程中遇到困难,可以参考 GitHub 上的完整示例。
🌐 If you get stuck while working through this guide, refer to the full example on GitHub.
项目设置 #
🌐 Project setup
在你开始构建之前,你需要先设置数据库和 API。你可以通过在 Supabase 中启动一个新项目,然后在数据库中创建一个“架构”来完成这一步。
🌐 Before you start building you need to set up the Database and API. You can do this by starting a new Project in Supabase and then creating a "schema" inside the database.
创建一个项目 #
🌐 Create a project
- 在 Supabase 仪表板中创建一个新项目。
- 输入你的项目详情。
- 等新数据库上线。
设置数据库模式 #
🌐 Set up the database schema
现在设置数据库模式。你可以在 SQL 编辑器中使用“用户管理入门”快速开始,也可以复制粘贴下面的 SQL 并运行。
🌐 Now set up the database schema. You can use the "User Management Starter" quickstart in the SQL Editor, or you can copy/paste the SQL from below and run it.
- 在仪表板中转到SQL 编辑器页面。
- 点击 社区 > 快速入门 标签下的 用户管理入门。
- 点击运行。
你可以通过运行 db pull 命令将数据库架构拉到本地项目。查看本地开发文档获取详细说明。
🌐 You can pull the database schema down to your local project by running the db pull command. Read the local development docs for detailed instructions.
1supabase link --project-ref <project-id>2# You can get <project-id> from your project's dashboard URL: https://supabase.com/dashboard/project/<project-id>3supabase db pull获取 API 详情 #
🌐 Get API details
要与数据库表中的数据进行交互,你可以使用封装了自动生成的数据 API 端点的客户端库,并使用来自项目 Connect 对话框的项目 URL 和密钥进行认证。
🌐 To interact with data in database tables, you use the client libraries that wrap the auto-generated Data API endpoints, authenticating using the Project URL and key from the project Connect dialog.
阅读 API 密钥文档 以全面了解所有密钥类型、用途以及在哪里可以找到它们。
正在构建应用 #
🌐 Building the app
先从零开始搭建 React Native 应用吧。
🌐 Start by building the React Native app from scratch.
初始化一个 React Native 应用 #
🌐 Initialize a React Native app
使用 Expo 初始化一个名为 expo-social-auth 的应用,使用 标准模板:
🌐 Use Expo to initialize an app called expo-social-auth with the standard template:
1npx create-expo-app@latest23cd expo-social-auth安装其他依赖:
🌐 Install the additional dependencies:
- supabase-js
- @react-native-async-storage/async-storage - React Native 的一个键值存储库。
- expo-secure-store - 提供了一种在设备上本地安全存储键值对的方法。
- expo-splash-screen - 提供了一种以编程方式管理启动屏的方法。
1npx expo install @supabase/supabase-js @react-native-async-storage/async-storage expo-secure-store expo-splash-screen现在,创建一个辅助文件来初始化 Supabase 客户端,用于网页和 React Native 平台,使用特定平台的存储适配器:移动端使用Expo SecureStore,网页端使用AsyncStorage 。
🌐 Now, create a helper file to initialize the Supabase client for both web and React Native platforms using platform-specific storage adapters: Expo SecureStore for mobile and AsyncStorage for web.
1import AsyncStorage from '@react-native-async-storage/async-storage'2import { createClient } from '@supabase/supabase-js'3import 'react-native-url-polyfill/auto'45const isSSR = typeof window === 'undefined'67const ExpoWebSecureStoreAdapter = {8 getItem: (key: string) => {9 if (isSSR) return null10 console.debug('getItem', { key })11 return AsyncStorage.getItem(key)12 },13 setItem: (key: string, value: string) => {14 if (isSSR) return15 return AsyncStorage.setItem(key, value)16 },17 removeItem: (key: string) => {18 if (isSSR) return19 return AsyncStorage.removeItem(key)20 },21}2223export const supabase = createClient(24 process.env.EXPO_PUBLIC_SUPABASE_URL ?? '',25 process.env.EXPO_PUBLIC_SUPABASE_PUBLISHABLE_KEY ?? '',26 {27 auth: {28 storage: ExpoWebSecureStoreAdapter,29 autoRefreshToken: true,30 persistSession: true,31 detectSessionInUrl: false,32 },33 }34)设置环境变量 #
🌐 Set up environment variables
你需要之前复制的 API URL 和 publishable 密钥 在这里。这些变量在你的 Expo 应用中是安全的,因为 Supabase 在你的数据库上启用了 行级安全。
🌐 You need the API URL and the publishable key copied earlier.
These variables are safe to expose in your Expo app since Supabase has Row Level Security enabled on your database.
创建一个包含这些变量的 .env 文件:
🌐 Create a .env file containing these variables:
1EXPO_PUBLIC_SUPABASE_URL=""2EXPO_PUBLIC_SUPABASE_PUBLISHABLE_KEY=""3EXPO_PUBLIC_APPLE_AUTH_SERVICE_ID=""4EXPO_PUBLIC_APPLE_AUTH_REDIRECT_URI=""5EXPO_PUBLIC_GOOGLE_AUTH_WEB_CLIENT_ID=""设置受保护的导航 #
🌐 Set up protected navigation
接下来,你需要保护应用导航,防止未认证的用户访问受保护的路由。使用 Expo SplashScreen 在获取用户资料和验证身份状态时显示加载屏幕。
🌐 Next, you need to protect app navigation to prevent unauthenticated users from accessing protected routes. Use the Expo SplashScreen to display a loading screen while fetching the user profile and verifying authentication status.
创建 AuthContext#
🌐 Create the AuthContext
创建一个 React 上下文 来管理身份验证会话,使其可以从任何组件访问:
🌐 Create a React context to manage the authentication session, making it accessible from any component:
1import { createContext, useContext } from 'react'23export type AuthData = {4 claims?: Record<string, any> | null5 profile?: any | null6 isLoading: boolean7 isLoggedIn: boolean8}910export const AuthContext = createContext<AuthData>({11 claims: undefined,12 profile: undefined,13 isLoading: true,14 isLoggedIn: false,15})1617export const useAuthContext = () => useContext(AuthContext)创建 AuthProvider#
🌐 Create the AuthProvider
接下来,创建一个提供者组件来在整个应用中管理认证会话:
🌐 Next, create a provider component to manage the authentication session throughout the app:
1import { AuthContext } from '@/hooks/use-auth-context'2import { supabase } from '@/lib/supabase'3import { PropsWithChildren, useEffect, useState } from 'react'45export default function AuthProvider({ children }: PropsWithChildren) {6 const [claims, setClaims] = useState<Record<string, any> | undefined | null>()7 const [profile, setProfile] = useState<any>()8 const [isLoading, setIsLoading] = useState<boolean>(true)910 // Fetch the claims once, and subscribe to auth state changes11 useEffect(() => {12 const fetchClaims = async () => {13 setIsLoading(true)1415 const { data, error } = await supabase.auth.getClaims()1617 if (error) {18 console.error('Error fetching claims:', error)19 }2021 setClaims(data?.claims ?? null)22 setIsLoading(false)23 }2425 fetchClaims()2627 const {28 data: { subscription },29 } = supabase.auth.onAuthStateChange(async (_event, _session) => {30 console.log('Auth state changed:', { event: _event })31 const { data } = await supabase.auth.getClaims()32 setClaims(data?.claims ?? null)33 })3435 // Cleanup subscription on unmount36 return () => {37 subscription.unsubscribe()38 }39 }, [])4041 // Fetch the profile when the claims change42 useEffect(() => {43 const fetchProfile = async () => {44 setIsLoading(true)4546 if (claims) {47 const { data } = await supabase.from('profiles').select('*').eq('id', claims.sub).single()4849 setProfile(data)50 } else {51 setProfile(null)52 }5354 setIsLoading(false)55 }5657 fetchProfile()58 }, [claims])5960 return (61 <AuthContext.Provider62 value={{63 claims,64 isLoading,65 profile,66 isLoggedIn: claims != undefined,67 }}68 >69 {children}70 </AuthContext.Provider>71 )72}创建 SplashScreenController#
🌐 Create the SplashScreenController
创建一个 SplashScreenController 组件来显示认证会话加载时的 Expo SplashScreen:“}
🌐 Create a SplashScreenController component to display the Expo SplashScreen while the authentication session is loading:
1import { useAuthContext } from '@/hooks/use-auth-context'2import { SplashScreen } from 'expo-router'34SplashScreen.preventAutoHideAsync()56export function SplashScreenController() {7 const { isLoading } = useAuthContext()89 if (!isLoading) {10 SplashScreen.hideAsync()11 }1213 return null14}创建一个登出组件 #
🌐 Create a logout component
创建一个登出按钮组件来处理用户退出:
🌐 Create a logout button component to handle user sign-out:
1import { supabase } from '@/lib/supabase'2import React from 'react'3import { Button } from 'react-native'45async function onSignOutButtonPress() {6 const { error } = await supabase.auth.signOut()78 if (error) {9 console.error('Error signing out:', error)10 }11}1213export default function SignOutButton() {14 return <Button title="Sign out" onPress={onSignOutButtonPress} />15}然后把它添加到用于显示用户资料数据和注销按钮的 app/(tabs)/index.tsx 文件中:
🌐 And add it to the app/(tabs)/index.tsx file used to display the user profile data and the logout button:
1import { Image } from 'expo-image'2import { StyleSheet } from 'react-native'34import { HelloWave } from '@/components/hello-wave'5import ParallaxScrollView from '@/components/parallax-scroll-view'6import { ThemedText } from '@/components/themed-text'7import { ThemedView } from '@/components/themed-view'8import SignOutButton from '@/components/social-auth-buttons/sign-out-button'9import { useAuthContext } from '@/hooks/use-auth-context'1011export default function HomeScreen() {12 const { profile } = useAuthContext()1314 return (15 <ParallaxScrollView16 headerBackgroundColor={{ light: '#A1CEDC', dark: '#1D3D47' }}17 headerImage={18 <Image19 source={require('@/assets/images/partial-react-logo.png')}20 style={styles.reactLogo}21 />22 }23 >24 <ThemedView style={styles.titleContainer}>25 <ThemedText type="title">Welcome!</ThemedText>26 <HelloWave />27 </ThemedView>28 <ThemedView style={styles.stepContainer}>29 <ThemedText type="subtitle">Username</ThemedText>30 <ThemedText>{profile?.username}</ThemedText>31 <ThemedText type="subtitle">Full name</ThemedText>32 <ThemedText>{profile?.full_name}</ThemedText>33 </ThemedView>34 <SignOutButton />35 </ParallaxScrollView>36 )37}3839const styles = StyleSheet.create({40 titleContainer: {41 flexDirection: 'row',42 alignItems: 'center',43 gap: 8,44 },45 stepContainer: {46 gap: 8,47 marginBottom: 8,48 },49 reactLogo: {50 height: 178,51 width: 290,52 bottom: 0,53 left: 0,54 position: 'absolute',55 },56})创建一个登录界面 #
🌐 Create a login screen
接下来,创建一个基本的登录界面组件:
🌐 Next, create a basic login screen component:
1import { Link, Stack } from 'expo-router'2import { StyleSheet } from 'react-native'34import { ThemedText } from '@/components/themed-text'5import { ThemedView } from '@/components/themed-view'67export default function LoginScreen() {8 return (9 <>10 <Stack.Screen options={{ title: 'Login' }} />11 <ThemedView style={styles.container}>12 <ThemedText type="title">Login</ThemedText>13 <Link href="/" style={styles.link}>14 <ThemedText type="link">Try to navigate to home screen!</ThemedText>15 </Link>16 </ThemedView>17 </>18 )19}2021const styles = StyleSheet.create({22 container: {23 flex: 1,24 alignItems: 'center',25 justifyContent: 'center',26 padding: 20,27 },28 link: {29 marginTop: 15,30 paddingVertical: 15,31 },32})实现受保护的路由 #
🌐 Implement protected routes
用 AuthProvider 和 SplashScreenController 封装导航。
🌐 Wrap the navigation with the AuthProvider and SplashScreenController.
使用 Expo Router 的受保护路由,你可以保护导航:
🌐 Using Expo Router's protected routes, you can secure navigation:
1import { DarkTheme, DefaultTheme, ThemeProvider } from '@react-navigation/native'2import { Stack } from 'expo-router'3import { StatusBar } from 'expo-status-bar'4import 'react-native-reanimated'56import { SplashScreenController } from '@/components/splash-screen-controller'78import { useAuthContext } from '@/hooks/use-auth-context'9import { useColorScheme } from '@/hooks/use-color-scheme'10import AuthProvider from '@/providers/auth-provider'1112// Separate RootNavigator so we can access the AuthContext13function RootNavigator() {14 const { isLoggedIn } = useAuthContext()1516 return (17 <Stack>18 <Stack.Protected guard={isLoggedIn}>19 <Stack.Screen name="(tabs)" options={{ headerShown: false }} />20 </Stack.Protected>21 <Stack.Protected guard={!isLoggedIn}>22 <Stack.Screen name="login" options={{ headerShown: false }} />23 </Stack.Protected>24 <Stack.Screen name="+not-found" />25 </Stack>26 )27}2829export default function RootLayout() {30 const colorScheme = useColorScheme()3132 return (33 <ThemeProvider value={colorScheme === 'dark' ? DarkTheme : DefaultTheme}>34 <AuthProvider>35 <SplashScreenController />36 <RootNavigator />37 <StatusBar style="auto" />38 </AuthProvider>39 </ThemeProvider>40 )41}你现在可以通过运行以下命令来测试这个应用:
🌐 You can now test the app by running:
1npx expo prebuild2npx expo start --clear确认应用按预期工作。启动画面在获取用户资料时显示,即使尝试使用 Link 按钮导航到主页,登录页面仍然会出现。
🌐 Verify that the app works as expected. The splash screen displays while fetching the user profile, and the login page appears even when attempting to navigate to the home screen using the Link button.
默认情况下,Supabase Auth 在为用户创建会话之前要求进行邮箱验证。要支持邮箱验证,你需要实现深度链接处理!
🌐 By default Supabase Auth requires email verification before a session is created for the user. To support email verification you need to implement deep link handling!
在测试时,你可以在你的项目的邮箱认证提供商设置中禁用邮箱确认。
🌐 While testing, you can disable email confirmation in your project's email auth provider settings.
整合社交认证 #
🌐 Integrate social authentication
现在将社交认证与 Supabase Auth 集成,先从 Apple 认证开始。如果你只需要实现 Google 认证,可以直接跳到Google 认证部分。
🌐 Now integrate social authentication with Supabase Auth, starting with Apple authentication. If you only need to implement Google authentication, you can skip to the Google authentication section.
苹果认证 #
🌐 Apple authentication
先在登录界面里添加按钮:
🌐 Start by adding the button inside the login screen:
1…2import AppleSignInButton from '@/components/social-auth-buttons/apple/apple-sign-in-button';3…4export default function LoginScreen() {5 return (6 <>7 <Stack.Screen options={{ title: 'Login' }} />8 <ThemedView style={styles.container}>9 …10 <AppleSignInButton />11 …12 </ThemedView>13 </>14 );15}16…对于苹果认证,你可以选择以下方式:
🌐 For Apple authentication, you can choose between:
- Invertase 的 React Native 苹果认证库 - 支持 iOS 和 Android
- react-apple-signin-auth - 支持网页端,也被 Invertase 推荐
- Expo 的 AppleAuthentication 库 —— 仅支持 iOS
无论选择哪种方式,你都需要从 Apple 开发者控制台 获取一个服务 ID。
🌐 For either option, you need to obtain a Service ID from the Apple Developer Console.
要在 Android 和网络上启用 Apple 注册,你还需要注册通过运行得到的隧道 URL(例如 https://arnrer1-anonymous-8081.exp.direct):
🌐 To enable Apple sign-up on Android and Web, you also need to register the tunnelled URL (e.g., https://arnrer1-anonymous-8081.exp.direct) obtained by running:
1npx expo start --tunnel然后把它添加到 你的 Supabase 仪表板认证配置 的 重定向 URL 字段里。
🌐 And add it to the Redirect URLs field in your Supabase dashboard Authentication configuration.
想了解更多信息,请查看 Supabase 使用苹果登录 指南。
🌐 For more information, follow the Supabase Login with Apple guide.
前提条件
在继续之前,确保你已经按照 Invertase 初始设置指南 和 Invertase 安卓设置指南 中的要求完成了必要的准备工作。
你需要在 .env 文件中添加两个新的环境变量:
1EXPO_PUBLIC_APPLE_AUTH_SERVICE_ID="YOUR_APPLE_AUTH_SERVICE_ID"2EXPO_PUBLIC_APPLE_AUTH_REDIRECT_URI="YOUR_APPLE_AUTH_REDIRECT_URI"iOS#
安装 @invertase/react-native-apple-authentication 库:
1npx expo install @invertase/react-native-apple-authentication然后创建 iOS 特定的按钮组件 AppleSignInButton:
1import { supabase } from '@/lib/supabase'2import { AppleButton, appleAuth } from '@invertase/react-native-apple-authentication'3import type { SignInWithIdTokenCredentials } from '@supabase/supabase-js'4import { router } from 'expo-router'5import { Platform } from 'react-native'67async function onAppleButtonPress() {8 // Performs login request9 const appleAuthRequestResponse = await appleAuth.performRequest({10 requestedOperation: appleAuth.Operation.LOGIN,11 // Note: it appears putting FULL_NAME first is important, see issue #29312 requestedScopes: [appleAuth.Scope.FULL_NAME, appleAuth.Scope.EMAIL],13 })1415 // Get the current authentication state for user16 // Note: This method must be tested on a real device. On the iOS simulator it always throws an error.17 const credentialState = await appleAuth.getCredentialStateForUser(appleAuthRequestResponse.user)1819 console.log('Apple sign in successful:', { credentialState, appleAuthRequestResponse })2021 if (22 credentialState === appleAuth.State.AUTHORIZED &&23 appleAuthRequestResponse.identityToken &&24 appleAuthRequestResponse.authorizationCode25 ) {26 const signInWithIdTokenCredentials: SignInWithIdTokenCredentials = {27 provider: 'apple',28 token: appleAuthRequestResponse.identityToken,29 nonce: appleAuthRequestResponse.nonce,30 access_token: appleAuthRequestResponse.authorizationCode,31 }3233 const { data, error } = await supabase.auth.signInWithIdToken(signInWithIdTokenCredentials)3435 if (error) {36 console.error('Error signing in with Apple:', error)37 }3839 if (data) {40 console.log('Apple sign in successful:', data)41 router.navigate('/(tabs)')42 }43 }44}4546export default function AppleSignInButton() {47 if (Platform.OS !== 'ios') {48 return <></>49 }5051 return (52 <AppleButton53 buttonStyle={AppleButton.Style.BLACK}54 buttonType={AppleButton.Type.SIGN_IN}55 style={{ width: 160, height: 45 }}56 onPress={() => onAppleButtonPress()}57 />58 )59}要在模拟器上测试功能,去掉 getCredentialStateForUser 检查:
在 iOS 中启用 Apple 验证功能:
1{2 "expo": {3 …4 "ios": {5 …6 "usesAppleSignIn": true7 …8 },9 …10 }11}按照 Expo 文档 的说明,将功能添加到 Info.plist 文件中。
在测试应用之前,如果你已经构建了 iOS 应用,请先清理项目生成的文件:
1npx react-native-clean-project clean-project-auto如果问题仍然存在,尝试完全清除缓存,正如许多用户在这个已关闭的问题中报告的那样。
最后,通过安装 Pod 库并运行 Expo prebuild 命令来更新 iOS 项目:
1cd ios2pod install3cd ..4npx expo prebuild现在在真实设备上测试这个应用吧:
1npx expo run:ios --no-build-cache --device你应该能看到带有 Apple 验证按钮的登录界面。
如果你在使用本指南的过程中遇到困难,可以参考GitHub 上的完整 Invertase 示例。
安卓
安装所需的库:
1npx expo install @invertase/react-native-apple-authentication react-native-get-random-values uuid接下来,创建 Android 专用的 AppleSignInButton 组件:
1import { supabase } from '@/lib/supabase'2import { appleAuthAndroid, AppleButton } from '@invertase/react-native-apple-authentication'3import { SignInWithIdTokenCredentials } from '@supabase/supabase-js'4import { Platform } from 'react-native'5import 'react-native-get-random-values'6import { v4 as uuid } from 'uuid'78async function onAppleButtonPress() {9 // Generate secure, random values for state and nonce10 const rawNonce = uuid()11 const state = uuid()1213 // Configure the request14 appleAuthAndroid.configure({15 // The Service ID you registered with Apple16 clientId: process.env.EXPO_PUBLIC_APPLE_AUTH_SERVICE_ID ?? '',1718 // Return URL added to your Apple dev console. We intercept this redirect, but it must still match19 // the URL you provided to Apple. It can be an empty route on your backend as it's never called.20 redirectUri: process.env.EXPO_PUBLIC_APPLE_AUTH_REDIRECT_URI ?? '',2122 // The type of response requested - code, id_token, or both.23 responseType: appleAuthAndroid.ResponseType.ALL,2425 // The amount of user information requested from Apple.26 scope: appleAuthAndroid.Scope.ALL,2728 // Random nonce value that will be SHA256 hashed before sending to Apple.29 nonce: rawNonce,3031 // Unique state value used to prevent CSRF attacks. A UUID will be generated if nothing is provided.32 state,33 })3435 // Open the browser window for user sign in36 const credentialState = await appleAuthAndroid.signIn()37 console.log('Apple sign in successful:', credentialState)3839 if (credentialState.id_token && credentialState.code && credentialState.nonce) {40 const signInWithIdTokenCredentials: SignInWithIdTokenCredentials = {41 provider: 'apple',42 token: credentialState.id_token,43 nonce: credentialState.nonce,44 access_token: credentialState.code,45 }4647 const { data, error } = await supabase.auth.signInWithIdToken(signInWithIdTokenCredentials)4849 if (error) {50 console.error('Error signing in with Apple:', error)51 }5253 if (data) {54 console.log('Apple sign in successful:', data)55 }56 }57}5859export default function AppleSignInButton() {60 if (Platform.OS !== 'android' || appleAuthAndroid.isSupported !== true) {61 return <></>62 }6364 return (65 <AppleButton66 buttonStyle={AppleButton.Style.BLACK}67 buttonType={AppleButton.Type.SIGN_IN}68 onPress={() => onAppleButtonPress()}69 />70 )71}你现在应该可以通过在实体设备或模拟器上运行来测试身份验证了:
1npx expo run:android --no-build-cacheGoogle 验证 #
🌐 Google authentication
先在登录界面添加按钮:
🌐 Start by adding the button to the login screen:
1…2import GoogleSignInButton from '@/components/social-auth-buttons/google/google-sign-in-button';3…4export default function LoginScreen() {5 return (6 <>7 <Stack.Screen options={{ title: 'Login' }} />8 <ThemedView style={styles.container}>9 …10 <GoogleSignInButton />11 …12 </ThemedView>13 </>14 );15}16…对于谷歌认证,你可以在以下选项中进行选择:
🌐 For Google authentication, you can choose between the following options:
- GN Google 登录高级版 - 支持 iOS、Android 和网页,使用最新的 Google 一键登录(但 需要订阅)
- @react-oauth/google - 支持网页(所以对移动端来说不是很合适,但它能用)
- 依赖 Supabase Auth 的
signInWithOAuth功能——它也支持 iOS、Android 和网页(还可以用来管理其他任何 OAuth 提供商)
GN Google 免费登录 不支持 iOS 或 Android,因为它不允许在登录请求中传递自定义 nonce。
🌐 The GN Google Sign In Free doesn't support iOS or Android, as it doesn't allow to pass a custom nonce to the sign-in request.
无论选择哪种方式,你都需要从谷歌云引擎获取一个 Web 客户端 ID,具体操作可参考 Google 登录 指南。
🌐 For either option, you need to obtain a Web Client ID from the Google Cloud Engine, as explained in the Google Sign In guide.
本指南只在网页端使用 @react-oauth/google@latest 选项,在移动平台使用 signInWithOAuth 。
🌐 This guide only uses the @react-oauth/google@latest option for the Web, and the signInWithOAuth for the mobile platforms.
在继续之前,先在 .env 文件中添加一个新的环境变量:
🌐 Before proceeding, add a new environment variable to the .env file:
1EXPO_PUBLIC_GOOGLE_AUTH_WEB_CLIENT_ID="YOUR_GOOGLE_AUTH_WEB_CLIENT_ID"安装 @react-oauth/google 库:
1npx expo install @react-oauth/google在 app.json 中启用 expo-web-browser 插件:
1{2 "expo": {3 …4 "plugins": [5 …6 [7 "expo-web-browser",8 {9 "experimentalLauncherActivity": false10 }11 ]12 …13 ],14 …15 }16}然后创建 iOS 特定的按钮组件 GoogleSignInButton:
1import { supabase } from '@/lib/supabase'2import { CredentialResponse, GoogleLogin, GoogleOAuthProvider } from '@react-oauth/google'3import { SignInWithIdTokenCredentials } from '@supabase/supabase-js'4import { useEffect, useState } from 'react'56import 'react-native-get-random-values'78export default function GoogleSignInButton() {9 // Generate secure, random values for state and nonce10 const [nonce, setNonce] = useState('')11 const [sha256Nonce, setSha256Nonce] = useState('')1213 async function onGoogleButtonSuccess(authRequestResponse: CredentialResponse) {14 console.debug('Google sign in successful:', { authRequestResponse })15 if (authRequestResponse.clientId && authRequestResponse.credential) {16 const signInWithIdTokenCredentials: SignInWithIdTokenCredentials = {17 provider: 'google',18 token: authRequestResponse.credential,19 nonce: nonce,20 }2122 const { data, error } = await supabase.auth.signInWithIdToken(signInWithIdTokenCredentials)2324 if (error) {25 console.error('Error signing in with Google:', error)26 }2728 if (data) {29 console.log('Google sign in successful:', data)30 }31 }32 }3334 function onGoogleButtonFailure() {35 console.error('Error signing in with Google')36 }3738 useEffect(() => {39 function generateNonce(): string {40 const array = new Uint32Array(1)41 window.crypto.getRandomValues(array)42 return array[0].toString()43 }4445 async function generateSha256Nonce(nonce: string): Promise<string> {46 const buffer = await window.crypto.subtle.digest('sha-256', new TextEncoder().encode(nonce))47 const array = Array.from(new Uint8Array(buffer))48 return array.map((b) => b.toString(16).padStart(2, '0')).join('')49 }5051 let nonce = generateNonce()52 setNonce(nonce)5354 generateSha256Nonce(nonce).then((sha256Nonce) => {55 setSha256Nonce(sha256Nonce)56 })57 }, [])5859 return (60 <GoogleOAuthProvider61 clientId={process.env.EXPO_PUBLIC_GOOGLE_AUTH_WEB_CLIENT_ID ?? ''}62 nonce={sha256Nonce}63 >64 <GoogleLogin65 nonce={sha256Nonce}66 onSuccess={onGoogleButtonSuccess}67 onError={onGoogleButtonFailure}68 useOneTap={true}69 auto_select={true}70 />71 </GoogleOAuthProvider>72 )73}使用隧道 HTTPS URL 在你的浏览器中测试身份验证:
1npx expo start --tunnel要让 Google 登录正常工作,就像你之前为 Apple 做的那样,你需要将获取的隧道 URL(例如 https://arnrer1-anonymous-8081.exp.direct)注册到你的 Google Cloud 控制台的 OAuth 2.0 客户端 ID 配置中的授权 JavaScript 来源列表里。